I repainted the Noble Collection Harry Potter wand replica

benomaleno

New Member
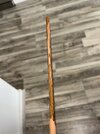
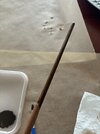
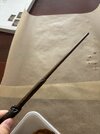
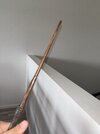
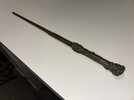
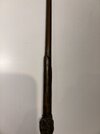
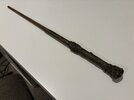
I purchased this wand back in 2011 and was very disappointed with how unpainted and inaccurate the wand was painted, so I purchased 3 acrylic paints and repainted it to match images of the wand props that have been auctioned off. I also rounded the tip :)
Screen Shot 2024-01-24 at 9.33.50 pm.png
 
Looks fantastic! I have one of those. May I ask what 3 paints you went with?

Thanks!
Thank you!
Vallejo
Model Color
Acrylic-colors
70.822 German C Black Brown

Vallejo
Model Air
71.040
Burnt Umber

Vallejo
Model Air
71.077 Qood

I hope this is enough information for you! I haven’t used acrylics before :)
Are you planning on repainting yours?
 
I hope this is enough information for you! I haven’t used acrylics before :)
Are you planning on repainting yours?

Thank you so much for the info!

Yes, yours looks excellent...a little accuracy would be nice, so I think I'll follow in your footsteps.

Appreciate any advice you might suggest. Thanks again!

Bill
 
Thank you so much for the info!

Yes, yours looks excellent...a little accuracy would be nice, so I think I'll follow in your footsteps.

Appreciate any advice you might suggest. Thanks again!

Bill
Sweet! It’s a good idea. I’ve got a slightly better painted noble collection one so was happy to go ham on this one.

I sanded the tip down to round it off, wouldn’t recommend this though as you may expose the metal rod which is difficult to sand and paint.

The paints I used I mixed together to achieve the desired effects. I would recommend searching ‘Harry Potter wand prop auction’ or using pages such as this one: https://usm.propstoreauction.com/lot-details/index/catalog/287/lot/73095 to use as reference, I based mine off this wand here.

I started with a bit of a darker brownish/black down towards the handle (I didn’t really do anything to the handle it looks fine). I basically layered some dark strokes with a fine brush up from the handle to the tip, similar to the prop, then worked on some broader strokes from the handle. I wanted to have clear distinction between strokes so that it gave the appearance of the wood effect.

I felt the acrylic paint was highly forgiving and overall (for a paint job) it was easy and very rewarding! I’ve attached some work in progress and finished product images :) keep me posted on how you go!

(A side note: I spent around $12AUD on the paints, cheap as!
 

Attachments

  • IMG_4598.jpeg
    IMG_4598.jpeg
    1.4 MB · Views: 58
  • IMG_4604.jpeg
    IMG_4604.jpeg
    2.3 MB · Views: 52
  • IMG_4605.jpeg
    IMG_4605.jpeg
    2.3 MB · Views: 55
  • IMG_4606.jpeg
    IMG_4606.jpeg
    1.2 MB · Views: 54
  • IMG_4664.jpeg
    IMG_4664.jpeg
    1.4 MB · Views: 61
  • IMG_4661.jpeg
    IMG_4661.jpeg
    1.1 MB · Views: 49
  • IMG_4665.jpeg
    IMG_4665.jpeg
    3 MB · Views: 59

Your message may be considered spam for the following reasons:

If you wish to reply despite these issues, check the box below before replying.
Be aware that malicious compliance may result in more severe penalties.
Back
Top