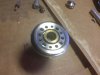
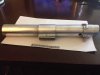
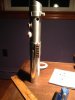
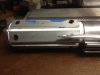
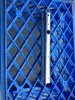
Had this in the custom saber thread but decided to start my own rather than clogging up the other thred with build pics. Was getting the itch to build another saber but wanted to make one of my own rather than one seen in the films. Started with a bunch of random leftover parts from other builds. Used a umbrella post as the body since it was aluminum. Then sanded off the black wrinkle paint from an heliand shroud. Used a overly weatherd Repro Graflex clamp and coverd it witha aluminum flashing. The clamp lever had broken off but the pin and screw were okay so made a custom clamp lever from an Xacto knife handle. The sidebars were made by me as well. Then just for giggles i made knurled tape and wrapped it around the clamp. Happy with the way this is going but not sure about the lever. Might have made it a bit too long? Opinions welcome!
You are using an out of date browser. It may not display this or other websites correctly.
You should upgrade or use an alternative browser.
You should upgrade or use an alternative browser.
My custom saber build.
- Thread starter propmainiac
- Start date
Thanks! Dont know. May have been a beach umbrella? Found this at my dads house in some junk he had laying around. Still have to sand the whole body for a uniform finish. I just might want make this a light up saber with sound and a blade. Is there a kit that i can buy that I just build?
Thanks! The clamp itself is a Graflex repro i got some time ago. Sold the sidebars made my own from keystock. Then I weatherd it too much and messed up the plating and snapped the lever. I coverd the clamp with aluminum. So far the cost on this is zero. I think it was last year when I built a Vader Mpp clamp that came out much better than expected! Its under Scratchbuilt Mpp clamp. If you need any help please let me know
Due to the rather limited availability of mass produced clamps I've been tinkering with fabricating my own. I have to say, yours looks pretty sharp!
On my last custom I had great results using a cheap 3D printed graflex repro, but then using it in concert with one of Roy's TFA clamp covers.
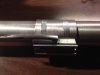
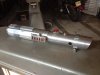
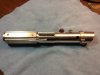
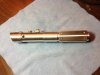
Got some more done on my saber. Need some advice. Not sure if I like it. Added knobs and a red button. Also reversed the clamp lever cause it seemed a little too long and awkward to hold. The red button was from a hardware build and the orher knob is a lamp knob. Both are screwed in to the body of the saber.
Attachments
I think it's pretty cool! The think the overall shape, proportions and details are perfect. I think what it needs is a little contrast. Maybe use a little AB or some sort of patina on the shroud so it's a different tone? I think grips will change up the vibe a lot.
If it were on my bench I'd flip the lever to be headed down instead of up and I'd extend the texture tape right up to the box. You thinking edge card or bubbles? TCSS makes a red edge card that would look great seated right below the red button.
If it were on my bench I'd flip the lever to be headed down instead of up and I'd extend the texture tape right up to the box. You thinking edge card or bubbles? TCSS makes a red edge card that would look great seated right below the red button.
The tape was a lets see how this looks kinda thing. Ill make more tape then extend it. Yeah some contrast would be good. I have some copper sheet thats real thin and may try to make a clamp card similar to the ROTJ luke saber.
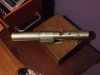
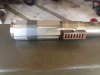
Havent had a lot of time here lately and its been ungodly hot so no working in the garage on my projects. But did some work in my home office tonight on the saber. Added a custom clamp card made from plastic coverd in copper foil and black pinstripe tape. Not a permanent peice but wanted a little contrast on the saber. I am going to try to space the black stripes a little more evenly.
Hi all
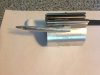
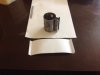
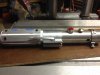
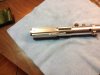
made my metal grips and have to say I like em! Still have to do a little filing and sanding but there pretty much done. Probably going to rivet them on since i dont have enough button head screws. Heres pics please ignore the duct tape its just to hold them on. Lol!
made my metal grips and have to say I like em! Still have to do a little filing and sanding but there pretty much done. Probably going to rivet them on since i dont have enough button head screws. Heres pics please ignore the duct tape its just to hold them on. Lol!
Attachments
Thanks! They are about 4 inches long and 1/2 inch wide. Just have to figure out how to space them out the right way.
Hi all
been on a mission to finish unfinished projects and back to working on my saber. Ive cut and added grips and not quite sure what to do next. Should i paint them to break up all the aluminum or leave them as is. There on with black screws untill i figure out what im doing here. Any and all advice welcome.
been on a mission to finish unfinished projects and back to working on my saber. Ive cut and added grips and not quite sure what to do next. Should i paint them to break up all the aluminum or leave them as is. There on with black screws untill i figure out what im doing here. Any and all advice welcome.
Attachments
Awesome!! Another thing I was thinking when I looked through here is maybe instead of the grips you made, even 6-8 strips of the knurled tape player vertically up the handle, where the grips would usually sit, would look awesome especially after weathering was added with black, orange, and brown to dirty up the knurled in the tape strips like rust and dirt.
Alex
Alex
")
The screws are just holding the grips for now just temporary.
Hello all
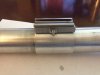
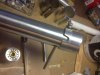
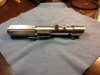
wrapping up my custom saber build this weekend. So I took Seths advice and wet sanded the aluminum bar grips and im very happy with how the look now. They have a nice satin look which contrasts well with the aluminum body. I also completed wetsanding the saber body and im very glad I did. Looks much better and the finish is more even. Still need somethingbto cap the bottom with and maybe some kind of knob for the underside. Still not sure about the long lever i made but Ill keep ut for now. Heres pics.
wrapping up my custom saber build this weekend. So I took Seths advice and wet sanded the aluminum bar grips and im very happy with how the look now. They have a nice satin look which contrasts well with the aluminum body. I also completed wetsanding the saber body and im very glad I did. Looks much better and the finish is more even. Still need somethingbto cap the bottom with and maybe some kind of knob for the underside. Still not sure about the long lever i made but Ill keep ut for now. Heres pics.
Attachments
Similar threads
- Replies
- 367
- Views
- 53,376
- Replies
- 0
- Views
- 30,557
- Sticky
- Replies
- 41
- Views
- 27,997
- Replies
- 327
- Views
- 33,200