My 1/350 TOS Enterprise Build--- WIP

Update...

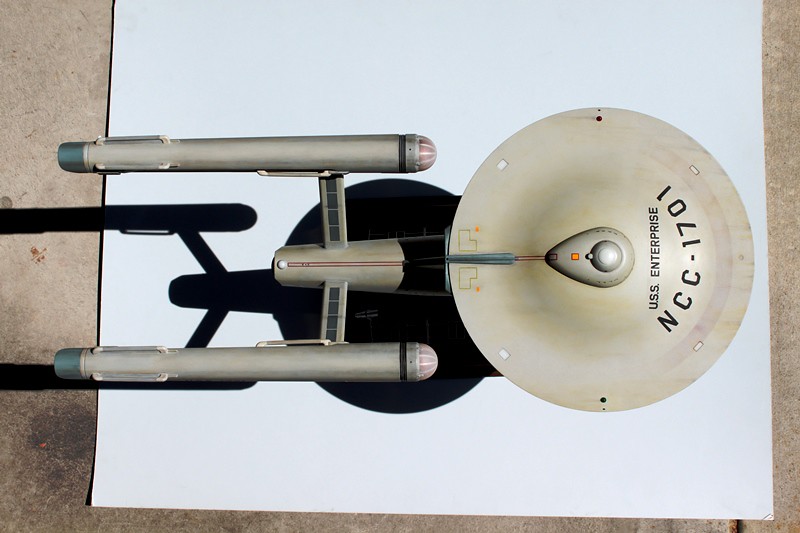
Here's where I'm at with the base...

I glued styrene sheet to the underside of the stand with Testors liquid cement. Holes were drilled and slots carved out for the screws that will hold it to the wooden base yet allow it to be removeable:


IMG_4820 by trekriffic, on Flickr

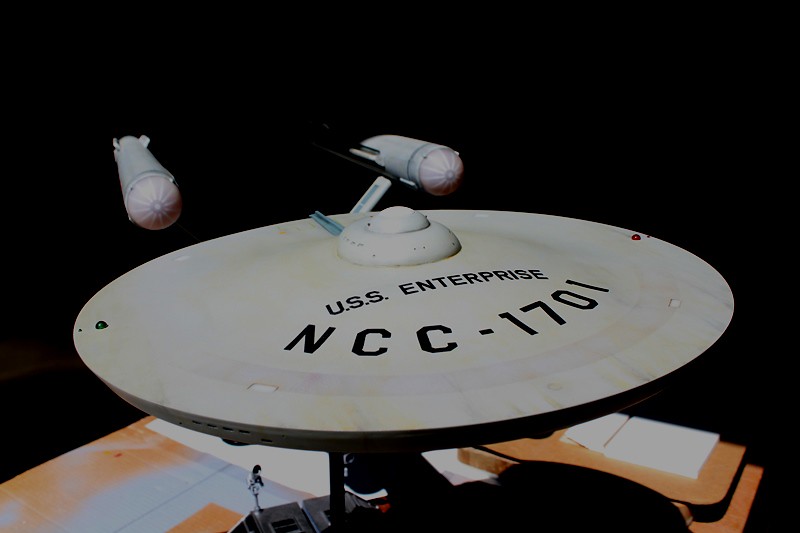
The wooden base after 4 coats of Varathane mahogany stain and 2 coats of Varathane liquid plastic coat. It will get one more plastic coat before it's done:


IMG_4842 by trekriffic, on Flickr

Next... windows...

Yipee!
I came up with an idea that will help me prolong this build since it's been such a blast so far!
I have noticed that several of the windows-almost all, in fact, are recessed and don't sit quite flush with the hull after gluing from the backside.
I think this is due to the curvature of the window backplate not exactly matching the curvature of the hull.
It is not an issue where I cut the windows off the backplate; such as the windows flanking the shuttle bay where the fit was so tight the backplate thickness prevented me from closing up the hull.
Anyway, what I did was to cut small rectangular window panes from thin clear styrene sheet:


IMG_4836 by trekriffic, on Flickr

Using tweezers I inserted the clear window panes into the openings on top of the existing window inserts. I glued the new panes in using Krystal Klear for the white windows and Elmer's Clear Glue for the black ones. For round ports I merely filled them flush with the hull using Krystal Klear:


IMG_4834 by trekriffic, on Flickr

You can see the difference in this photo. The new window pane is installed in the window to the far left. The others have not been dealt with yet. The glue is still wet in this pic:


IMG_4825 by trekriffic, on Flickr

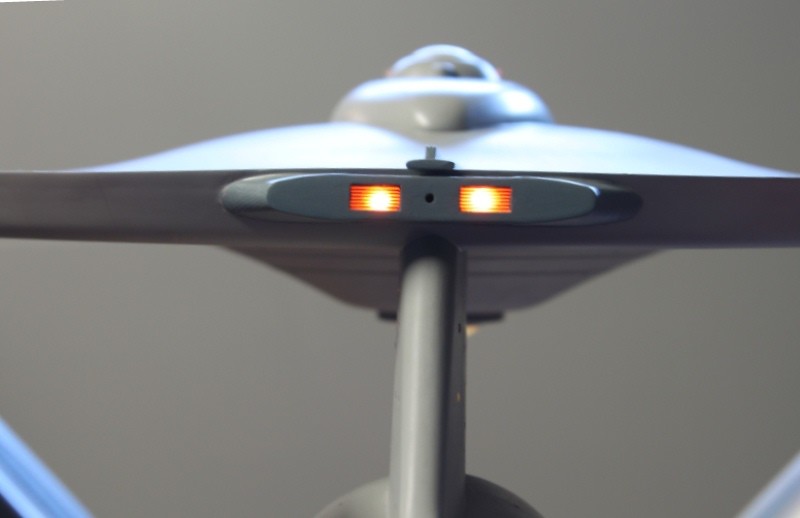
Here is a completed row of illuminated windows.
I think it's a significant improvement from before with the windows in their deep recesses:


IMG_4846 by trekriffic, on Flickr

I estimate it should only take me another week to finish the rest of the windows which should be about when I have funding and can order my set of painting masks from Orbital Drydock.
 
Found out something interesting... when I turn the impulse engines on using the pushbutton switch the light in the saucer dome over the bridge flickers and goes out. When I turn the impulse engines off the dome light comes back on. I surmise that there is only enough amperage available for the two N ports on the saucer PC board to power 2 LEDs as the N ports were intended to only power 1 impulse engine LED each per port. So I have 2 LEDs for the impulse engines running off one N port and 1 for the dome light running off the other N port for a total of 3 LEDs on the N ports. So I have to choose having the impulse engines off with the dome lit or the impulse engines on with the dome dark. But not both lit. This is a bit confusing since the impulse LEDs are wired in series and should only be using 20 mA between them. So if the board is supplying 20 mA per port we should be fine but perhaps that's not enough current so somehow the N port tied into the impulse engines is stealing current from the other N port...whatever...at this stage I'm not about to try prying the B-C deck off the saucer (it's glued on with CA) to rewire the dome light so I'll just live with it. At least the dome light isn't burned out as I initially feared.
 
Saturday update...

Finally finished the base:


IMG_4885 by trekriffic, on Flickr

Finally finished adding extra thickness to the windows. The shadowcasters are pretty cool thanks to PargGrafix. I love Paulbo's stuff:


IMG_4847 by trekriffic, on Flickr
IMG_4853 by trekriffic, on Flickr


IMG_4854 by trekriffic, on Flickr


IMG_4860 by trekriffic, on Flickr

More shuttlebay pics. This tiime using a tripod. More shadowcasters in the back observation gallery:


IMG_4881 by trekriffic, on Flickr


IMG_4880 by trekriffic, on Flickr


IMG_4878 by trekriffic, on Flickr

Intercoolers were masked with liquid mask and painted Canadian Voodoo Grey
on the front and back. Still need to peel the dried masking film off:


IMG_4884 by trekriffic, on Flickr

Impulse engines ala the remastered version:


IMG_4883 by trekriffic, on Flickr

More bridge pics...


IMG_4907 by trekriffic, on Flickr


IMG_4915 by trekriffic, on Flickr

Hard to tell in this image but that's Balok's puppet from "The Corboomite Maneuver" oj nthe main viewscreen:


IMG_4913 by trekriffic, on Flickr

Some low light pics:


IMG_4863 by trekriffic, on Flickr


IMG_4892 by trekriffic, on Flickr

Nice shot of the engines:


IMG_4906 by trekriffic, on Flickr

Tomorrow I start on some weathering. Once I've finished weathering I'll install the deflector rings and dish and the "nipple" on the lower sensor dome...
 
Astounding! Those shadow casters are a real delight! Great work!

Thanks a lot!

Now we move on to the really fun stuff... WEATHERING!

Finished weathering the upper saucer yesterday. Went with rust, orange rust, and soot. It's fairly subtle; more so than the studio model I think. Used the photo of the original as a guide with the exception of the green. I don't plan on adding any green to the weathering on my model.


IMG_4924 by trekriffic, on Flickr


IMG_4931 by trekriffic, on Flickr


IMG_4927 by trekriffic, on Flickr\
 
New update...

Yesterday I was thinking about the weathering on the nacelles...

I realized I needed to apply the pastels over the top of the darker grey area located underneath and just back of the three rectangular flux constrictors at the front of each nacelle. Looking at the kit decals, I realized they were too large to fit; they were also a shade of grey lighter than my hull color and they needed to be a darker shade of grey.

So I resolved to paint these areas instead. Using the decals as a guide (at least the rear portions where the scallops are) I cut masks out of Tamiya tape and applied them:


IMG_4943 by trekriffic, on Flickr

After more masking of surrounding areas with blue painter's tape and wax paper to prevent overspray I airbrushed a mix of Imperial Japanese Navy Sky Grey, Shady Cove, Insignia White and some of the Medium Grey mix I'd used for the end caps and impulse engines. It's sort of an intermediate color.
Here are the grey areas after unmasking and a little wetsanding to remove paint ridges at the edges:


IMG_4944 by trekriffic, on Flickr

Here's the decal showing what I meant about being oversized. Unless the intent was to cover the sides of the flux constrictors with the decal they would have needed to be trimmed to fit at the front. But that wouldn't have solved the issue with the color being too light so I think my decision to paint them on was correct:


IMG_4948 by trekriffic, on Flickr

I also did the weathering on the dorsal. You can barely see the two grey streaks between upper and lower rows of windows. The orange rust is very subtle too:


IMG_4946 by trekriffic, on Flickr

The underside of the saucer afer weathering. I kept it very light:


IMG_4945 by trekriffic, on Flickr

I'm really trying to keep the weathering subdued, for a model this size it's really important not to overdo it.
 
The instructions say to apply the decals before adding the flux constrictors. ;)
But as you said they are to light for your build.

For future reference for those that wish to paint the details, Aztec Dummy now makes masks for the details and the markings (reg lettering, stripes, etc).

Liking the weathering.:thumbsup
 
Division 6,

That's funny! I was saying to myself last night, "Hmmmm... The only way these would go on without trimming would be if you put the decal on before gluing the flux constrictors on." Guess I shoudl have read the instructions. Still, as you say, they were too light for my hull color so best to just paint them on. I'm familiar with Aztec Dummy for paint masks too; although, I'm going to get the set put out by Orbital Drydock for this build.
 
Thanks for all the kind words guys!

Spent Saturday working on the starboard nacelle and the other half of the secondary hull. Spent about 4 hours on it then had to break off early for dinner and cards at the in-laws.

Sunday was spent on the port nacelle and the pylons...

Firstly I applied soot to the grooves behind the bussard collar:


IMG_4976 by trekriffic, on Flickr

Then I removed most of it rubbing with a rag:


IMG_4981 by trekriffic, on Flickr


IMG_4982 by trekriffic, on Flickr

The port side of the secondary hull:


IMG_4984 by trekriffic, on Flickr

Nacelles and pylons:


IMG_4985 by trekriffic, on Flickr

The whole ship after sealing with Dullcote:


IMG_4993 by trekriffic, on Flickr


IMG_4994 by trekriffic, on Flickr


IMG_4999 by trekriffic, on Flickr

So what you see here took me about 9 hours to complete. I could have bought the weathering decals and spent about 5-6 ous applying them but I think the extra time it took to weather using pastels gave the ship a more subtle weathered look than the decals would have; pardon me for saying this, those of you who went the decal route, but, to me, the decals just looked to stark for my taste.

I'll go back tomorrow with the gel ink pen and accentuate certain streaks on the rest of the ship the way I did on the saucer.

Then I have to attach the deflector dish assembly, and all the colored dome lights to the upper saucer flashers and the bussard collar tops. And the wee "nipple" to the lower sensor dome of course.

I also need to see about ordering vinyl masks for the ship's registry and pennants.

Stay tuned!
 
Update...

Moving right along, after the last round of weathering using the black gel pen ink I realized I had gone a little overboard and it was a little darker and dirtier than I wanted so, to tone it down and clean it up a bit, I went back in with some of the hull color over the top of the weathering. I had to mix up a new batch of paint though as I had used up the original hull color mix. After some experimentation and mixing of ModelMaster with ACE Shady Cove I was abe to make up a new batch that blended with the original hull color so closely I was amazed at myself. Anyway, I chose not to airbrush it though as I have better control with a brush and I'm very good with a brush. Using a fairly wide, stiff, wedge-shaped brush I dry-brushed the dorsal, secondary hull, pylons, and nacelles. Took about 2 hours but she turned out very nice, much more interesting textures than you'd get with a single shade of unweathered grey.
Here are the final weathered pics. I suppose you coudl say this is the Grey Lady at the end of her last 5 year mission:


IMG_5011 by trekriffic, on Flickr


IMG_5010 by trekriffic, on Flickr


IMG_5008 by trekriffic, on Flickr


IMG_5004 by trekriffic, on Flickr


IMG_5002 by trekriffic, on Flickr


IMG_5001 by trekriffic, on Flickr


IMG_5000 by trekriffic, on Flickr

Her finish is extremely flat right now but, unless I'm mistaken, the Orbital Drydock paint masks adhere best to a glossy surface so I have a can of Glosscote standing by. Will need a glossy finish anyway for the decals that I will be using. I'm painting the ships registry and pennants rather than decaling them so as to avoid any issues with decal silvering.

Have I said this before? I LOVE THIS SHIP!!!
 
I received the vinly paint masks I ordered from Orbital Drydock on Saturday. Did family stuff on Sunday but got some work done with them on Monday...

The vinyl masks:


IMG_5067 by trekriffic, on Flickr

Window masks:


IMG_5068 by trekriffic, on Flickr

Laid out next to the Enterprise on my worktable:


IMG_5086 by trekriffic, on Flickr

The backing was peeled away and the masks rubbed down onto the model which I'd given a shot of Glosscote the night before to help with adhesion. The adhesive Orbital Drydock uses is just right-not too sticky so you can reposition the mask as many times as you need to before burnishing it down with the spudger tool Brett provided. After removijg the transfer film I brushed the edges of the mask with Future to seal the edge and eliminate any chance of paint bleeding under the mask. Probably overkill on my part but it's worked well for me in the past so I figure better safe than sorry:


IMG_5087 by trekriffic, on Flickr

After applying all the ventral masks I finished masking off the rest of the ship using tape and wax paper:


IMG_5088 by trekriffic, on Flickr

I painted using Model Master enamels-Insignia Red, Insignia Yellow, Flat White, Flat Black, and a mix of Gunship Grey and Flat White.

The lower secondary hull after airbrushing the first layer of colors. Brett has provided secondary masks that will go on over the main colored paint in the center for airbrurshing the borders later:


IMG_5096 by trekriffic, on Flickr

The lower saucer after airbrushing:


IMG_5097 by trekriffic, on Flickr

That's it for now. Tomorrow I'll spray the borders around the secondary hull markings then apply the upper saucer masks and the ones on the sides of the nacelles and secondary hull.

This is gonna look sweet! I highly recommend the Orbital Drydock mask set!
 
Last edited:
This is an awesome build, and you've come up with some very creative solutions!

I have the 1/350 Refit that I need to build, but I also really want to get this ship, too. It's my husband's favorite E (mine is the Refit).
 
Pics...

Yesterday evening after applying the secondary masks and airbrushing the border colors:


IMG_5098 by trekriffic, on Flickr

Unveiling the Grey Lady's bottom side:


IMG_5102 by trekriffic, on Flickr


IMG_5101 by trekriffic, on Flickr


IMG_5100 by trekriffic, on Flickr

I sprayed with Dullcote and weathered the nacelle and secondary hull markings with black pastel chalk to match the rest of the weathering. I kept it very subtle though.

On to the upper surfaces and sides!
 
Pics from the past few days including today...

Tamiya tape is applied over the seams between the secondary masks and the the primary masks on each side of the "boomerang" thingy on the nacelle and secondary hull pennants to prevent bleed. This is covered in Brett's instructions:


IMG_5109 by trekriffic, on Flickr

White enamel is brushed on as an undercoat prior to airbrushing with insignia yellow:


IMG_5110 by trekriffic, on Flickr

Portside pennants finished and unmasked:


IMG_5112 by trekriffic, on Flickr

Moving onto the spine pinstripes I cut out the kit decal, which was the same length as the mask, and used it as a template to mark the locations of the three lights:


IMG_5113 by trekriffic, on Flickr

Here the hole locations have been transferred from the decal to the mask film using an ink pen:


IMG_5114 by trekriffic, on Flickr

I used a sharp exacto knife to cut cross-hatches over the hole locations and applied the mask to the spine using my old spudger tool to tamp it down. Then I brushed on some Future, waited a few minutes, and tamped it down some more. A little of the Future flowed under the edges to seal the mask and help stick it down tighter:


IMG_5116 by trekriffic, on Flickr


IMG_5117 by trekriffic, on Flickr

After painting the mask was removed. The stripes were clean and uniform. I was very pleased to say the least:


IMG_5120 by trekriffic, on Flickr

The other pinstripes on the saucer were masked and painted. This was a bit tricky as you need to trim the mask to fit around the accelerator in the back and the base of B-C deck in front. Some re-masking with Tamiya tape and touchup with a brush was required but in the end I was happy with the results:


IMG_5119 by trekriffic, on Flickr

That's it for now. Tomorrow I hope to finish the upper saucer and that should do it for the painting masks. Then I'll work on the remaining small decals.


Now for the upper saucer... today's progress...

Was gonna be about 90 degrees out in the garage with a hot car next to me later so I was movin' and shakin' in the mornin'...

I decided to work on the big name and registry first so laid down the masks for both. The bottom of the name needed to align with the top corner of the N and 1 below them. I aligned them with a soft ruler:


IMG_5122 by trekriffic, on Flickr

I had one corner on the N that tore a little so I covered it with Tamiya tape. The first 1 was strangely fatter towards the top than the bottom, maybe I streched it out with all the positioning and re-positioning I did to get it aligned properly with the almost invisible gridlines. Regardless, after failing to fix it by peeling up and repositioning the vinyl I laid a narrow strip of scrap vinyl mask down and covered the seam with Tamiya tape:


IMG_5123 by trekriffic, on Flickr

Name and registry masked off:


IMG_5124 by trekriffic, on Flickr

After a shot of flat black I pulled up the masks. Some of the paint pulled away in places and I needed to fix the letters with a brush. Here you see where I masked the spots to be retouched:


IMG_5125 by trekriffic, on Flickr

After retouching. Not bad...


IMG_5126 by trekriffic, on Flickr

I mixed some olive drab, white, yellow, and pale green to paint the panels on either side of the accelerator. I got a pretty close match to the decal I think:


IMG_5127 by trekriffic, on Flickr

All I have left to mask and paint at this point is the red border around the yellow panel on top of B-C Deck. That will have to wait until tomorrow when the yellow paint will be fully dry.

Now I think I'll spend some time on the Botany Bay...
 
Thanks Guys!

Here are some bright sunlight garage pics to hold you guys over until I can get set up and take the better ones with my backdrops and "studio" lights...


Look Spock... no silvering with mask-o-mania!


IMG_5128 by trekriffic, on Flickr


IMG_5131 by trekriffic, on Flickr


IMG_5132 by trekriffic, on Flickr


IMG_5133 by trekriffic, on Flickr


IMG_5134 by trekriffic, on Flickr


IMG_5135 by trekriffic, on Flickr


IMG_5136 by trekriffic, on Flickr

Oh and did I mention there will be some pics at a later date with the 1/350 Botany Bay alongside? My client bought me one as part of my fee for building him one! I "Khan" hardly wait to show them both together.
 
Back
Top