turner3d
Active Member
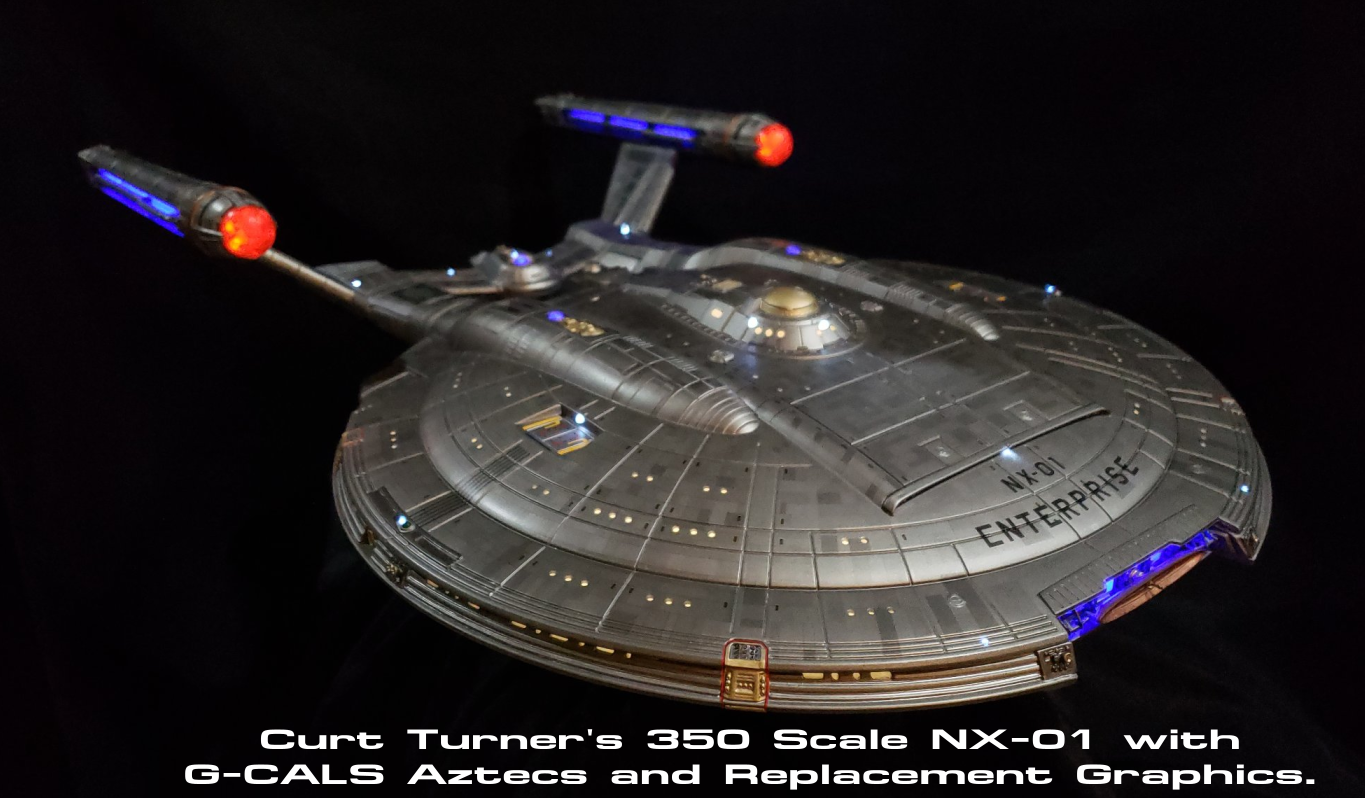
I recently finished a 1:350 NX-01 from the show, "Star Trek: Enterprise." This was a real labor of love, as I designed the circuitry, wired it up, built and painted the model, and wrote all the code from scratch. This all came about because I couldn't find a single after-market lighting kit that was even remotely accurate. This is my first ever lighted starship build. It took me more than a year to plan out, test, and put together in my spare time.
I decided to go with an Arduino for its heart, but realized that I didn't have nearly enough PWM channels to work with to do what I wanted to do, so I went with the 24-channel TLC-5947 LED controller board from Adafruit. As I read more and more posts by starship modelers about how they wish they would have made this LED brighter or that one was too bright, I decided to do something crazy and make every one of the many segments of COB, LED strips, and 65 discreet LEDs have software-controllable brightness. Not every LED individually, but I came up with 24 lighting groups which made sense to be controlled together. This approach would allow me to leave the Arduino accessible for reprogramming in the base, while mounting the 5947 in the saucer section, requiring only 6 wires to run up through the mounting tube. Here are a couple shots of the MDF base all wired up.

Driving all of the LEDs from the 5947 required some additional circuitry for some of the channels, since the chip wasn't capable of pushing nearly enough current on its own. All of this made for some pretty crazy wiring!

I also coded in a startup sequence, just because I had the lighting channel separated out. I shot this video as soon as the model was running under its own power, before I'd even finished up the light blocking.
The animations and timings are pretty accurate, enumerated from analyzing scenes from the show frame-by-frame. Even the blinking lights don't just snap on and off - they take a couple of frames to fade in and out. Here is a picture-in-picture sort of edit I did to finish up tweaking the timing
I shot the segments of this video on my 5-year old Samsung phone in front of a black tablecloth. It's obvously not the best, but you get the idea. I'm going to try to put a better video together soon.
A few weeks ago, I discovered that a new technology called "WebSerial" had recently been released. Browser support isn't very broad yet, but it works great in Chrome. As a web developer by trade, I had almost no choice but to built a show-themed, browser-based interface for the model. It's still a work in progress, but here's what I have so far.
One of my next steps will be to work music and sound effects into the interface for various functions like the startup sequence, going to warp, and who knows what else. I'll hopefully be updating this topic soon with more progress. I realize I'm already way over in overkill territory, but I'm having a blast working on it, so why not?
Update: 2024/1/7
Speaking of my next steps, I finally have the unending-scope-creep UI nearly finished, and am trying to figure out how to do a video about it while keeping it relatively short. At one point, I had a reasonably small to-do list of features and bug fixes. The more I worked on the coding, the more ideas for new stuff I came up with, and the to-do list was growing a lot faster than the completed list for a while there. There really aren't any fake controls or displays - they all do something, and there are a lot of modes and functionality.
The top left houses a functioning terminal window for communicating with the Arduino with text commands, but nearly everything can be done via web browser in a touch-screen Android tablet with a USB connection to the model. I have attempted to be as faithful as I could to the aesthetic of Mike Okuda's great work. Here's a sneak peek of it in action:

I also had some fun and shot a new demo video of the ship since the phone I shot the last one on was ancient, and I got a new one. This video captures the startup sequence, sound effects, and a few beauty shots afterwards with resolutions up to 2160p @ 60fps.
More on the new UI soon!
Update: 2024/1/29
As promised, here's more on the UI. I tried to keep it short, but even at 6 minutes, I had to leave out a LOT of details. There's a whole lot of me explaining stuff as well as music and sound effects, so it probably won't make much sense if you're volume's not up.
I decided to go with an Arduino for its heart, but realized that I didn't have nearly enough PWM channels to work with to do what I wanted to do, so I went with the 24-channel TLC-5947 LED controller board from Adafruit. As I read more and more posts by starship modelers about how they wish they would have made this LED brighter or that one was too bright, I decided to do something crazy and make every one of the many segments of COB, LED strips, and 65 discreet LEDs have software-controllable brightness. Not every LED individually, but I came up with 24 lighting groups which made sense to be controlled together. This approach would allow me to leave the Arduino accessible for reprogramming in the base, while mounting the 5947 in the saucer section, requiring only 6 wires to run up through the mounting tube. Here are a couple shots of the MDF base all wired up.
Driving all of the LEDs from the 5947 required some additional circuitry for some of the channels, since the chip wasn't capable of pushing nearly enough current on its own. All of this made for some pretty crazy wiring!
I also coded in a startup sequence, just because I had the lighting channel separated out. I shot this video as soon as the model was running under its own power, before I'd even finished up the light blocking.
The animations and timings are pretty accurate, enumerated from analyzing scenes from the show frame-by-frame. Even the blinking lights don't just snap on and off - they take a couple of frames to fade in and out. Here is a picture-in-picture sort of edit I did to finish up tweaking the timing
I shot the segments of this video on my 5-year old Samsung phone in front of a black tablecloth. It's obvously not the best, but you get the idea. I'm going to try to put a better video together soon.
A few weeks ago, I discovered that a new technology called "WebSerial" had recently been released. Browser support isn't very broad yet, but it works great in Chrome. As a web developer by trade, I had almost no choice but to built a show-themed, browser-based interface for the model. It's still a work in progress, but here's what I have so far.
One of my next steps will be to work music and sound effects into the interface for various functions like the startup sequence, going to warp, and who knows what else. I'll hopefully be updating this topic soon with more progress. I realize I'm already way over in overkill territory, but I'm having a blast working on it, so why not?
Update: 2024/1/7
Speaking of my next steps, I finally have the unending-scope-creep UI nearly finished, and am trying to figure out how to do a video about it while keeping it relatively short. At one point, I had a reasonably small to-do list of features and bug fixes. The more I worked on the coding, the more ideas for new stuff I came up with, and the to-do list was growing a lot faster than the completed list for a while there. There really aren't any fake controls or displays - they all do something, and there are a lot of modes and functionality.
The top left houses a functioning terminal window for communicating with the Arduino with text commands, but nearly everything can be done via web browser in a touch-screen Android tablet with a USB connection to the model. I have attempted to be as faithful as I could to the aesthetic of Mike Okuda's great work. Here's a sneak peek of it in action:
I also had some fun and shot a new demo video of the ship since the phone I shot the last one on was ancient, and I got a new one. This video captures the startup sequence, sound effects, and a few beauty shots afterwards with resolutions up to 2160p @ 60fps.
More on the new UI soon!
Update: 2024/1/29
As promised, here's more on the UI. I tried to keep it short, but even at 6 minutes, I had to leave out a LOT of details. There's a whole lot of me explaining stuff as well as music and sound effects, so it probably won't make much sense if you're volume's not up.
Last edited: