Terry Lyons
New Member
I haven't made as much prop-making progress in the past year as I had hoped, and this project took far longer than I had intended, but I’m glad to finally have it finished!
Back when I build my M-4 Shuriken, I also drew up plans for the Carnifex. At the time, I decided not to go ahead with building it as I felt the process would be too similar to the Shuriken, and I wanted to try something different. A year later, a friend expressed interest in the Carnifex, giving me an excuse to revive the project. I decided to make myself both a Carnifex and a Paladin, and agreed to make an extra Carnifex for my friend.

As with previous projects, the piece was 3D modelled in Blender, converted to 2D blueprints, scaled and printed. I used my scroll saw to cut the layers out of MDF and stacked them to form the shape of the gun, with additional sheets of styrene used for some of the detailing.


The outer panels were sloped towards the top using a palm sander, and the grips were shaped with a drum sanding bit on the Dremel. The bevelled and sloped areas were sculpted with Apoxie Sculpt, and additional detail was added with styrene and acrylic rod.

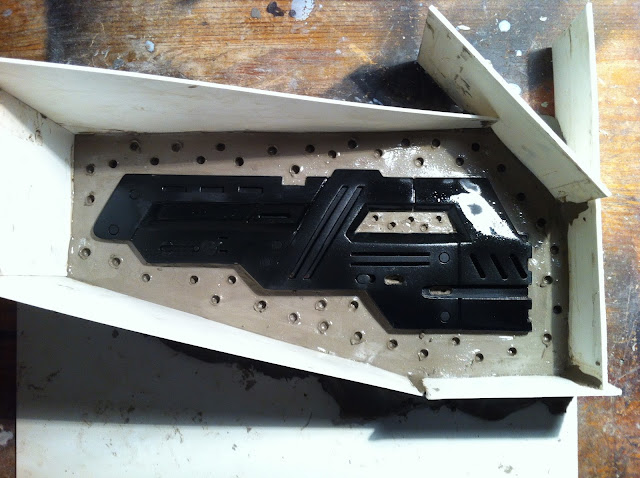
Unlike my Shuriken, which was a one-off MDF piece, this would be the master used for mold-making, so careful consideration was taken when putting it together. I kept the MDF layers that formed the right panel of the Carnifex separate in order to give me access to the internals of the gun, into which I cut channels for wiring, spaces for a battery holder, barrels and trigger mechanism. I went through the process of sanding and priming the master until I was happy that it was ready for molding.

I’m always eager to learn new techniques, so I decided to make a matrix mold of the gun body. I first cut the rough shape of the Carnifex body into some scrap MDF, into which the master, wrapped in cling film, was placed to define the mold’s dividing line. The master was covered in a layer of clay, into which I sculpted the registration matrix for the mold jacket. The clay was sealed with multiple coats of varnish, over which I sprayed mold release to prevent the jacket from sticking.

The mold jacket was made with fiberglass: I brushed polyester resin over the clay and waited for it to start gelling before layering on strips of fiberglass (300gm chopped strand mat), onto which more resin was brushed. I used 3 layers of fiberglass, and made sure to leave enough protruding at the edge to be able to bolt the two halves of the jacket together.
When the first half of the jacket had cured, I removed the MDF sheet and repeated the process for the second half: cover the Carnifex master in clay, sculpt the registration channels, seal the clay, apply release (I used both spray release and Vaseline on the fiberglass to ensure the second half wouldn’t stick to it), brush on a layer of resin, layer up the fiberglass while brushing on more resin.


Once this process was complete, I drilled a series of holes into the protruding fiberglass to allow me bolt the two halves together when making the mold and casting, then pulled the jacket apart and cleaned it up, sanding down any sharp edges. I also drilled vents into the jacket to allow air escape when I started pouring rubber into it.
The master was placed back into one half of the jacket, clayed up, and registration keys added. Both halves were sprayed with release and the second half was bolted down. I then started pouring rubber (Smooth-On Mold Max 40), covering the vents with a lump of clay whenever the silicone started leaking out. When cured, the process was repeated to create the second half of the mold.
For the other parts of the gun, the barrels, trigger, side plate, battery cover, I made one- or two-part block molds.

Before casting the Carnifex, I dusted some talcum powder into the molds to improve coverage and reduce bubbles in the plastic. The molds were then closed, the jacket halves of the matrix mold bolted together, and the Carnifex cast using Smooth-On Smooth Cast 300.


After the castings were demolded and cleaned up, I started assembly of the guns. The electronics consist of a power switch with an indicator light (red for the Paladin, turquoise for the Carnifex), a trigger, and barrel lights. Unfortunately, shortly after completing the guns, the electronics for both Carnifexes died. The Paladin still works fine, so I’m assuming that the turquoise indicator light in the Carnifex is to blame.
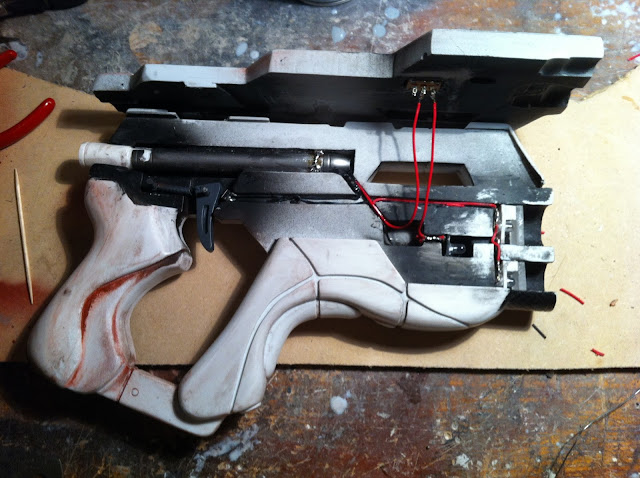

Each barrel contains 3 white LEDs connected in parallel, which come on when the trigger connects with a push button (but only if the main power switch is on). The LEDs were diffused with acrylic which I had sanded to make opaque. I used a penlight torch as an inline battery holder for 2 AAA batteries, creating a custom twist-and-lock locking mechanism using the cylinder that protrudes from the back of the gun. This cylinder has a spring which connects to the batteries, and metal contacts that complete the circuit through the body of the battery holder when locked in place.
With the electronics in place, the guns were glued together and given a final clean-up with Apoxie Sculpt to fill any gaps. They were then primed and the grip texture applied using Rustoleum Textured paint.

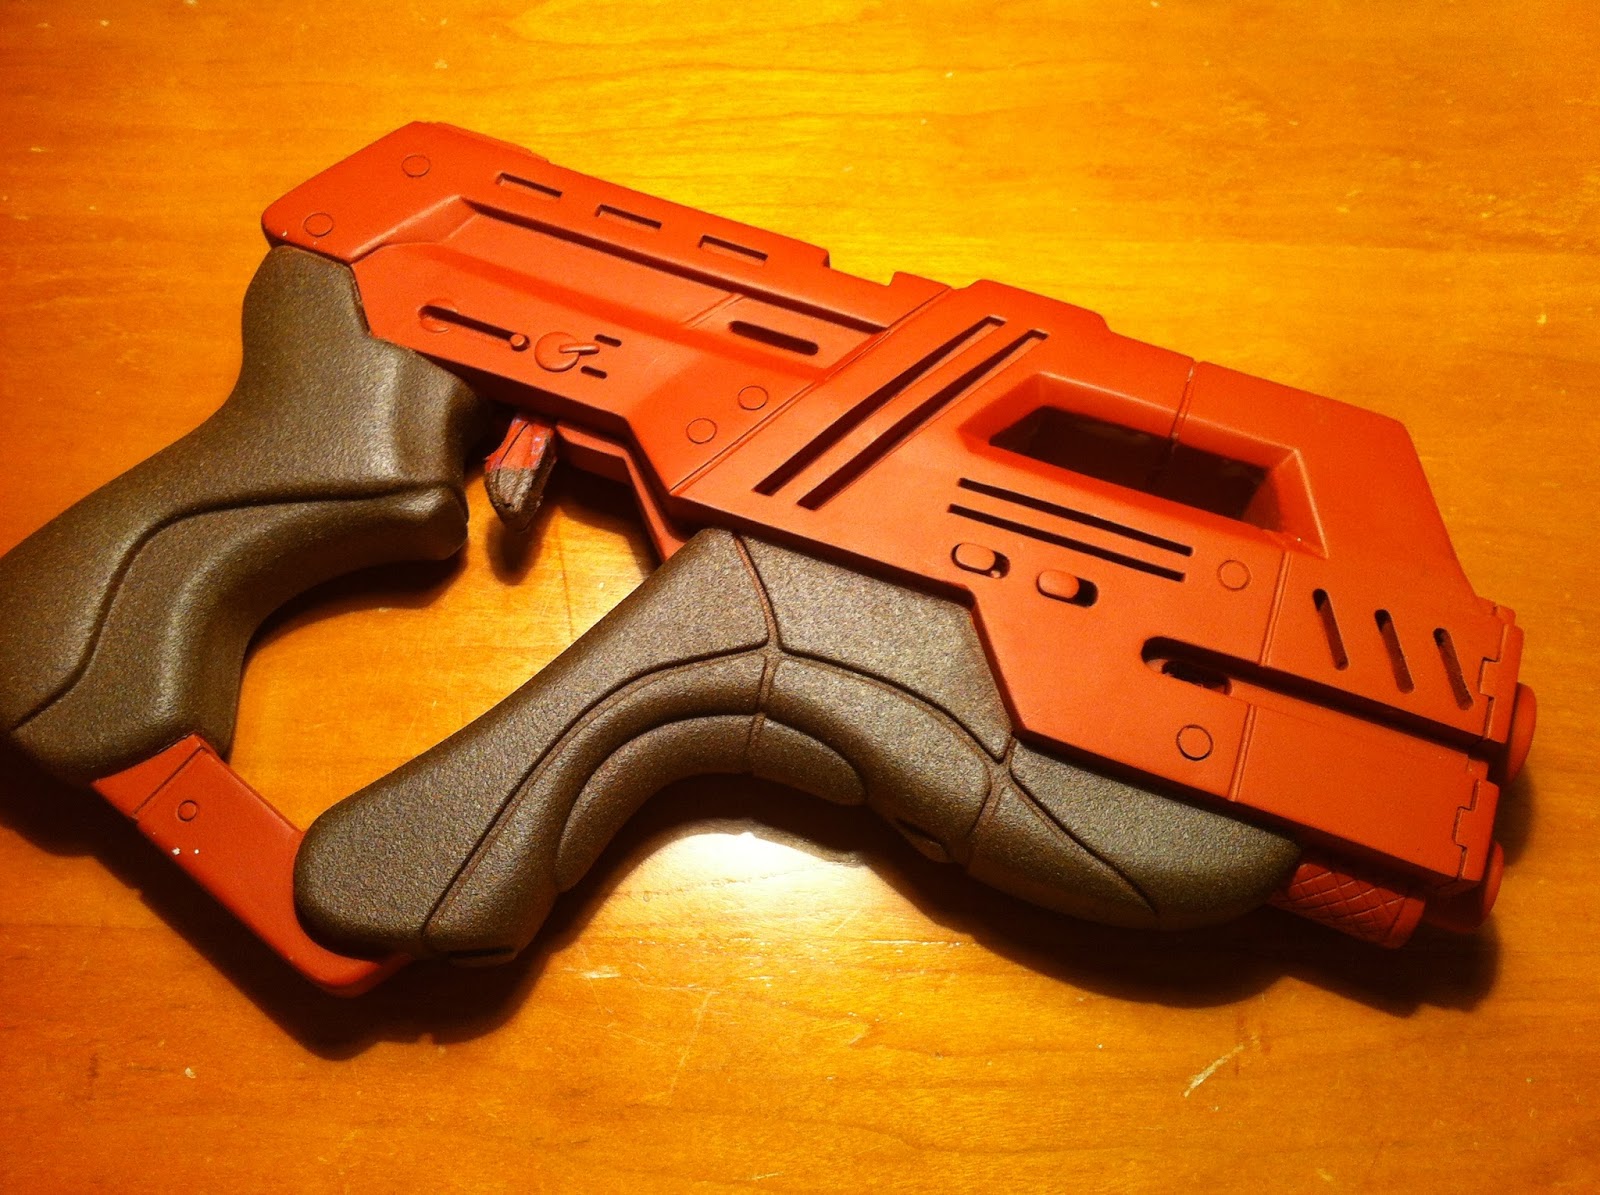
I put together the lettering and markings in Illustrator, and had them printed on vinyl to use as stencils. After undercoating the guns, the vinyl was stuck on and airbrushed to apply the markings.


The final painting step was to weather the guns. For the Carnifex, I took some sandpaper to the orange markings to scratch them up a bit. I had used a white undercoat for the orange, so light sanding revealed this, while slightly heavier sanding exposed the grey base coat, giving a nice layered distressed appearance to these parts. The edges of the grey parts of the gun were drybrushed with first light grey, then black, then metallic acrylic paint to create a varied weathering pattern, imitating areas of older and newer wear. Finally, I went over the whole gun with a layer of watered-down acrylic black, wiping it off as I went, to simulate grime in the recesses and tone down some of the brighter colours.


I took a more subtle approach to weathering the Paladin. After undercoating the whole gun in black, I masked off the areas that were to remain black and airbrushed on the main white coat, controlling the amount of paint applied to give a powdered coat that had some depth and wasn’t flat white. The white areas were lightly drybrushed with black to simulate some wear and dirt, while the markings and lettering was drybrushed with white. When dry, the guns were sealed with a layer of clear coat.

Thanks for reading,
Terry
Back when I build my M-4 Shuriken, I also drew up plans for the Carnifex. At the time, I decided not to go ahead with building it as I felt the process would be too similar to the Shuriken, and I wanted to try something different. A year later, a friend expressed interest in the Carnifex, giving me an excuse to revive the project. I decided to make myself both a Carnifex and a Paladin, and agreed to make an extra Carnifex for my friend.
As with previous projects, the piece was 3D modelled in Blender, converted to 2D blueprints, scaled and printed. I used my scroll saw to cut the layers out of MDF and stacked them to form the shape of the gun, with additional sheets of styrene used for some of the detailing.


The outer panels were sloped towards the top using a palm sander, and the grips were shaped with a drum sanding bit on the Dremel. The bevelled and sloped areas were sculpted with Apoxie Sculpt, and additional detail was added with styrene and acrylic rod.

Unlike my Shuriken, which was a one-off MDF piece, this would be the master used for mold-making, so careful consideration was taken when putting it together. I kept the MDF layers that formed the right panel of the Carnifex separate in order to give me access to the internals of the gun, into which I cut channels for wiring, spaces for a battery holder, barrels and trigger mechanism. I went through the process of sanding and priming the master until I was happy that it was ready for molding.

I’m always eager to learn new techniques, so I decided to make a matrix mold of the gun body. I first cut the rough shape of the Carnifex body into some scrap MDF, into which the master, wrapped in cling film, was placed to define the mold’s dividing line. The master was covered in a layer of clay, into which I sculpted the registration matrix for the mold jacket. The clay was sealed with multiple coats of varnish, over which I sprayed mold release to prevent the jacket from sticking.

The mold jacket was made with fiberglass: I brushed polyester resin over the clay and waited for it to start gelling before layering on strips of fiberglass (300gm chopped strand mat), onto which more resin was brushed. I used 3 layers of fiberglass, and made sure to leave enough protruding at the edge to be able to bolt the two halves of the jacket together.
When the first half of the jacket had cured, I removed the MDF sheet and repeated the process for the second half: cover the Carnifex master in clay, sculpt the registration channels, seal the clay, apply release (I used both spray release and Vaseline on the fiberglass to ensure the second half wouldn’t stick to it), brush on a layer of resin, layer up the fiberglass while brushing on more resin.


Once this process was complete, I drilled a series of holes into the protruding fiberglass to allow me bolt the two halves together when making the mold and casting, then pulled the jacket apart and cleaned it up, sanding down any sharp edges. I also drilled vents into the jacket to allow air escape when I started pouring rubber into it.
The master was placed back into one half of the jacket, clayed up, and registration keys added. Both halves were sprayed with release and the second half was bolted down. I then started pouring rubber (Smooth-On Mold Max 40), covering the vents with a lump of clay whenever the silicone started leaking out. When cured, the process was repeated to create the second half of the mold.
For the other parts of the gun, the barrels, trigger, side plate, battery cover, I made one- or two-part block molds.


Before casting the Carnifex, I dusted some talcum powder into the molds to improve coverage and reduce bubbles in the plastic. The molds were then closed, the jacket halves of the matrix mold bolted together, and the Carnifex cast using Smooth-On Smooth Cast 300.


After the castings were demolded and cleaned up, I started assembly of the guns. The electronics consist of a power switch with an indicator light (red for the Paladin, turquoise for the Carnifex), a trigger, and barrel lights. Unfortunately, shortly after completing the guns, the electronics for both Carnifexes died. The Paladin still works fine, so I’m assuming that the turquoise indicator light in the Carnifex is to blame.


Each barrel contains 3 white LEDs connected in parallel, which come on when the trigger connects with a push button (but only if the main power switch is on). The LEDs were diffused with acrylic which I had sanded to make opaque. I used a penlight torch as an inline battery holder for 2 AAA batteries, creating a custom twist-and-lock locking mechanism using the cylinder that protrudes from the back of the gun. This cylinder has a spring which connects to the batteries, and metal contacts that complete the circuit through the body of the battery holder when locked in place.
With the electronics in place, the guns were glued together and given a final clean-up with Apoxie Sculpt to fill any gaps. They were then primed and the grip texture applied using Rustoleum Textured paint.
I put together the lettering and markings in Illustrator, and had them printed on vinyl to use as stencils. After undercoating the guns, the vinyl was stuck on and airbrushed to apply the markings.


The final painting step was to weather the guns. For the Carnifex, I took some sandpaper to the orange markings to scratch them up a bit. I had used a white undercoat for the orange, so light sanding revealed this, while slightly heavier sanding exposed the grey base coat, giving a nice layered distressed appearance to these parts. The edges of the grey parts of the gun were drybrushed with first light grey, then black, then metallic acrylic paint to create a varied weathering pattern, imitating areas of older and newer wear. Finally, I went over the whole gun with a layer of watered-down acrylic black, wiping it off as I went, to simulate grime in the recesses and tone down some of the brighter colours.
I took a more subtle approach to weathering the Paladin. After undercoating the whole gun in black, I masked off the areas that were to remain black and airbrushed on the main white coat, controlling the amount of paint applied to give a powdered coat that had some depth and wasn’t flat white. The white areas were lightly drybrushed with black to simulate some wear and dirt, while the markings and lettering was drybrushed with white. When dry, the guns were sealed with a layer of clear coat.
Thanks for reading,
Terry