mvmagic
Well-Known Member
Hey everyone. Thought to share my Mando build which also happens to be my first "real" finishing job on a 3D print. Got my first printer this year. I had thought of getting one for a long time but as I was looking for a good Mando 3D model for a friend, I was referred to Great Ape's model right here on RPF and that really was the tipping point and the printer arrived a week later. For a few months I kept churning out small prints, the Mando files always tempting me... After learning the ways of the for...I mean my printer, I decided its time to dive into the deep end and take my chances on a 6-day print with really no support. I can honestly say it was a week with less than adequate sleep, the last day being most harrowing...
I do know casting would be the best way, but not having done any serious print finishing, wanted this to be as much of an exercise in finishing as it is getting a bucket of my own.
Armed with a 2,5 kg spool I was as ready as I was gonna be...


At this point I started to worry more, as it had gone so well...

And some time later:


The very top had very visible lines, so it was filled with some drywall putty and sanded a few times. Then I started going with XTC 3D, diluted with rubbing alcohol and sanded. Did 3 coats of it.

Detail parts test fitted. The parts will be reprinted as not totally happy with the results:

After the resin coats, it was filler primer time:

Very top, the really problematic area, turned out just fine:

Filler primer was then wetsanded:

I did make a few booboos... Accidentally took wrong rattlecan which caused a reaction with the original black paint, resulted in some peeling. After that, I put on a coat of the proper paint, backed onto a leaf blower and ended up dusting the entire helmet. Had that been a TV show, it would have been 5 straight minutes of beeping...
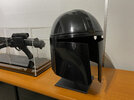
This is where it is now:

Theres both some dust and water on it in the picture.
Some time after the holidays, its metal time...
I do know casting would be the best way, but not having done any serious print finishing, wanted this to be as much of an exercise in finishing as it is getting a bucket of my own.
Armed with a 2,5 kg spool I was as ready as I was gonna be...
At this point I started to worry more, as it had gone so well...
And some time later:
The very top had very visible lines, so it was filled with some drywall putty and sanded a few times. Then I started going with XTC 3D, diluted with rubbing alcohol and sanded. Did 3 coats of it.
Detail parts test fitted. The parts will be reprinted as not totally happy with the results:
After the resin coats, it was filler primer time:
Very top, the really problematic area, turned out just fine:
Filler primer was then wetsanded:
I did make a few booboos... Accidentally took wrong rattlecan which caused a reaction with the original black paint, resulted in some peeling. After that, I put on a coat of the proper paint, backed onto a leaf blower and ended up dusting the entire helmet. Had that been a TV show, it would have been 5 straight minutes of beeping...
This is where it is now:
Theres both some dust and water on it in the picture.
Some time after the holidays, its metal time...
")