so. Three new parts. With warmer place to try to cure properly. No uv in there tho. I found the primer (different brand, ran out of the other) was tacky as well after a few days. Beginning to wonder if it’s something to do with the Asa. Or all of the rustoleum paint at my local store is 100 years old
You are using an out of date browser. It may not display this or other websites correctly.
You should upgrade or use an alternative browser.
You should upgrade or use an alternative browser.
Making the Carlyle Elysium SMG
- Thread starter scornflake
- Start date
You may very well be onto something. I know my paints would not cure on faux leather but I had no clue what plastic it really was so can't even avoid it in the future.so. Three new parts. With warmer place to try to cure properly. No uv in there tho. I found the primer (different brand, ran out of the other) was tacky as well after a few days. Beginning to wonder if it’s something to do with the Asa. Or all of the rustoleum paint at my local store is 100 years old
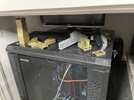
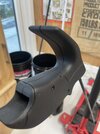
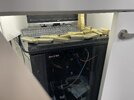
I should add as it may not be obvious. Those items are sitting on top of a computer rack running 24/7. A small heater if you will. Under a stairwell. An enclosed space.You may very well be onto something. I know my paints would not cure on faux leather but I had no clue what plastic it really was so can't even avoid it in the future.
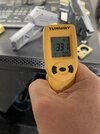
I’m hoping the environments temp helps. It’s prob 30degC there. Easily.
I looked up ASA generally and it is supposed to be water resistant. So at this point I’m not thinking that my wet sanding of parts is the cause. Even though that intuitively seems possible.I should add as it may not be obvious. Those items are sitting on top of a computer rack running 24/7. A small heater if you will. Under a stairwell. An enclosed space.
I’m hoping the environments temp helps. It’s prob 30degC there. Easily.
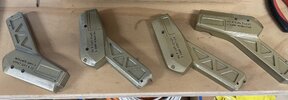
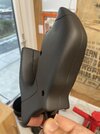
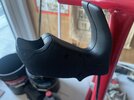
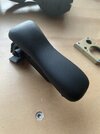
So after a few days sitting on top of the computer rack… a bit better. Wouldn’t call it rock hard. I’m running out of patience tho. So. I’ve got two sets of rear thingies. One that has been around since day one. And one that’s just been primed and now has one coat. This’ll let me play with both acrylic and enamel clear coats.
Attachments
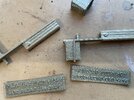
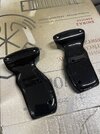
Directly after sanding at 600. Very light. Perhaps only three strokes with a hard block. Will put back in cupboard to dry.


I guess that means weathering will be easy......Directly after sanding at 600. Very light. Perhaps only three strokes with a hard block. Will put back in cupboard to dry. View attachment 1899385View attachment 1899386View attachment 1899387View attachment 1899389
I know that very light coats dry exceptionally fast under the perfect conditions. If you have never tried the static methods or seen them done, it is highly impressive. I couldn't possibly guide you on that but it looked pretty basic. Pretty much just negative charging the part and very light spray. It pulls it down tight to the surface.Interestingly. I did another coat on the rear stock part about 6hrs ago. It already feels dry. Cured even (it won’t be. But it feels that way). There’s no hint of tackiness. You would not even know if I’d done another coat (yeh. I did)
I think in your situation, you are seeing the speed of paint drying on cured paint.... very fast, compared to paint drying on the surface of your print (the material you were questioning for possibly containing a solvent to your paint and keeping it from curing). You are maybe completely sealed now and the new paint is no longer coming in contact with the print material. Would be worth checking on some of the other parts. This is one of the main reasons for the old school primer first, sand, then paint that most of us wandered away from when fancy promises started showing up on our new brands.
But it would be cool to be over the hump and let progress be progress at each new step.
We used to build paint booths at the machine shop and they went through short cycles of static addition and then spray then heat then around the booth to go back in again but it was also purpose mixed static cling paints like the "powder coating" method but ours was wet and pumped into the boot automatically, no people involved.
Interesting stuff! Thanks for the info - learning thingsI know that very light coats dry exceptionally fast under the perfect conditions. If you have never tried the static methods or seen them done, it is highly impressive. I couldn't possibly guide you on that but it looked pretty basic. Pretty much just negative charging the part and very light spray. It pulls it down tight to the surface.
I think in your situation, you are seeing the speed of paint drying on cured paint.... very fast, compared to paint drying on the surface of your print (the material you were questioning for possibly containing a solvent to your paint and keeping it from curing). You are maybe completely sealed now and the new paint is no longer coming in contact with the print material. Would be worth checking on some of the other parts. This is one of the main reasons for the old school primer first, sand, then paint that most of us wandered away from when fancy promises started showing up on our new brands.
But it would be cool to be over the hump and let progress be progress at each new step.
We used to build paint booths at the machine shop and they went through short cycles of static addition and then spray then heat then around the booth to go back in again but it was also purpose mixed static cling paints like the "powder coating" method but ours was wet and pumped into the boot automatically, no people involved.
")
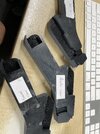
I had primed all the parts. Some of my sanding was perhaps a little aggressive - but those original rear handle thingies; I had intentionally tried to prime (think I even did 2 coats of primer, using it as a filler) and then be careful on the sand, so that I didn't just take it all off again.
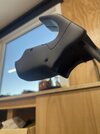
Todays update. Parts continue to sit atop the server. There are a number of smaller bits (the trigger housing, front of the sight, rear of the site) that now feel OK. The sight itself is feeling better. Not perfect, but much better. Those front/rear parts, interestingly (like above) were sprayed again just one day ago and feel OK, giving credence to the idea that it might be something to do with the ASA/paint layer interface that is causing the tackiness.
So. For now, I'm just going to leave. there's little I can do from here.
I might as well practice some patience, and see where things get to over the next week.
A spraypainter mate of mine did recommend an alternate primer (for those interested: PPG ONECHOICE EPOXY RUB THRU PRIMER AEROSOL). I'd used it in the past and it worked great. Can't do anything about it now, as I'm a bit beyond that, but I do wish that my previous self had just gone and spent the extra $4 per can on that stuff. I know it works. OK. Sure. I can't know it'd fix my current issue, but I'm sure looking at it with a "ooo ... look.... primer for Adults!"
joberg
Legendary Member
Seems interesting that primer...but that's the problem with the RPF: lots of products used by our U.S. brothers don't sell elsewhere (Canada, Australia, N.Z., U.K.) etc... I've ordered on line from Amazon U.S. before and a few things have happened: not shipping to Canada. Taxes + Custom "add-ons" makes it very expensive (since my poor CDN$ is lower than the U.S.$)...or simply because the product cannot be exported for environmental reasonsTodays update. Parts continue to sit atop the server. There are a number of smaller bits (the trigger housing, front of the sight, rear of the site) that now feel OK. The sight itself is feeling better. Not perfect, but much better. Those front/rear parts, interestingly (like above) were sprayed again just one day ago and feel OK, giving credence to the idea that it might be something to do with the ASA/paint layer interface that is causing the tackiness.
So. For now, I'm just going to leave. there's little I can do from here.
I might as well practice some patience, and see where things get to over the next week.
A spraypainter mate of mine did recommend an alternate primer (for those interested: PPG ONECHOICE EPOXY RUB THRU PRIMER AEROSOL). I'd used it in the past and it worked great. Can't do anything about it now, as I'm a bit beyond that, but I do wish that my previous self had just gone and spent the extra $4 per can on that stuff. I know it works. OK. Sure. I can't know it'd fix my current issue, but I'm sure looking at it with a "ooo ... look.... primer for Adults!"
Same prob for me here. Anything I read, well, then I have to translate. I think the great thing is different suggestions. E.g: I hadn’t actually mentally thought about enamel vs acrylic for a clear coat. And now looking at that primer, I see it’s an epoxy? Based? I admit I have no idea what that means. Makes me wonder if my painter mate knew all this all along (same primer I used to fix a build issue with the d9 gun a few years back) and has been humouring me while staring at his ceiling.
Dunno. Cos. Of course. I’m not using it (so far) on this build, am I? Nope. Im Not. Cos I’ve been a muppet and used “cheap” primer from a local hardware store. Sigh.
Said primer and painter mate are close by. As in “let’s go get lunch and say hi” type of close by. So. I think I will get some. And say hi to Mr Painter Mate at the same time.
What does this mean for this project? Uuuuurm. Nothing right now. But hey. Blurb. Progress. Or at least a fabrication of those things. Yay.
Today I have a video update. Cos:
Similar threads
- Replies
- 53
- Views
- 3,342