You are using an out of date browser. It may not display this or other websites correctly.
You should upgrade or use an alternative browser.
You should upgrade or use an alternative browser.
Making a Cosplay Captain America TFA work...
- Thread starter roblenzz
- Start date
Off to a nice start Bobby :thumbsup
:lol
I know how you feel! I had to take apart several of my finished pieces and redo a few of them because I wasn't happy with my first attempt. It's all worth it in the end though, especially since you'll know
I know how you feel! I had to take apart several of my finished pieces and redo a few of them because I wasn't happy with my first attempt. It's all worth it in the end though, especially since you'll know
mfgundlach
New Member
Nevertheless your suit is looking good, I need to find the time to start a Captain America suit. I think I'm gonna go the easy route first and do the WW2 paratrooper outfit first, then when I get time start with the suit from the Avengers!
roblenzz
Active Member
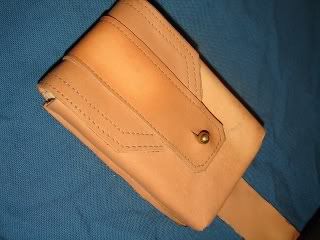
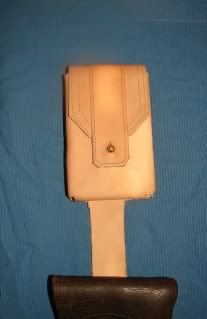
Thanks guys for the compliments. Here is one of the pouches, I am happy now that I went back and added the stitching to the body of the pouch. Now it won't bug me everytime I look at it:
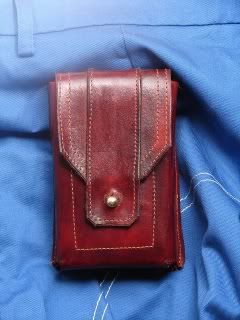
The others are dyed but this one I had added the leather balm to give it a warm sheen. I have the belt w/ grommets done and one side dyed waiting to dry so I can flip it. Thanks again for the comments
The others are dyed but this one I had added the leather balm to give it a warm sheen. I have the belt w/ grommets done and one side dyed waiting to dry so I can flip it. Thanks again for the comments
Chris27989
Sr Member
nice pouches! nice stitching detail
roblenzz
Active Member
Hey Fly, that's the Cosplay suit.
Here is the belt finished with the exception of the drop down holster and coming up with a way of fastening the belt behind the buckle. I think I'm going to loop the belt through the buckle and attach two snaps that will be hidden by the first pouch...


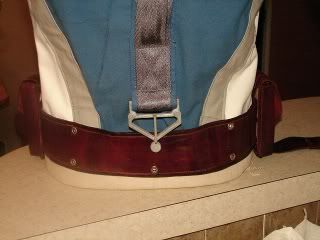
Here is the belt finished with the exception of the drop down holster and coming up with a way of fastening the belt behind the buckle. I think I'm going to loop the belt through the buckle and attach two snaps that will be hidden by the first pouch...
Bobby, that looks awesome! Great job :thumbsup
EyeofSauron
Master Member
man thats just so cool
roblenzz
Active Member
Thanks Fly, Kevin and EOS. Just finishing up the drop leg holster but am waiting for it to dry before I post pics. That is about all for today. It fit pretty well and sat right on my leg when I test fit it am am pretty excited. The only minor issue so far is the weight of the 1911 and I had to remount and adjust so it would be tight to my leg instead of wanting to tilt out.
I spilled a brand new, full container of "British Tan" on my work bench Couldn't have been half or almost empty... The whole thing... Now I have a British Tan workbench, leather working tools, garage floor, hands... What a waste of 5 bucks...
I spilled a brand new, full container of "British Tan" on my work bench
Couldn't have been half or almost empty... The whole thing... Now I have a British Tan workbench, leather working tools, garage floor, hands... What a waste of 5 bucks...Graphic Jordan
Sr Member
What color dye did you use? That looks darker than the British Tan... ?
roblenzz
Active Member
I used British Tan, but the key to getting it deep is to dye it until it is almost saturated with color, let it dry, then applying a leather balm (which goes on thin, not a paste). Then I hit the balm w/ a hair dryer. It gets real dull looking but buffs out to a real authentic looking sheen. But I promise you, it is Fiebing Brand, "British Tan."
EyeofSauron
Master Member
i have a quick question, did you use some kind of polyester thread for the seams, because they didnt take the color, or is that just the way it happens?
Graphic Jordan
Sr Member
So you slathered it in thick? Then wiped excess after it dried? Mine just looks orange and I'm using the same kind.
Similar threads
- Replies
- 2
- Views
- 735
- Replies
- 14
- Views
- 2,241
- Replies
- 66
- Views
- 15,648
- Replies
- 10
- Views
- 3,697
R