ewige
Active Member
So since I had very little luck finding details on casting plaster on here before I started this project, i figured I'd post here some of the stuff I learned while attacking this thing.
First of all, I decided that since I was going to be casting these in plaster. I knew that there were a number of pieces on the show cast in resin to make them more durable for handling by the characters, but they were supposed to be plaster in the story, and there were indeed a number of plaster ones as well. Everythign I'd read said that if you wanted detail + strength in plaster figurines, go for Hydrocal, and my experiences have reflected that.
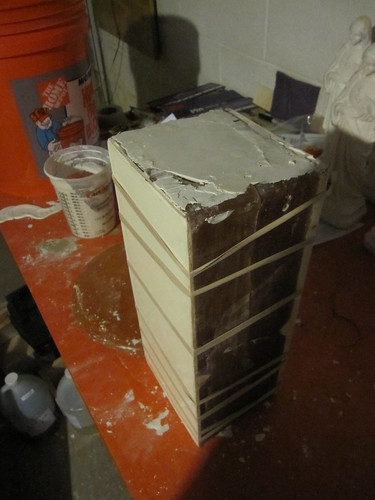
For a molding material, I decided to use PolyTek 74-30 polyurethane rubber. I had read somewhere that silicon didn't do as well with plaster casting (although I do not know exactly why this would be the case, and it may just be woo), and the undercuts on Mary were subtle enough that 74-30 was more than flexible enough. I built a mold box for Mary using some lengths of board, wood glue, and wood screws.
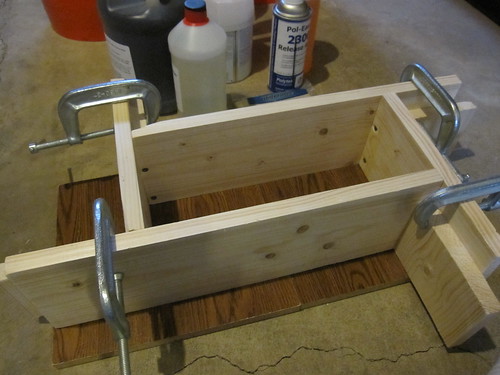
The box is actually comprised of four L-shaped pieces, which are then held together with C-clamps, so that the box can be resized as needed. i then filled part of the box with water based clay, and carved out a spot for Mary, laid the statue in, and filled up any voids with more clay. I made a few registration keys with the end of a sharpie marker, filled the corners and screw-holes with more clay, and sprayed the whole thing liberally with 2300 Mold Release.

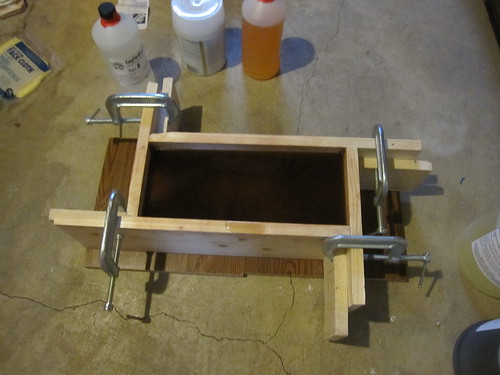
Then I mixed enough 2-part urethane rubber molding material to cover the piece to an appropriate depth.
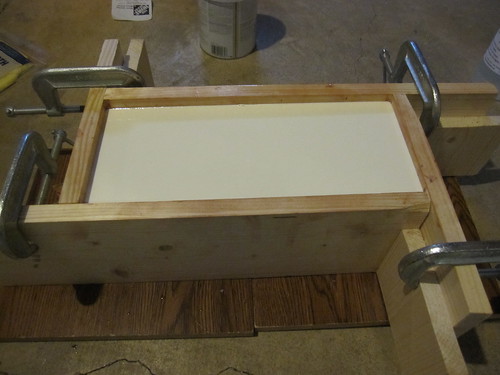
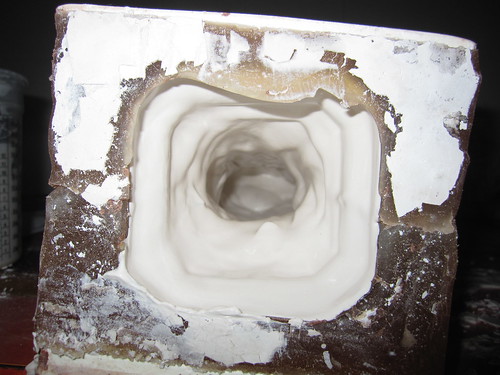
Once it had cured enough (approx 24-48 hours) I cut a few registration keys along the walls and poured in some EasyFlo 60 resin to make a nice custom backing for the mold.
I'd like to say this was my first experience with easyflo resin and boy, when they say it has a 120 second pot life, they mean it. I stirred counting to 90, poured it in, and in seconds it looked like this:
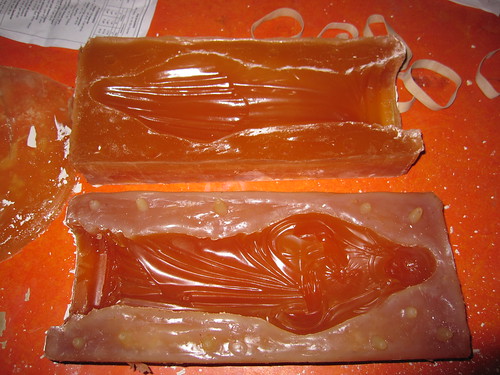
After the resin had fully cured (30 minutes?) I flipped the whole thing over and began carefully removing the clay. I cleaned the clay out and repeated the whole rubber/resin process for the second half. After it was all cured, I now had something like this:
After I sanded the edges of the resin backing (they were rather sharp after curing), I was ready to start casting! I got myself a 50 lb bag of hydrocal and some cheap plastic mixing containers. I secured the two halves of the mold together with heavy rubber bands, and poured into the mold a small amount of water mixed with a little bit of dish soap. Since plaster is water-based, it has significant surface tension which can tend toward having surface air bubbles, especially in tiny crevices and undercuts. The dishsoap rinse acts as a surfactant and breaks the surface tension, making the plaster slush nicer, and bubbles less likely.
One nice thing about using a polyurethane mold is that it requires no mold release for plaster casting, so that wasn't a concern.
I used the following tried and true plaster mixing method: pour into a mixing vessel an amount of water (in this case, maybe 8 oz, or a third of a big plastic picnic cup) and then begin sifting in, by hand, handfuls of hydrocal powder. Eventually (about four handfuls, in this case) the powder will pile up above the water surface, and the water won't accept any more powder. Sprinking a little more powder on the surface will result in what really looks like a dry lake bed, with cracks and such.
At this point, I let the hydrocal slake for about 2 minutes, and then I stirred with my hand for two minutes. Stirring with your hand really lets you feel any lumps and work them out (although with this small working amount, lumps were very rare).
I then poured the plaster into the mold and slushed it around, taking special care to get it into the little spaces like elbows and such. The first few tries I had made too much plaster so I just poured the excess into a bucket.
I let this cure for 45 minutes and then mixed another batch, sloshed a second coat and then inverted the mold onto a rubber mat. This had the effect of sealing up the base of the statue, and after 45 more minutes, I had something like this:
I removed the rubber bands, and demolded the piece, cleaned the mold and set off again.
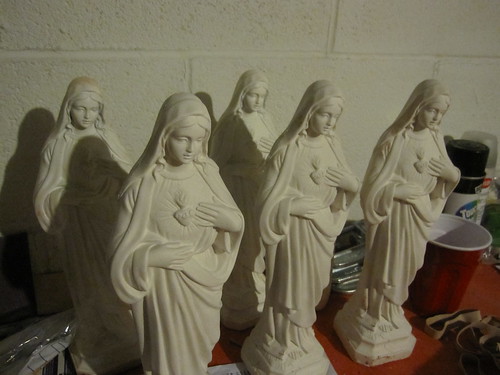
While they were demolded but still curing, I used a sculpting tool to scrape down the seams. I initially considered sanding them away, but after looking at dozens of stills from the blu-rays, I'm convinced that the seams should be left visible.
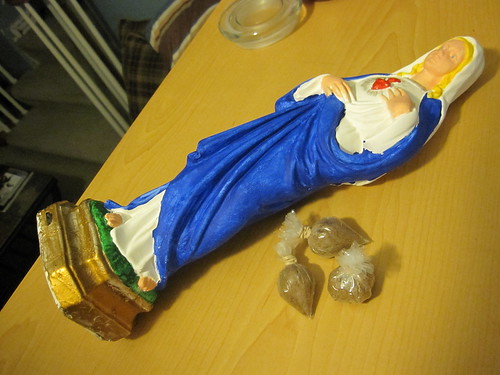
After I had made a few, I primed them using BIN white spray shellac. This sealed it up nice for painting, which I did with cheap hobby acrylics to good effect. The colors were Antigque Gold (base, neckline and heart rays) Christmas Green (grass) plain old vanilla Red and Yellow (heart and hair).
The blue used here was cobalt blue, and while this matches some of the screens due to lighting, I think the true color for most of the replicas was a lighter variety, and I will be trying a different color for future paint jobs.
After I tied some rubber bands around a few sandwich baggies of brown sugar I had this:
Next steps? I'd like to seal this paint job and then weather it with sandpaper along the highlights, and then seriously dirty the thing outdoors. Not sure how much I want to chip it, but I'll have at least six in my medicine crate set, so some of them will undoubtedly be more chipped than others.
I also did a few where I slushed the second inner coat but did not do the invert, leaving the base open. Then I put some heroin baggies in the statue, mixed up a very small batch of plaster and sealed up the base. Mostly these are nice because the baggies rattle around inside, lending more authenticity, and should anyone break one open (accidentally or otherwise) it will be a nice surprise.
First of all, I decided that since I was going to be casting these in plaster. I knew that there were a number of pieces on the show cast in resin to make them more durable for handling by the characters, but they were supposed to be plaster in the story, and there were indeed a number of plaster ones as well. Everythign I'd read said that if you wanted detail + strength in plaster figurines, go for Hydrocal, and my experiences have reflected that.
For a molding material, I decided to use PolyTek 74-30 polyurethane rubber. I had read somewhere that silicon didn't do as well with plaster casting (although I do not know exactly why this would be the case, and it may just be woo), and the undercuts on Mary were subtle enough that 74-30 was more than flexible enough. I built a mold box for Mary using some lengths of board, wood glue, and wood screws.
The box is actually comprised of four L-shaped pieces, which are then held together with C-clamps, so that the box can be resized as needed. i then filled part of the box with water based clay, and carved out a spot for Mary, laid the statue in, and filled up any voids with more clay. I made a few registration keys with the end of a sharpie marker, filled the corners and screw-holes with more clay, and sprayed the whole thing liberally with 2300 Mold Release.
Then I mixed enough 2-part urethane rubber molding material to cover the piece to an appropriate depth.
Once it had cured enough (approx 24-48 hours) I cut a few registration keys along the walls and poured in some EasyFlo 60 resin to make a nice custom backing for the mold.
I'd like to say this was my first experience with easyflo resin and boy, when they say it has a 120 second pot life, they mean it. I stirred counting to 90, poured it in, and in seconds it looked like this:
After the resin had fully cured (30 minutes?) I flipped the whole thing over and began carefully removing the clay. I cleaned the clay out and repeated the whole rubber/resin process for the second half. After it was all cured, I now had something like this:
After I sanded the edges of the resin backing (they were rather sharp after curing), I was ready to start casting! I got myself a 50 lb bag of hydrocal and some cheap plastic mixing containers. I secured the two halves of the mold together with heavy rubber bands, and poured into the mold a small amount of water mixed with a little bit of dish soap. Since plaster is water-based, it has significant surface tension which can tend toward having surface air bubbles, especially in tiny crevices and undercuts. The dishsoap rinse acts as a surfactant and breaks the surface tension, making the plaster slush nicer, and bubbles less likely.
One nice thing about using a polyurethane mold is that it requires no mold release for plaster casting, so that wasn't a concern.
I used the following tried and true plaster mixing method: pour into a mixing vessel an amount of water (in this case, maybe 8 oz, or a third of a big plastic picnic cup) and then begin sifting in, by hand, handfuls of hydrocal powder. Eventually (about four handfuls, in this case) the powder will pile up above the water surface, and the water won't accept any more powder. Sprinking a little more powder on the surface will result in what really looks like a dry lake bed, with cracks and such.
At this point, I let the hydrocal slake for about 2 minutes, and then I stirred with my hand for two minutes. Stirring with your hand really lets you feel any lumps and work them out (although with this small working amount, lumps were very rare).
I then poured the plaster into the mold and slushed it around, taking special care to get it into the little spaces like elbows and such. The first few tries I had made too much plaster so I just poured the excess into a bucket.
I let this cure for 45 minutes and then mixed another batch, sloshed a second coat and then inverted the mold onto a rubber mat. This had the effect of sealing up the base of the statue, and after 45 more minutes, I had something like this:
I removed the rubber bands, and demolded the piece, cleaned the mold and set off again.
While they were demolded but still curing, I used a sculpting tool to scrape down the seams. I initially considered sanding them away, but after looking at dozens of stills from the blu-rays, I'm convinced that the seams should be left visible.
After I had made a few, I primed them using BIN white spray shellac. This sealed it up nice for painting, which I did with cheap hobby acrylics to good effect. The colors were Antigque Gold (base, neckline and heart rays) Christmas Green (grass) plain old vanilla Red and Yellow (heart and hair).
The blue used here was cobalt blue, and while this matches some of the screens due to lighting, I think the true color for most of the replicas was a lighter variety, and I will be trying a different color for future paint jobs.
After I tied some rubber bands around a few sandwich baggies of brown sugar I had this:
Next steps? I'd like to seal this paint job and then weather it with sandpaper along the highlights, and then seriously dirty the thing outdoors. Not sure how much I want to chip it, but I'll have at least six in my medicine crate set, so some of them will undoubtedly be more chipped than others.
I also did a few where I slushed the second inner coat but did not do the invert, leaving the base open. Then I put some heroin baggies in the statue, mixed up a very small batch of plaster and sealed up the base. Mostly these are nice because the baggies rattle around inside, lending more authenticity, and should anyone break one open (accidentally or otherwise) it will be a nice surprise.
Last edited:
") "
"