You are using an out of date browser. It may not display this or other websites correctly.
You should upgrade or use an alternative browser.
You should upgrade or use an alternative browser.
Lost In Space-Jupiter II 2020
- Thread starter gt350pony66
- Start date
gt350pony66
Master Member
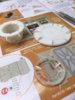
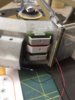
these are Model Master acrylics, now a lot of guys will tell you to use floquil and Tamia and they probably are better paints but not always the easiest to find. this stuff works for me. the far left is "roof brown" that I used for the dark outer main floor. the second is "dark tan ocre" #FS30219, this I used for the inner floor color. The 3rd "sand" #FS33531 for the walls and the "pale green #FS34227 mixed 50/50 with the Sand to get the green for the wall panel inserts and the other thing that are green.
Attachments

Goodtime
Active Member
these are Model Master acrylics, now a lot of guys will tell you to use floquil and Tamia and they probably are better paints but not always the easiest to find. this stuff works for me. the far left is "roof brown" that I used for the dark outer main floor. the second is "dark tan ocre" #FS30219, this I used for the inner floor color. The 3rd "sand" #FS33531 for the walls and the "pale green #FS34227 mixed 50/50 with the Sand to get the green for the wall panel inserts and the other thing that are green.
Thank you!
gt350pony66
Master Member
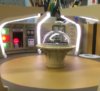
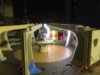
I decided to do something with the small gap between the table top and the base so I hogged it out and used a MF gun window and sandwiched it between so it would have a glow to it. the light also radiates slightly to the top. As far as the walls and ceiling piece, it's being a bit more challenging to get it all to fit, but I'll get it. So far so good
Attachments
-
 intr1.jpeg52.5 KB · Views: 190
 -
 intr2.jpeg51.7 KB · Views: 187
 -
 intr3.jpeg52.2 KB · Views: 189
 -
 intr4.jpeg40.5 KB · Views: 179
 -
 intr5.jpeg42.2 KB · Views: 174
 -
 intr6.jpeg51.8 KB · Views: 192
 -
 intr7.jpeg82.6 KB · Views: 199
 -
 intr8.jpeg62.4 KB · Views: 204
 -
 intr10.jpeg41.1 KB · Views: 197
 -
 intr11.jpeg47.6 KB · Views: 208
gt350pony66
Master Member

gt350pony66
Master Member
Thanks brotherWow! That is looking fantastic
Now you are making me want to pick one up
") Although I will admit not everything is going as I envisioned it and replacing the wall sections with scratch ones seemed easy enough but as i get closer to actually installing them and having them fit the side walls and ceiling panel i'm having to modify and patch up where i made errors. But, it should all turn out. i don't think I'm going to have the upper hull removable for viewing. I don't much feel like doing the upright control panels in the cockpit with all that FO, i don't think it's worth the trouble
Although I will admit not everything is going as I envisioned it and replacing the wall sections with scratch ones seemed easy enough but as i get closer to actually installing them and having them fit the side walls and ceiling panel i'm having to modify and patch up where i made errors. But, it should all turn out. i don't think I'm going to have the upper hull removable for viewing. I don't much feel like doing the upright control panels in the cockpit with all that FO, i don't think it's worth the troublegt350pony66
Master Member
heads up though...the kit was 100 bucks, the lighting kit was 140 and the PE was like another 40. lighting kit is pretty good and you HAVE to have the sequential light for the fusion core thingy, but as always with me, have to add lots of other light goodies. It's been a fun kit so far but i think i spent too much money on itThanks brother
gt350pony66
Master Member
And one more thing...if i had it to do over again, i wouldn't use those greenish and tan colors for the interior. I saw one on line where the guy used some grayish tones...it looks better even if it's not correct.
gt350pony66
Master Member


gt350pony66
Master Member
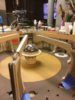
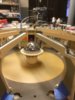
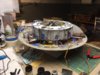
Well this project is proving a bit more tricky than I expected, but that's the challenge. divider walls all up and lit, the gyro ball has a breather LED which is pretty cool. I placed 3, 2mm white :LED's behind the logic circuit panel...and last night I finished stringing several hundred strands of .25mm FO for the blinking light panels behind and to the top of the freezer tubes. Still a crap=load to do on this one. Not nearly as much FO, but it reminds me of the ISD.
Attachments


gt350pony66
Master Member
Thanks dude! i'm just going use like 3 or 4 blinkers and put random strands of FO in each one, they should have enough variation in blink for a decent effect. probably going to start that soon. there's still the under deck lights to do for the freezer tubes, elevator and the other 3 skinny tubes that stand in the middle of each pair of freezers. crap load of lights on this turd...Interior is looking fantastic with that lighting
Are you using a 555 timers for the blinking effects, or blinking LEDs or something else?
gt350pony66
Master Member
And an ambient light in the ladder well...it never endsThanks dude! i'm just going use like 3 or 4 blinkers and put random strands of FO in each one, they should have enough variation in blink for a decent effect. probably going to start that soon. there's still the under deck lights to do for the freezer tubes, elevator and the other 3 skinny tubes that stand in the middle of each pair of freezers. crap load of lights on this turd...
Hunk a Junk
Sr Member
I like the small detail of how the strip lights in the divider walls reflect off the gyro ball dome to look like spokes of light. I love those kind of unintended details that add so much.
gt350pony66
Master Member
I know it's been a few since I updated, I've moved right along, had some issues with dud LED's and grounds but I got it all squared. Still a lot to do but this is how far I've gotten. I had to extend the down ladder and scratch another rung cause you can see it from the front window. Aside from the lighting kit that I bought, I've added almost as many lights...might have gone a little overboard
Attachments
-
 j2a.jpeg40.4 KB · Views: 173
 -
 j2b.jpeg45.5 KB · Views: 184
 -
 j2c.jpeg272.1 KB · Views: 179
 -
 j2d.jpeg40.9 KB · Views: 164
 -
 j2e.jpeg39.7 KB · Views: 182
 -
 j2f.jpeg46.2 KB · Views: 177
 -
 j2g.jpeg129.1 KB · Views: 173
 -
 j2h.jpeg141.1 KB · Views: 203
 -
 j2i.jpeg132.5 KB · Views: 179
 -
 j2j.jpeg138.2 KB · Views: 180
gt350pony66
Master Member
I'm almost done with this one. Looks like I'll be doing a good bit of modeling for at least the next 30 days. The dealer group I work for shut all 26 stores down for at least a month, I'm healthy and everyone I know is, but they're taking care of us financially in the short and out health care in he long. John Bergstrom and his boys are awesome folks to work for.
Anyway, back to the J2. Here's the latest pics. I figured out all my added lights, and I think it was the strip SMD's that were pulling the most juice, I split the power to twin 9V's. I didn't want to try to tap the lighting set that has a plug in converter for fear I'd jack it up. I think I added more lights than the lighting set came with.
Anyway, back to the J2. Here's the latest pics. I figured out all my added lights, and I think it was the strip SMD's that were pulling the most juice, I split the power to twin 9V's. I didn't want to try to tap the lighting set that has a plug in converter for fear I'd jack it up. I think I added more lights than the lighting set came with.
Attachments


gt350pony66
Master Member
Well, this one is done. I hope all you folks are being safe and staying healthy. I got furloughed from work for 30 days, they're gonna pay us in two weeks anyway, but not sure what's gonna happen after that. But in the mean time it's a model building fest.
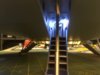
Anyway, I'm glad this one is done, it fought me pretty hard towards the end. Due to lower hull warp I had to put screws in it. I powered all the extra lights I added with 2 9V's on separate circuits. I didn't dare tap into the lighting kit for fear I'd ruin something, so I need the upper hull removable to replace batteries. All in all it was a fun build, very challenging but it turned out pretty good all things considered. I have the Polar Lights 12" version as well and think I'm going to tackle that next while it's all still fresh. There's no lighting kit for that one except for the fusion core light disc that I found at a hobby swap meet. As far as the rest of the lights, it's going to be a tougher deal due to the smaller scale. take care all
Anyway, I'm glad this one is done, it fought me pretty hard towards the end. Due to lower hull warp I had to put screws in it. I powered all the extra lights I added with 2 9V's on separate circuits. I didn't dare tap into the lighting kit for fear I'd ruin something, so I need the upper hull removable to replace batteries. All in all it was a fun build, very challenging but it turned out pretty good all things considered. I have the Polar Lights 12" version as well and think I'm going to tackle that next while it's all still fresh. There's no lighting kit for that one except for the fusion core light disc that I found at a hobby swap meet. As far as the rest of the lights, it's going to be a tougher deal due to the smaller scale. take care all
Attachments
-
 j2f1.jpeg88 KB · Views: 192
 -
 j2f2.jpeg86.8 KB · Views: 209
 -
 j2f3.jpeg79.9 KB · Views: 181
 -
 j2f4.jpeg65.1 KB · Views: 175
 -
 j2f5.jpeg64.9 KB · Views: 199
 -
 j2f6.jpeg69.7 KB · Views: 186
 -
 j2f7.jpeg54 KB · Views: 166
 -
 j2f8.jpeg70.2 KB · Views: 180
 -
 j2f9.jpeg77.3 KB · Views: 181
 -
 j2f10.jpeg64.8 KB · Views: 196
gt350pony66
Master Member
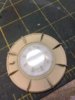
Also, there was no ceiling panels supplied for the center so I used Evergreen sheet between the ribs and the center is an MPC Falcon radar dish with a 1/2700 Star Destroyer shield generator top stuck to it
Similar threads
- Replies
- 1
- Views
- 1,349
- Replies
- 10
- Views
- 5,053
- Replies
- 9
- Views
- 4,458
- Replies
- 1
- Views
- 1,257