King SOL OT saber

thd9791

Master Member
RPF PREMIUM MEMBER
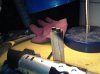
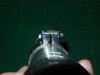
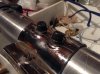
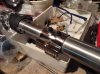
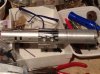
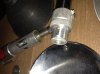
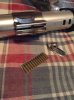
I'm up to no good again. I had a king sol lying around that was MAJORLY scratched up on the bottom. (I actually gouged a curly strip of metal out of it by accident too, see later posts) so I bought a Heiland reflector to go on top. Now..clamps....i removed the king sol bracket (none of the screws lined up, it was pretty bad work) then I decided to buy one of those metal "clamp" sections from eBay. Originally these were made in the 80s by that early replica company..can't remember the name. Anyone still have those magazines?

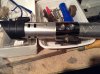
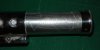
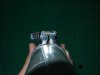
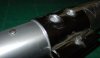
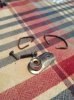
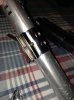
anyways this is how I basically skinned part of the flash. These clamps are cut from tubes and very rough inside. I removed it again and took a grinding wheel to the inside. I also tightened the clamp once it was in place - there's a socket head screw and this lever shaped piece on the other side.there are these raised areas for transistors I'm assuming...they look neat so I decided to play along. I took two generic transistors and hit them with wrinkle paint! The black transistor idea has been in the back of my head for years.

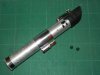
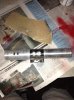
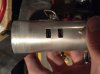
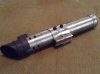
i found a little extender card at school and always wanted to use the plug on something. Now I can! What else....I actually decided to drill into the test button to hang a ring. I didn't like the look of adding anything anywhere else, the end cap is still a viable option.
 

Attachments

  • image.jpg
    image.jpg
    515.9 KB · Views: 133
  • image.jpg
    image.jpg
    952.3 KB · Views: 119
  • image.jpg
    image.jpg
    915 KB · Views: 103
I'm betting the clamp came from Marco Enterprises.

Watching this thread to see how this turns out. I have a King Sol on the way. (From Ebay) It's my first King Sol. Looking forward to tinkering with it.
 
I'm betting the clamp came from Marco Enterprises.

Watching this thread to see how this turns out. I have a King Sol on the way. (From Ebay) It's my first King Sol. Looking forward to tinkering with it.

I believe you're correct! The lightsaber replicas tended to have big on switches sticking out of the handles for electronics I think. Someone is selling off a bunch of Marco parts on Ebay and I find them fascinating
 
Tom, tell me about this clamp lever some more.

So the clamp itself is cut from a thick chrome tube. Literally, they cut a section and then sliced it lengthwise.
Welded to the "cut" area is a metal box with "sidebars and ridges" like a graflex clamp. (I'll post pictures soon) The two sides of the clamp box area are not level, looking at the side. I had to add a layer of something to one half of the clamp area for a card to lay flat. Even with that, one end of the clamp is uneven and the back is flat.

It was probably so rough because they welded the "box" on and sliced the whole thing with heat (There are scorch marks inside) and the inside has the remnants of that slice job. I guess technically, cut, it mimics a clamp. Although it can only be pried open a tad. Before grinding out the inside, i pushed it on my flash unit. It has that matte aluminum instead of a chrome finish and a piece inside the clamp dragged a huge gouge in the body. There was a long curly sliver of metal from the gouge poking up, like using a cheese grater...yea, I'm definitely putting T track on this one.

Running through the middle is a long socket head allen screw. On the other side is basically a block of metal with a threaded hole. The metal is just cut in a 2D lever shape, sort-of, and acts like a nut for the screw. You can see the threading because one half of the clamp (the lower side) has a cut-out in the floor of the clamp for it to pass through. You can see that in the pictures above. Since the lever nut doesn't have anything to stop the threaded rod you can tighten it quite a bit, and when it's not tight it can loosely swing around.

The previous owner tried to get the original king sol midband off too and gouged a nice zig-zag in the other side. I'll be happy to cover those up.

- - - Updated - - -

You have to much free time. [emoji6]
So I keep watching in awe.

I do...I do have too much time. I took a better paying job, that's slightly boring, half because it leaves me with weekends and evenings for hobbies like this :D and...also for the money.
 
I'm documenting this project over two devices, so bear with me. Here is me painting the transistors and realizing the holes are too small. Then - I find material to level out the floor of the clamp. The next post will have better pics with my Nikon s9100..
 

Attachments

  • image.jpg
    image.jpg
    933.1 KB · Views: 87
  • image.jpg
    image.jpg
    1.2 MB · Views: 92
  • image.jpg
    image.jpg
    844.7 KB · Views: 104
Last edited:
Ok so a number of things happened yesterday. I painted the black test button with a mixture of copper, bright red enamel and flat black paints. I used newspaper to dab at it with different layers and it gave it that "busted" worn look!

Here are the gouges in the body of the flash unit. They hurt to look at haha
 

Attachments

  • DSCN3195.jpg
    DSCN3195.jpg
    1.1 MB · Views: 63
  • DSCN3197.jpg
    DSCN3197.jpg
    1.6 MB · Views: 59
Now, here is the detail of that "clamp" section from Marco Enterprises. See how uneven it is? It looks like raw metal work, but it is heavy. I like the weight - and with enough packing tape and the mesh this card is going nowhere!

I tried to countersink the transistor holes and it took hours.They're just barely the size of the transistors (but the transistors don't sit at the bottom still). I'm thinking I may JB weld them in there, it IS metal on metal after all.
 

Attachments

  • DSCN3191.JPG
    DSCN3191.JPG
    2.5 MB · Views: 67
  • DSCN3193.JPG
    DSCN3193.JPG
    2.4 MB · Views: 56
  • DSCN3194.jpg
    DSCN3194.jpg
    1.6 MB · Views: 71
  • DSCN3202.jpg
    DSCN3202.jpg
    1.3 MB · Views: 63
Here are some pics of where I am now with this Saber. The Ring is from the same old Radio strap that my Mystery Saber D ring came from. Also, I got the Heiland thumbscrew off my Vader ESB thing. I bought a diamond knurled thumbscrew from the custom saber shop to match the prop in it's current form.

(I'm still displeased with that project. I used the wrong screws, it's top heavy due to the shroud - which I am proud of repairing, and the clamp is bent and just doesn't look right. The bubbles actually broke and fell out last week, we'll see what I do with it later)

Anyways! This one is really coming together. I call this a Vader 2.0 :lol
 

Attachments

  • DSCN3198.jpg
    DSCN3198.jpg
    1.8 MB · Views: 63
  • DSCN3190.jpg
    DSCN3190.jpg
    1.1 MB · Views: 75
I believe you're correct! The lightsaber replicas tended to have big on switches sticking out of the handles for electronics I think. Someone is selling off a bunch of Marco parts on Ebay and I find them fascinating

Same here, even though I've never bought a single thing from him. I used to buy his catalogs when he advertised in the back of Starlog Magazine,,,way before the RPF. It looks like he's getting out of the business, according to the auction descriptions.

Are you planning to hide the scratches w/grips or go at it with some sandpaper to smooth it out?

You just reminded me that I have some transistors stashed away. Gonna have to work some in some future projects. A couple transistors would mean using a couple less button-head allen screws on my customs, lol.
 
Speaking of the scratches - I decided to go the way another member went ;) I wet sanded the whole thing (rough then fine sandpaper) and with a lot of elbow grease it came out lovely! It looks like machined metal now. Those scratches are much less noticeable. also apoxie sculpted those transistors into the beveled holes (I also beveled the transistor rims to fit as well). Squashed some putty underneath, then peeled the excess away, and voila!

- - - Updated - - -

Hers a pic of where I am now, I'm thinking I need to gone some T Track :) I already have the belt clip covered

- - - Updated - - -

Picture....
 

Attachments

  • image.jpg
    image.jpg
    1.1 MB · Views: 71
  • image.jpg
    image.jpg
    1.4 MB · Views: 80
  • image.jpg
    image.jpg
    701.7 KB · Views: 76
  • image.jpg
    image.jpg
    889.2 KB · Views: 73
  • image.jpg
    image.jpg
    877.2 KB · Views: 75
  • image.jpg
    image.jpg
    441.3 KB · Views: 117
Thank you guys!

I got that look by wrapping a piece of sandpaper (rough) around the tube and twisting it back and forth. So, I was dragging the sandpaper horizontally and continued to do this.

I did the same thing with fine sandpaper, which actually created a lot of heat! I had to keep stopping so I didn't light things on fire
 
This thread is more than 8 years old.

Your message may be considered spam for the following reasons:

  1. This thread hasn't been active in some time. A new post in this thread might not contribute constructively to this discussion after so long.
If you wish to reply despite these issues, check the box below before replying.
Be aware that malicious compliance may result in more severe penalties.
Back
Top