Thank you!Looks nice and like the actual prop from Age of Ultron and Thor Ragnarok. Can I commission you to do that to my King Arts Mjolnir?
Please send me a DM and we can discuss
Thank you!Looks nice and like the actual prop from Age of Ultron and Thor Ragnarok. Can I commission you to do that to my King Arts Mjolnir?
thanks Dan!!!This. Thing. Is.
SICK!

thank you!Awesome thread and awesome work! I have a Cattoys Mjolnir that I'm thinking of
modding myself.
Thanks! I'll keep you posted!thank you!
looking forward to seeing what you do if you decide to mode it!
For those of you that own a King Arts and replaced the leather handle how did you go about it? There's that one screw in the pommel cap, but even after getting it out nothing will move... Don't want to force it either unless I know it comes off eventually. Any tips?
Got to that part but even after taking those 2 screws out the pommel won't move. I was going after that hex nut on the other end but that one is held in place by a ton of epoxy resin. Had to start milling it down but not quite sure that's the best way to go... Did you manage the get the pommel off without taking the hex nut out on the other end?The single screw just holds that center cap (with the "Marvel" print on it). Once you take that screw out, pop that cap off and there should be two more screws under that.
Got to that part but even after taking those 2 screws out the pommel won't move. I was going after that hex nut on the other end but that one is held in place by a ton of epoxy resin. Had to start milling it down but not quite sure that's the best way to go... Did you manage the get the pommel off without taking the hex nut out on the other end?
Interesting thank you! Thought I had tried to pull it pretty hard but will try again now. That hex nut is not moving anyway haha.Got it off after those 2 screws. Didn't have to do anything on the other end or with the hex nut. Here you can see what it looks like once it comes off. It's a little pressure fitted but slow and steady pull and it should come right off.
View attachment 1451095
it is VERY old epoxy that is keeping it in place, and a lot of it... honestly to get the handle removed from the head, you just need to twist REALLY hard.What’s the best way to get the handle off? I was thinking of using a hair dryer to heat up then try to unscrew.
Thanks for the info, I put on a pair of gloves and cranked on it for a while and i
This thing overall is pretty badly built. It's full of epoxy which defeats the purpose of having screws, nuts and threaded rods, and makes it super hard to take it apart.No better feeling... I literally laughed out loud and gave a lot of fist pumps in triumph when I loosened mine lol
Mine had the same issue. I just took off the little extension portion that fit into the groove on the hammer and it sits flush now.This thing overall is pretty badly built. It's full of epoxy which defeats the purpose of having screws, nuts and threaded rods, and makes it super hard to take it apart.
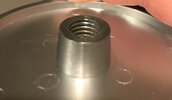
Mine came with a problem on the hammer head disc which wasn't sitting flush on the hammer head. Maybe it was from the previous owners but doubt it... I basically had to turn down the inside of the disc on my lathe and mill down the small threaded rod that sticks out of the inside of the disc since it was all stuck with epoxy as well and it was glued on all twisted.. now the new issue I'm facing is that I need another piece of threaded rod to replace the one I took out, but it doesn't look it's anything standard.. it's close to 7/16" but not exactly, it's close to metric M12 but smaller.. so that's where I'm at. Fun!