JFcustom's FOAM files

Re: FOAM speed building files'n'tricks ►Multi-Hero cowl◄ added.

I haven't tried any of these yet but the files look awesome and judging by the response here this looks like I'm gonna end with some pretty cool stuff. The one thing I was wondering about in case I missed it before but has anyone done the speed building files for Robocop the original one that's another one I'd love to have just a suggestion any way keep up the great work.
 
Re: FOAM speed-building files'n'tricks : added "Howto sharpen a blade".


How to sharpen a blade.


I read in almost every thread about issues with foam clean cutting that several dozens of new blades can be needed to build a full suit. Of course we all agree on the requirement of a highly sharp blade, and the less we can say is that a supersharp blade does not stay supersharp for a long time at all.

It mustn't be a reason to replace it systematically. Only the very edge of the blade is blunt, don't waist it for such a short. There are many ways to sharpen it back. You're allowed to disbelieve : I use the same blade since april. I'm a tightwad... :D

If foam by itself is able to blunt a blade, this same foam may also sharpen it. The main trick is NOT to take an aggressive nor fierce material. No whetstone, no grindstone, no polishing Dremel tip, not event the thinest sanding paper... Something just like Death, in "Reaper man" from Terry Pratchett, is sharpening his scytheblade using wind and moonlight until it can even cut a conversation.

Here we must choose a couple of tools, that will widely depend of what you can find around you :
- a long and soft one, like the wooden stick of your sweeper.
- a hard and sleek one, for exemple the handle of a steel ladle,
An object with a circular section works better. Too flat and the blade won't press enough, too thin and it will press too much.

HOWTO :

The way you would lay down some marmelade on a toast, scrub with some wide movements each side of the slanted blade on the surface of your wooden stick. On all the length of the blade, always in the same direction. Do not press at all ! the weight of the cutter is enough. Do it lightly and tactfully. Wood is slightly abrasive, it will polish the edge of the blade. Then, do the same on the steel handle. Metal is hard and bald, it will flatten the imperfections. Do it ten times on each side with each tool, and check the sharpness on a small wasted piece of foam. Do it frequently, don't wait your blade to be worn out before doing it again.

You can also use a strip of cardboard, the side of a shoebox, an empty roll of kitchen paper,even a tissue flap... a copper pipe, the side of your desktop computer, a metal doorknob or chair leg...

You sir, are an absolute genious!!
 
Re: FOAM speed building files'n'tricks ►Multi-Hero cowl◄ added.

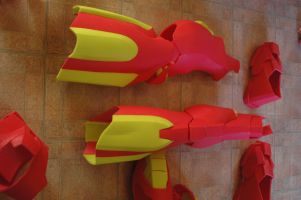
Hey guys just thought I would post some progress of my Iron patriot using the speed building files its starting to take shape now :)

 
Re: FOAM speed building files'n'tricks ►Multi-Hero cowl◄ added.

My wife told me I needed a hobby that wasn't reading and blah blah blah.....Now this may seem like a noob question but I would like to build a War-machine and MK IV for my six year old twin sons to wear for holloween. How would sizing work or what would I need to do??

Thanks!
 
Re: FOAM speed building files'n'tricks ►Multi-Hero cowl◄ added.

wow this is fantastic... I cant wait to give this a go, I have made 1 mk 4 and that took months, i'm hoping this will be a lot faster which it looks to be.
1 question; on the first page it says the male suits are all scaled to a 6' person... is that true for all of them? i'm looking at the iron patriot in particular, i'm just shy of 6'.

thanks jfcustom
 
Re: FOAM speed building files'n'tricks ►Multi-Hero cowl◄ added.

You should be fine mate I found the best way is get your partner to measure you from top to toe I mean everything and not only length but also width then print off a body diagram and write all your measurements down on it for future reference makes things a lot easier. My last suit I built using stealths foam templates the suit took me about 5 months to complete what I have done so far with the Iron patriot using jfs templates has taken me about two weeks give or take I should have it finished in about a month and as you can see theres still lots of detail on it and the bits that are missing can always be added afterwards :D also it always a good idea to check for each suit just in case there is slight variations on sizes :)

oh awesome... thanks billymaya
 
Re: FOAM speed building files'n'tricks ►Multi-Hero cowl◄ added.

Im itching to have a go at the space marine suit not sure if 6mm foam will be strong enough for it though. Thanks Jfcustoms for the feed back ill keep practicing and get them as tidy as I can I have two different coloured foams one green one yellow and the green mat is so much firmer than the yellow but they come from the same company and same thickness

Not sure neigher... I think it will go for the shoulders and helmet, because of their double layered structure, but I don't know how it can turn out with the other parts... I guess it all depends of how flexible or not is your foam, and what you plan to coat it with.

Heya JF. I'm plowing along on the Classic Iron Man build. Thank you. If you would like me to post pics /WIP on here to show the design let me know. I don't want to clutter up your thread. Thanks again. It looks awesome. :)

Of course, post pics ! Since you're the first to own these templates (that are not released here yet because still uncomplete) you'll probably be machine-gunned with questions and feedbacks and comments :) that's always pleasant and is also a powerful source of motivation.

I was wondering if there was a possibility of the armored suits for the main characters of the animated series 'Tiger&Bunny' could be added in a foam unfold? I'm trying to get two suits done by the end of august. The suits for wild tiger and Barnaby brooks specifically.
Any help would be greatly appreciated.

Tiger suit is on my pending list... Paper pep files are waiting in their folder for their foam conversion. I have so much to do before tackling it, and of course I'm not only talking about my virtual life here...

Can you unfold a Mk 42 all for foam? Or the other armor?
this is the model IM3 armor.rar

Yes, I can. A bit later though...

Question, with the Thor pepakura how big around the waist and chest is it? And..... I have no idea how to change it. Heeeeelp.

Download and use Pepakura Designer. The free version is the same as the registered one. Only 'save' function is disabled.
It includes a measurement tool and allows to revise the scale according to your needs.

My wife told me I needed a hobby that wasn't reading and blah blah blah.....Now this may seem like a noob question but I would like to build a War-machine and MK IV for my six year old twin sons to wear for holloween. How would sizing work or what would I need to do??

"...and blah blah blah..." :D Oh I see. I have the same model at home... ;)
For what I can say so far about 5-6yo kid sized suits, it's that you may want to scale the armor just like if you were building it for a guy 3 or 4 inches smaller than the concerned kid. Simply because his head makes 1/6th of his overall tallness, for 1/8th for an adult. And build the helmet on separates measurements (as always).

scaleandage.jpg scaleandage.png

When is it better to add in the extra details? Pre or Post sealing/coating?

I've been asked this unprecedented and quite clever question by PM, it worth being quoted here.
Most of the time I seal the foam as a very last stage. When everything else is 100% done.
But, it can be cleaner to add the thinest details between the first and the second coating. For example, you want to carve from side to side some long parallel holes to imitate a grid... if your foam is too flexible, your grid will get distort, and no way to seal it cleanly. But if this spot was already hardened before you carve it, it remains hard once the holes are done, and your grid is straight. You can coat it a second time localy to make the whole piece uniform.
 
Last edited:
Re: FOAM speed building files'n'tricks ►Multi-Hero cowl◄ added.

hey guys am still having trouble with this new foam technique , i mean i dont mind spending months doing an armor since i dont like to rush things and i am very familiar with pepakura ( the hard way , resin bondo etc ) but i wanted to choose this method since its easierand less costly. well here we see darkside501st mark 7 shin jfcustom foam version. know sorry that am a dumb person but i still dont get it. why is more pieces is better then less pieces?? why is putting those pieces overlapsed on the page like that is better then having normal pieces on each page individually like darkside501st mark 7 shin ironmaided foam version. since that is more easy and less complicated , less pieces and not only that but once you cut the jfcustom shin ( all those pieces ) and glue them to make one hole piece. how do you tranform that template in a foam piece??? since ironmaided foam version is idividual and its easier because its piece by piece and not taking a hole big piece i mean i really dont get it. sorry for my ignorance am not trying to bash this thread but i youst hate it when i dont understand things the first time even though its well explained but am the kind of person that have learn to do armor watching videos and not pictures but i want to learn this method but i dont know how to do this the jfcustom way when everybody is trying it and have succeed.

jf custom shin.jpgironmaided shin.jpg
 
Re: FOAM speed building files'n'tricks ►Multi-Hero cowl◄ added.

Thanks JFCustom for answering my question, I really didn't think you would have the time to answer the question regarding extra details. Right now, I am just carving the little extra details that are missing from the foam build like some lines on the helmet. I will seal/coat it afterward and maybe in between to make it cleaner and prominent. Thanks so much for the advice!
 
Re: FOAM speed building files'n'tricks ►Multi-Hero cowl◄ added.

Hey Charlie,
the jf version only has 16 parts, the ironmaided has around 45. Where you would usually cut all your parts out from the individual pages with other techniques, this way you glue all your pages together first, thereby giving you larger and less templates to cut out resulting in a faster build time

hope that was helpful
-Mick
 
Re: FOAM speed building files'n'tricks ►Multi-Hero cowl◄ added.

...once you cut the jfcustom shin ( all those pieces ) and glue them to make one hole piece...
It's here! The wrong setting is pointed here.

A clue could have been : why the hell does JFcustom wants me to enable "print alignment marks for multiple pages" in "setting / print setting" before I print his files...

When your height pages come out of your printer, don't touch your glue, don't touch your scissors, don't touch your foam... just lay your height pages down on the floor or on your desk, side to side, as they lay on the right view, and use some adhesive tape to make a single large page.

pdotape03.jpg

... and suddenly what happens ? You have a single A1 page instead of height A4 pages, and you also have the 16 pieces of foam you can see on your first picture instead of 45 on the second.

Then, and only then, you can handle your blade, and cut up your foam the way you want.
I used to cut up the templates first, draw them onto the foam, and cut the foam.
But I find it's quicker and cleaner to lay down your single large page directly onto your large foam panel, and cut the foam through the paper at one time.

I'm almost certain it was explained, first page first post, just below "howto"...

I know how it can be frustrating not to understand something when everyone around just plays with it, and I hope this will help you to sense the concept. ;)


-edit-
didn't want to shortcut you mickc22, I only forgot to hit 'send' earlier... :$
 
Last edited:
Re: FOAM speed building files'n'tricks ►Multi-Hero cowl◄ added.

well i did understand now specially that part where you said cut trough the paper and foam , never thoug of that , i was youst in the process of cuting a single iron man handplate youst to test this ( trying it on a small thing ) ill be posting some pics of another doubt that i have but ill be good if i explain it while am working with it so you have an idea. give me a sec.
It's here! The wrong setting is pointed here.

A clue could have been : why the hell does JFcustom wants me to enable "print alignment marks for multiple pages" in "setting / print setting" before I print his files...

When your height pages come out of your printer, don't touch your glue, don't touch your scissors, don't touch your foam... just lay your height pages down on the floor or on your desk, side to side, as they lay on the right view, and use some adhesive tape to make a single large page.

View attachment 183038

... and suddenly what happens ? You have a single A1 page instead of height A4 pages, and you also have the 16 pieces of foam you can see on your first picture instead of 45 on the second.

Then, and only then, you can handle your blade, and cut up your foam the way you want.
I used to cut up the templates first, draw them onto the foam, and cut the foam.
But I find it's quicker and cleaner to lay down your single large page directly onto your large foam panel, and cut the foam through the paper at one time.

I'm almost certain it was explained, first page first post, just below "howto"...

I know how it can be frustrating not to understand something when everyone around just plays with it, and I hope this will help you to sense the concept. ;)

- - - Updated - - -

wait not a hand plate , somethig that has curves and that is bigger . lol
well i did understand now specially that part where you said cut trough the paper and foam , never thoug of that , i was youst in the process of cuting a single iron man handplate youst to test this ( trying it on a small thing ) ill be posting some pics of another doubt that i have but ill be good if i explain it while am working with it so you have an idea. give me a sec.
 
Re: FOAM speed building files'n'tricks ►Multi-Hero cowl◄ added.

ok so , here i have the boot since i figure i doit with a picture instead of actually making it on foam and waisting it since am not sure how to do this so ill youst practice with something else until i know am confident so here imagine that the 2d window its all cut out from foam , that there actually like so my question is how do you achieve that nice curve on the left 3d window?? by cutting mountain folds on the inside of the foam ??? because am assuming that a heat gun will youst ruin the the piece since it will bend the hole thing and it will look akward. and here i have the helmet , the faceplate where i mark both 3d windows and 2d windows with black arrows to show how will they connect??? by doing angle cuts?? since i tried to do angle cuts on curv ed pieces and i youst ripped the foam out :S shoe.jpgfaceplate.jpg
It's here! The wrong setting is pointed here.

A clue could have been : why the hell does JFcustom wants me to enable "print alignment marks for multiple pages" in "setting / print setting" before I print his files...

When your height pages come out of your printer, don't touch your glue, don't touch your scissors, don't touch your foam... just lay your height pages down on the floor or on your desk, side to side, as they lay on the right view, and use some adhesive tape to make a single large page.

View attachment 183038

... and suddenly what happens ? You have a single A1 page instead of height A4 pages, and you also have the 16 pieces of foam you can see on your first picture instead of 45 on the second.

Then, and only then, you can handle your blade, and cut up your foam the way you want.
I used to cut up the templates first, draw them onto the foam, and cut the foam.
But I find it's quicker and cleaner to lay down your single large page directly onto your large foam panel, and cut the foam through the paper at one time.

I'm almost certain it was explained, first page first post, just below "howto"...

I know how it can be frustrating not to understand something when everyone around just plays with it, and I hope this will help you to sense the concept. ;)


-edit-
didn't want to shortcut you mickc22, I only forgot to hit 'send' earlier... :$
 
Re: FOAM speed building files'n'tricks ►Multi-Hero cowl◄ added.

no worrys JF

I'm doing the Cap practice helmet at the mo, I'll post some pics when I'm done :D
 
Re: FOAM speed building files'n'tricks ►Multi-Hero cowl◄ added.

that would be awesome if you did , like to see your captain helmet so i can learn a bit more
no worrys JF

I'm doing the Cap practice helmet at the mo, I'll post some pics when I'm done :D
 
Re: FOAM speed building files'n'tricks ►Multi-Hero cowl◄ added.

...how do you achieve that nice curve on the left 3d window?? by cutting mountain folds on the inside of the foam ???... View attachment 183069

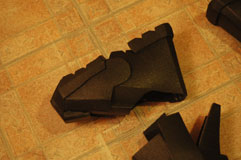
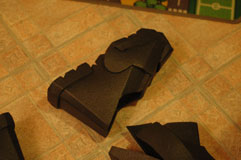
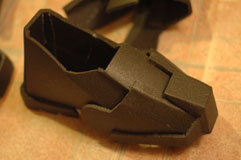
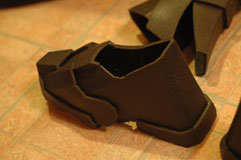
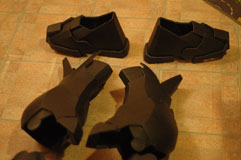
Yes, correct. It's only a matter of inner side cuts. V-cuts for a mountain, single cut for a valley... Some pics of this boot :


...how will they connect??? by doing angle cuts?? since i tried to do angle cuts on curv ed pieces and i youst ripped the foam out :SView attachment 183070

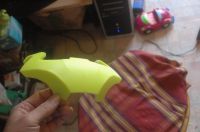
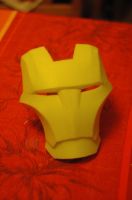
You should do angle cuts on flat pieces ! Your piece of foam is always flat on your desk when you do these angle cuts... Once your edges are angled, then yes you can apply glue onto them and join the connectable borders. The foam part will take its curve by itself. Pics :

These are not the same faceplates, but it's the same idea :

 
Re: FOAM speed building files'n'tricks ►Multi-Hero cowl◄ added.

sure charlie, I've done the middle section, and I'm working on the sides, hoping to finish it tomorrow

you should have a go at it yourself, it's good practice for the seams too
 
Re: FOAM speed building files'n'tricks ►Multi-Hero cowl◄ added.

hi, just wondering if anyone else is having the same problem as me? i have the iron patriot files but for some reason the forearm is from the war machine not IP... is that right? thanks
 
Back
Top