JFcustom's FOAM files

Re: Speed-building files'n'tricks : 4 days FOAM Iron Men.

Okay, this is the bit I'm struggling to do

Am I meant to use a knife or scissors, as in this video


https://www.youtube.com/watch?v=GOtwE5cK6ZU

If it's a knife, how the hell?? :(

i find using a really sharp blade easier, but to be honest just grab some scraps and practice to see what you prefer

- - - Updated - - -

im having troubles whit the link of the files... the link take me to the page and online appear a bonch of character and symbols
http://www.wintershade.com/therpf/oceanic.pdo

Right click>save target, or just use a different browser, my firefox does this so i just switch to Opera
 
Re: Speed-building files'n'tricks : 4 days FOAM Iron Men.

Okay, this is the bit I'm struggling to do

Am I meant to use a knife or scissors, as in this video


https://www.youtube.com/watch?v=GOtwE5cK6ZU

If it's a knife, how the hell?? :(

For short lengths that need an angle, scissors can work well. I get a lot cleaner angles by cutting them with a razor blade (just my plain old box cutter), tipping the blade at the angle I need. This is probably going to sound like a lot of work, but I cut all of my stuff like this:

I print out the templates for the piece I need. Then I take a pen and write on the templates themselves, using the 3d view in Pepakura as my guide. I guesstimate the angles I need to cut on each side of a particular piece, and write that angle on each side. So if I have an edge where to pieces meet at 90 degrees, I write 45 on each the corresponding side of each template piece. If the angle is under 45 degrees, I usually leave one of the foam pieces cut straight, and then cut the whole angle needed out of the other one. ANyways, I write down angles on each side of every template, ranging from 10 degrees (just a light bevel) all the way up to 45 (1/2 of a right angle joint).
After all these angles are figured out, I cut out the templates, and start tracing the outlines on the foam. I cut all of the corresponding angles into the foam as I cut the pieces out, this works out a lot cleaner than trying to add them later. If I estimated the angles needed decently, everything comes together really nice as I'm building.

Anyways, it's a bit of legwork to do this, but I think it's well worth it (and is a lot easier than trying to cut mitered edges on a piece that's already cut out)
 
!CCgrEL!Bmk~$(KGrHqIOKkQE0UGDuyg3BNLYs1R--g~~_12.JPG

Something you can also try.
 
I wish i could hug you. Thank you so much, I am working on a lady cyborg ( teen titans) And for some reason everything is sexy lady armors. I am 5 ft 11 and 240 pounds sexy armor is bad for me....
 
So I have been searching up and down for the answer to my question for about 3 hours now (grrrr). Basically whenever I have done a foam file in the past I have been lucky and went in and changed the scale to 26 or 26.5 and all is well, I print, pep and off I go. But now when opening a pep file the scaling is way off, instead of giving me a number in the double digits, i.e., 25, it gives me a scale number of 750 plus. I have a feeling it is a simple setting but have checked everything in Designer. Any help is appreciated.

pep scaling.JPG
 
So I have been searching up and down for the answer to my question for about 3 hours now (grrrr). Basically whenever I have done a foam file in the past I have been lucky and went in and changed the scale to 26 or 26.5 and all is well, I print, pep and off I go. But now when opening a pep file the scaling is way off, instead of giving me a number in the double digits, i.e., 25, it gives me a scale number of 750 plus. I have a feeling it is a simple setting but have checked everything in Designer. Any help is appreciated.

View attachment 352383

Not sure if this will help you out....

The workable scale of a pep model is determined in the 3d modeling software well before it's ever loaded into Pepakura and unfolded. So, a modeler who exports from their software a model 20 units tall (let's say that ends up being 20 millimeters) will unfold in Pepakura as 20 millimeters tall at a scale of 1. It all depends on the size the modeler saves the original 3d model at. That's why some average-size helmet scales are 10, while others are 25, and why one armor will fit a 6' person at 300 scale, while another one will have to be scaled 500 to be the same relative height. When you open an unfolded pep that you've downloaded, it will automatically open in the scale that it was last saved at; so if the person who uploaded the file had it saved at 750 scale, it will open at 750 scale when you first open it.

Totally makes sense. I know I can just do the math and adjust the scale up or down, I was just hoping I missed something and was able to change the scaling to something familiar as I have had such great luck with 26.5 in the past. Thanks again though.
 
Has anyone tried doing Starlord helmet using file from this thread? I had problems with some parts matching, some were too small and others too large. I have done full IM Mark VI suit and I haven't ecountered such problem with those files.
 
Has anyone tried doing Starlord helmet using file from this thread? I had problems with some parts matching, some were too small and others too large. I have done full IM Mark VI suit and I haven't ecountered such problem with those files.

I'm working on one as well, but I had to do some significant modifications to it to get it to fit my head properly (I found that while it fit alright around the top of my head, it was too big at the bottom, and way too long for me - instead of sitting at the base of my skull in the back, it sat on the bump at the top of my spine!). Aside from the problems inherent in modifying templates, I found that I had problems with the fit of the piece that goes over and around the eyes, and some problems around the ear pieces as well.
 
I'm hoping i came to the right place :) I've been able to extracts these 3 cowls from the character models i found online into an obj file format all i need is someone capable enough to make a foam unfold of them.

mk vs dc bat cowl.jpg
DC vs MK cowl


injustice.jpg

Injustice Bat cowl

batman mask.jpg

Jim Lee comic book Batcowl

i'm specifically extracting cowls that aren't available online this way we have a wider variety of bat cowls that are accessible for you guys ;)
 
Last edited:
Hi everyone,
don't blame me for being quiet these recent times, I'll be fully back in few weeks.
Anyway, better being quiet than saying nothing.
An old french proverb also says something like : it is better to shut up and let people think you're an idiot, rather that talking and leaving no doubt about it.
But I'm off topic.

About topic, this one would need to approach the redondant scaling question. Let's go step by step. I'll gather it all in the first post later, if there's still room enough for that ^^

_____________


So. How to scale.

The most often a suit is provided stamped with a default scale supposed to fit a 6 feet tall guy. And it often works just fine.

If you're 5'7" and not 6', you just have to tunne the scale down to your size. The scaling rule is :

My friend bought 7 shirts for $63,
how much will 5 shirts cost me ?

Easy, right ?
It's ($63/7)*5
That's $45.

7 shirts for $63 meens 5 shirts for $45

What did we do. We started with finding the price of one shirt, with $63/7. Then, we multiplied it by 5 to get the price of 5 shirts. ($63/7)*5.


Now:

My 72" tall friend uses a 25 scale factor,
what's the scale for my 67" tallness ?

Strictly the same, it's (25/72")*67"
Here, same thing, we found the scale for a one inch person, 25/72, and multiplied this scale by our own number of inchs, *67.

_____________


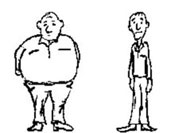
Let's go back to our default value, for a 6' tall guy. It often works. But the thing is, this guys are both 6' tall guys.
fat-thin.jpg


It's easy to see that we'll have to resize many parts, whatever the overall tallness of the guy can be. It can seem long and complicated, but it's exactly what we already do each time we buy clothes. You buy your shoes for a 8'2/3 shoesize, not for the feet of a 6' tall guy. You buy your hat for a medium head, not for the head of a 6'tall guy.

First thing you must know : you can't compute with feet. You must translate in inches first.
Because there's 12 inches in 1 foot. Not 10.

maths you could be tempted to follow, lowest to highest :
5
5.1
5.2
5.3
5.4
5.5
5.6
5.7
5.8
5.9
5.10
5.11
6


real maths :
5
5.1 = 5.10
5.11
5.2
5.3
5.4
5.5
5.6
5.7
5.8
5.9
6


5.11' are not 5'11", just like 5.9999 feet are not 5 feet and 9999 inches.

Same, you can't say 1h5mn is 1.5 hour, nor 1 day and 12 hours are 1.12 days...

So, count in inchs, not in feet.
The most often you'll have to count in millimeters anyway, because it's how Pepakura works.

_____________


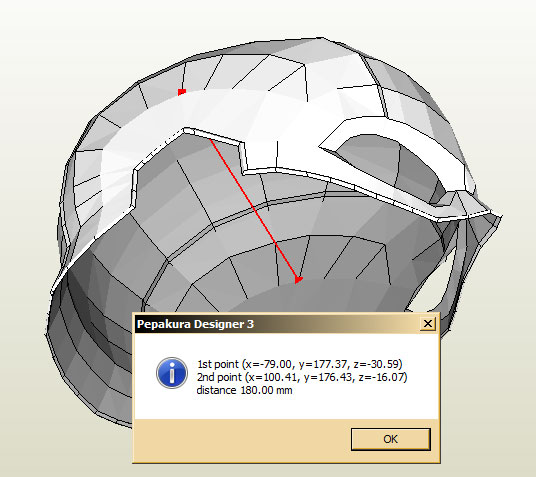
Well, Pepakura Designer offers a usefull tool called measurement tool. From now you'll want to download and install Pepakura Designer. It's free. No need to get any licence unless you want to use the "save" feature.

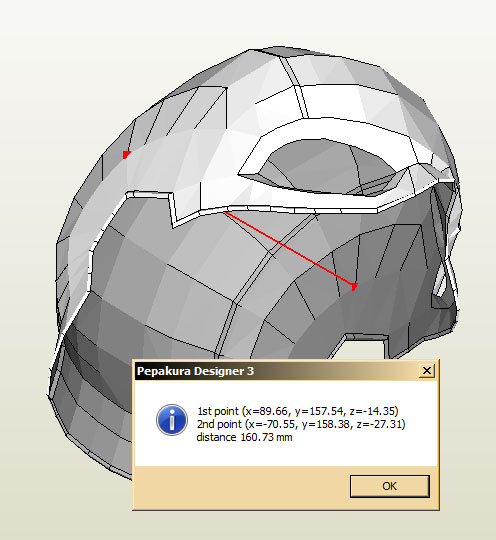
Open a file in Designer, right click the 2D layout, select "measurement tool". Now you can point two points on the 3D view, the distance between them will be displayed.
capmeasurement01.jpg

This distance depends of the scale factor. To get a smaller helmet, decrease the scale factor. To get a larger helmet, increase it.
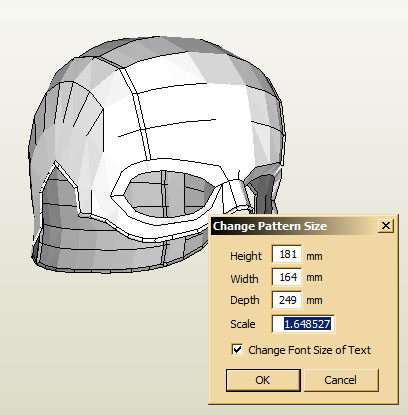
Here we have a helmet scaled at 1.648527 and 160.73mm from side to side.
capmeasurement02.jpg

If you want a 180mm wide helmet, just enter the suitable scale :

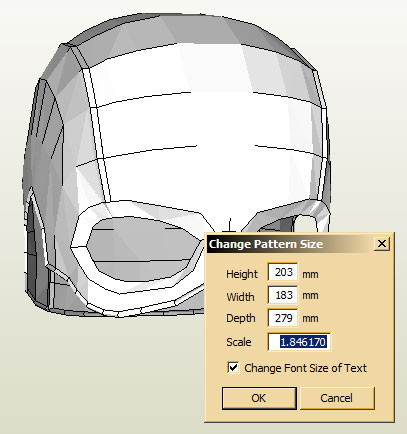
(1.648527/160.73)*180 = 1.84617

capmeasurement03.jpg


You can check : we get 180mm

capmeasurement04.jpg


Now the question is, "how do I know if it will fit my head".
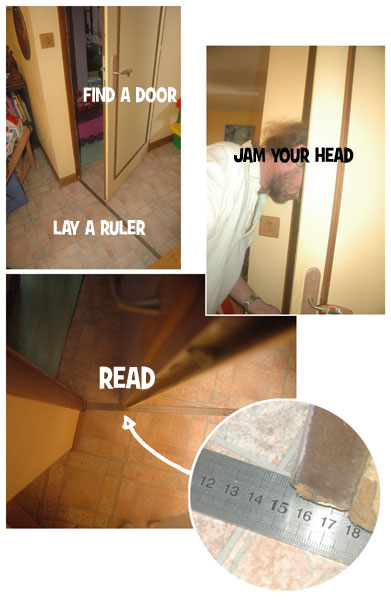
And the answer obviously is : "measure your head!"

The trick I use :
headwidth.jpg


Once you have the width of your head, add twice the thickness of your foam, add again enough room so you can feel comfortible in your helmet (it's not supposed to fit as close as a coat of paint), and compute your scale factor according to this value. Your helmet should match at first try.

_____________


Next, how to scale an arm.
 
Awsome guide! while were on the topic if anyone so happens to get their hands on the batman arkham knight character model be sure to let me know, i'll have the cowl extracted for you guys in no time or even the dark knight returns skin from the arkham city game! in the meantime i'll see if i can find any other unavailable cowls
 
I have a question about the Mark 6 files...

The Mark 6 has it's own directory with a chest plate and what appears to be part neck piece, part undersuit (shown in post 1)
torso-connect-01.gif

Also, judging by the files and that pic, it still uses the Mark 4 back piece.

Is that correct?

So what about the collar piece and dancin fool's neck piece as well as the neck seal piece.

Are those pieces optional? I'm working with the Mark 6 armor, but I'm deviating some for my own custom purposes. Which pieces are necessary to keep everything intact and not have any major gaps in the armor?

While we're on the subject, JFC said he builds those pieces to go on like a t-shirt... That neck piece would have to be pretty loose for me to get my head in there I think. How do you guys do it?
 
Last edited:
The 3 pieces you linked a picture of go on like a shirt if memory serves me. I think people cut the back or seperate the neck into 2 pieces so it can fit on you, atleast when I made a warmachine neck big enough to go over my head it was comically huge, so that was going to be my fix.
 
The 3 pieces you linked a picture of go on like a shirt if memory serves me. I think people cut the back or seperate the neck into 2 pieces so it can fit on you, atleast when I made a warmachine neck big enough to go over my head it was comically huge, so that was going to be my fix.

So I need to create a neck piece in addition to those 3 in the pic above?

How do you guys usually hold these together? Velcro or buckles or something?
 

Your message may be considered spam for the following reasons:

If you wish to reply despite these issues, check the box below before replying.
Be aware that malicious compliance may result in more severe penalties.
Back
Top