Jawa blaster real Enfeild and Grenade Cup

so spent a little time today shaping up the stock where I cut it. also tried getting the paint off of the stock...well the paint is gone but the stain is now lighter in that area...should I just strip the stock or leave it as wear?
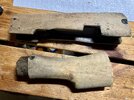
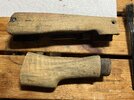
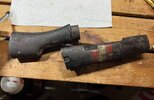
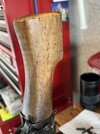
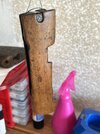
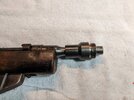
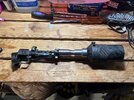
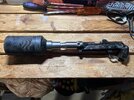
I would just leave it, looks like a natural spot for wear as that’s where you would hold it. I’m trying to get the barrel off my receiver and holy crap is it on there…not entirely sure how I’m going to get it off.
 
So here's the last couple of pictures for a while..I attached the adapter with a generous amount of jb weld. Also painted it with a matte black paint. I screwed on the grenade cup and it feels rock solid. gonna let it sit overnight just to be sure...this thing is heavy! oiled up the bolt and it works great. overall very happy how this came out. total cost under 300..
not bad for having the real parts
eventually I'll look for a flask and a hose to finish it..
 

Attachments

  • PXL_20240114_160843065.jpg
    PXL_20240114_160843065.jpg
    2.8 MB · Views: 61
  • PXL_20240114_235730861.jpg
    PXL_20240114_235730861.jpg
    3.9 MB · Views: 60
So here's the last couple of pictures for a while..I attached the adapter with a generous amount of jb weld. Also painted it with a matte black paint. I screwed on the grenade cup and it feels rock solid. gonna let it sit overnight just to be sure...this thing is heavy! oiled up the bolt and it works great. overall very happy how this came out. total cost under 300..
not bad for having the real parts
eventually I'll look for a flask and a hose to finish it..
That looks amazing! Mine is a slow go between work, kids and life I tinker when I have time. Hoping to make some progress this week!
 
Finally got around to getting my adapters fitted to the receiver! This was definitely the ‘hardest’ part of the build so far as I had to cut, drill, tap and die this to make it all work but 100% happy with the result!
 

Attachments

  • IMG_1458.jpeg
    IMG_1458.jpeg
    3.8 MB · Views: 59
  • IMG_1459.jpeg
    IMG_1459.jpeg
    3.6 MB · Views: 52
Blue-ed my adapters yesterday, going to touch up/re-blue some of the actual rifle parts this weekend. Blueing was quick and easy!
 

Attachments

  • IMG_1755.jpeg
    IMG_1755.jpeg
    1.6 MB · Views: 31
Blue-ed my adapters yesterday, going to touch up/re-blue some of the actual rifle parts this weekend. Blueing was quick and easy!
These are neat! Do these adapters from blaster factory screw into the receiver of the DP rifles? Or are they threaded into or onto the barrel some how? Trying to visualize how much work is required before I invest in the project.
 
These are neat! Do these adapters from blaster factory screw into the receiver of the DP rifles? Or are they threaded into or onto the barrel some how? Trying to visualize how much work is required before I invest in the project.
First off, these adapters are phenomenal! Very heavy/sturdy, and I would highly recommend them! I was trying to keep this build as simple and budget friendly as possible but the adapters were a must. I cut the barrel off flush with the end of the receiver. The unthreaded end of the barrel adapter is perfect size to run a 5/8-18 die over it. I drilled out small amount of ‘barrel’ left in the receiver with a 9/16 bit and tapped it 5/8-18 and used a step bit to create a small amount of space so it sat flush when screwed in as the die over the adapter doesn’t thread perfectly to the wider portion of the adapter and left a small gap initially. I did dremel off the rod welded through the receiver as well. I’ll back fill with JB weld or something. Other small issue I had is the ejector on the end of the bolt ‘hit’ the adapter when all the way forward so I removed it. You could also slightly drill out the end of the adapter or shorten it some but that would’ve been more work that just taking the ejector off. Below is my receiver before I drilled and tapped it. You can see the threads on the post above that I made on the adapter itself. I hope all that made sense as it was a bit of a ramble!
 

Attachments

  • IMG_1226.jpeg
    IMG_1226.jpeg
    1.3 MB · Views: 26
IMG_7412.jpeg

Not trying to highjack your thread, but if it’s any help I’m trying to make my own adapter from scratch, to keep costs down, this is as far as I’ve got and to be honest it’s not something I would recommend trying, no idea it I’ll get it to work so I may still end up having to buy and adapter anyway.
 
View attachment 1785023
Not trying to highjack your thread, but if it’s any help I’m trying to make my own adapter from scratch, to keep costs down, this is as far as I’ve got and to be honest it’s not something I would recommend trying, no idea it I’ll get it to work so I may still end up having to buy and adapter anyway.
I had to buy the 9/16 drill bit, 5/8-18 tap, die and handles for both. I had a basic tap and die set but it stopped at 1/2”. I don’t have a lathe or anything to do the metal work. Cutting the barrel off with a hacksaw was an absolute chore, even with a brand new blade! The adapters are awesome, they fit each other and the grenade cup perfectly!
 
Great that explians it! I was having trouble visualizing with out the parts in hand thanks!
I’m touching up/re-bluing the rest of the receiver right now. I still have to cut and re-finish the front and butt stocks too. I also plan on making a power pack out of a chunk of 2x4 to look like the antique powder horns used on screen. Should be fairly simple to cut and etch the design into the wood and paint so it doesn’t look like ‘wood’. There’s 3d printed ones out there but not worth the cost IMO.
 
I’m touching up/re-bluing the rest of the receiver right now. I still have to cut and re-finish the front and butt stocks too. I also plan on making a power pack out of a chunk of 2x4 to look like the antique powder horns used on screen. Should be fairly simple to cut and etch the design into the wood and paint so it doesn’t look like ‘wood’. There’s 3d printed ones out there but not worth the cost IMO.
Is their any screen shots or other pics showing the power pack hose connected to the blaster?
 
Is their any screen shots or other pics showing the power pack hose connected to the blaster?
The actual power pack used on screen is a 17-18th century black powder horn and the hose attachment is the powder spout. These can be found out in the wild but the ones I’ve seen have been $600 or more. I’m going to use some generic brass air hose fittings on the power pack and the butt stock and will just file the hard edges on it down so it’s not obvious and hit it with some sort of paint/weathering. I’ll use either air hose or automotive vacuum hose to connect them with some spring clamps.
 

Attachments

  • IMG_0977.jpeg
    IMG_0977.jpeg
    95.9 KB · Views: 27
  • IMG_8898.jpeg
    IMG_8898.jpeg
    3.5 MB · Views: 34
The actual power pack used on screen is a 17-18th century black powder horn and the hose attachment is the powder spout. These can be found out in the wild but the ones I’ve seen have been $600 or more. I’m going to use some generic brass air hose fittings on the power pack and the butt stock and will just file the hard edges on it down so it’s not obvious and hit it with some sort of paint/weathering. I’ll use either air hose or automotive vacuum hose to connect them with some spring clamps.
wow, I am very passionate about the jawa power pack and I have a rather large collection of those powder flasks, I have never seen this image on the left in this resolution and with a bit of color. the one I have is much smaller and black and white, thank you for sharing!
 
wow, I am very passionate about the jawa power pack and I have a rather large collection of those powder flasks, I have never seen this image on the left in this resolution and with a bit of color. the one I have is much smaller and black and white, thank you for sharing!
I’ve done as much research as I could find in this before jumping into it knowing I wanted to make one as screen accurate as possible. Finding the DP rifle itself with the grenade cup for $80 was a no brainer for me. For as much as I’d love to find a real powder horn that’s at least similar in size and era without spending a small fortune has proved next to impossible so attempting a re-creation is my best bet I think.
 
I’ve done as much research as I could find in this before jumping into it knowing I wanted to make one as screen accurate as possible. Finding the DP rifle itself with the grenade cup for $80 was a no brainer for me. For as much as I’d love to find a real powder horn that’s at least similar in size and era without spending a small fortune has proved next to impossible so attempting a re-creation is my best bet I think.
I sell some of my powder flasks from time to time between 100 and 180€, that is way cheaper than 600 :)
I have however been searching for a really close powder flask since 2017 and am still empty handed sadly!
 
A little progress today in getting the cosmoline, grime and paint off! The cool repair job was a nice surprise that I didn’t notice until it was cleaned up!
 

Attachments

  • IMG_2416.jpeg
    IMG_2416.jpeg
    2.6 MB · Views: 32
  • IMG_2418.jpeg
    IMG_2418.jpeg
    3 MB · Views: 31
  • IMG_1892.jpeg
    IMG_1892.jpeg
    2.9 MB · Views: 33

Your message may be considered spam for the following reasons:

If you wish to reply despite these issues, check the box below before replying.
Be aware that malicious compliance may result in more severe penalties.
Back
Top