You are using an out of date browser. It may not display this or other websites correctly.
You should upgrade or use an alternative browser.
You should upgrade or use an alternative browser.
Ironman Costume for 5yr old - LINKS on PAGE 1 - tips & important bits
- Thread starter indiefilmgeek
- Start date
chimmera30
Well-Known Member
Re: WIP Halloween Ironman Costume for my 5yr old - lots of pics
very nice video buddy!
very nice video buddy!
indiefilmgeek
Sr Member
Re: WIP Halloween Ironman Costume for my 5yr old - lots of pics
I picked up some Dupli-Color Adhesive Promoter this morning and tested it with one of my 3mm foam scale-test forearm pieces I have.
The important thing is that I did not treat the foam with ANYTHING before this test...
So, after 3 coats of this Adhesive Promoter, I hit the piece with 3 coats of the Sunburst Gold Auto Paint (also from Dupli-Color). Here is the result video...
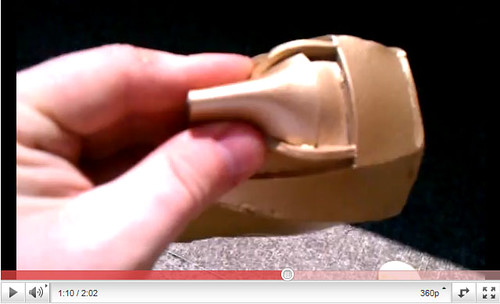
As mentioned in the video, the only downside to this seems to be a slight dimpling or pot-mark pattern to the paint. This shot was done after ANOTHER coat (that would be the fourth coat) was applied to this test piece.

All-in-all, I think I'm going to work with this method for the pieces I want TOTALLY flexible (forearm and bicep for sure). I might modify this slightly for foam pieces (like the elbow) I plan to harden with epoxy (or Plasti-Dip).
Now... I'm off to take a nap and then spend the holiday weekend sneaking in some build-time so I can knock out BOTH arms by the time work begins again on Tuesday. Ambitious? Yes, but it's good to have goals. :lol
I picked up some Dupli-Color Adhesive Promoter this morning and tested it with one of my 3mm foam scale-test forearm pieces I have.
The important thing is that I did not treat the foam with ANYTHING before this test...
So, after 3 coats of this Adhesive Promoter, I hit the piece with 3 coats of the Sunburst Gold Auto Paint (also from Dupli-Color). Here is the result video...

As mentioned in the video, the only downside to this seems to be a slight dimpling or pot-mark pattern to the paint. This shot was done after ANOTHER coat (that would be the fourth coat) was applied to this test piece.

All-in-all, I think I'm going to work with this method for the pieces I want TOTALLY flexible (forearm and bicep for sure). I might modify this slightly for foam pieces (like the elbow) I plan to harden with epoxy (or Plasti-Dip).
Now... I'm off to take a nap and then spend the holiday weekend sneaking in some build-time so I can knock out BOTH arms by the time work begins again on Tuesday. Ambitious? Yes, but it's good to have goals. :lol
indiefilmgeek
Sr Member
Re: WIP Halloween Ironman Costume for my 5yr old - lots of pics
It would certainly take patience (depending on how complex the total project is), but as long as you come to your pepakura project with persistence, anyone can do this. I definitely feel like my work on this project is much more craftsmanship than artistry. And craftsmanship implies that most folks can learn the trade (given a dedication to the project and some time).
If you're just intrigued with the pepakura build style, I'd suggest picking a 3D model you like, but one that's pretty basic in shape and design. You'd only be out probably $100 for something helmet-sized or smaller (provided you have standard tools around). Card-stock paper $5, fiberglass resin $15, bondo $20, several grits of sand paper $25, Paint $20 and random tools/materials $15.
It would be a great way to see if you like the build style, end up with a cool display piece and it won't break the bank!
Good luck and if you have any questions or run into any issues, drop me (or any of the folks you see on the RPF) a note - we'd be happy to offer you a helping hand! :thumbsup
Man, serious talent. The pepakura is intriguing, but I just don't think I have the patience or creativity for it.
It would certainly take patience (depending on how complex the total project is), but as long as you come to your pepakura project with persistence, anyone can do this. I definitely feel like my work on this project is much more craftsmanship than artistry. And craftsmanship implies that most folks can learn the trade (given a dedication to the project and some time).
If you're just intrigued with the pepakura build style, I'd suggest picking a 3D model you like, but one that's pretty basic in shape and design. You'd only be out probably $100 for something helmet-sized or smaller (provided you have standard tools around). Card-stock paper $5, fiberglass resin $15, bondo $20, several grits of sand paper $25, Paint $20 and random tools/materials $15.
It would be a great way to see if you like the build style, end up with a cool display piece and it won't break the bank!
Good luck and if you have any questions or run into any issues, drop me (or any of the folks you see on the RPF) a note - we'd be happy to offer you a helping hand! :thumbsup
Re: WIP Halloween Ironman Costume for my 5yr old - lots of pics
I may have to give it a go. I do know that the software doesn't come for Mac and I read in the pep help file that I need someone to convert the files to PDF. I love my Mac, but sometimes the lack of SW is frustrating.
I may have to give it a go. I do know that the software doesn't come for Mac and I read in the pep help file that I need someone to convert the files to PDF.
indiefilmgeek
Sr Member
Re: WIP Halloween Ironman Costume for my 5yr old - lots of pics
Yes, that's true. However, I've seen standard size pdf's of most of the available pep files on this forum and 405th. Are you going to need to adjust the scale +/- from the standard 6ft male height?
SIDE NOTE: I personally, think we need to work with the folks building pep files to make them easier to scale. The inclusion of a simple non-build object (say an unconnected band around where the wrist of the wearer would be for the arm file). That way, pep printers could just print that one piece and test it for scale until the it fits correctly. At that point the rest of the file can be printed reliably at the correct scale.
I may have to give it a go. I do know that the software doesn't come for Mac and I read in the pep help file that I need someone to convert the files to PDF.I love my Mac, but sometimes the lack of SW is frustrating.
Yes, that's true. However, I've seen standard size pdf's of most of the available pep files on this forum and 405th. Are you going to need to adjust the scale +/- from the standard 6ft male height?
SIDE NOTE: I personally, think we need to work with the folks building pep files to make them easier to scale. The inclusion of a simple non-build object (say an unconnected band around where the wrist of the wearer would be for the arm file). That way, pep printers could just print that one piece and test it for scale until the it fits correctly. At that point the rest of the file can be printed reliably at the correct scale.
Graphic Jordan
Sr Member
Re: WIP Halloween Ironman Costume for my 5yr old - lots of pics
I too use a Mac and using Pepakura is no problem. Simply boot windows using parallels, or something similar. I do it in coherence mode.. so all I have to see of those lousy windows programs is the program I am using.
J
I too use a Mac and using Pepakura is no problem. Simply boot windows using parallels, or something similar. I do it in coherence mode.. so all I have to see of those lousy windows programs is the program I am using.
J
I may have to give it a go. I do know that the software doesn't come for Mac and I read in the pep help file that I need someone to convert the files to PDF.I love my Mac, but sometimes the lack of SW is frustrating.
indiefilmgeek
Sr Member
Re: WIP Halloween Ironman Costume for my 5yr old - lots of pics
So much for finished up both arms this weekend. :rolleyes
First off, I got TOTALLY distracted when we decided to get my son's new toy out and test it in the back yard. Mikey has Sensory Integration Disorder (which means he doesn't process sensory experiences like most people). So, part of his therapy involves us providing him with a healthy 'sensory diet'. This giant inflatable ball was a virtual FEAST for Mikey's senses! In fact, play with it for 45 minutes on Monday morning calmed him down for the rest of the day. A win for everyone!
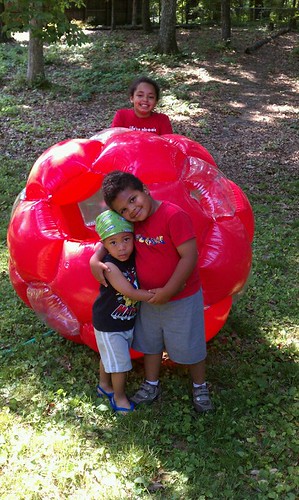
Why didn't WE have these when we were little!?!?
Back to the build...
I got the wrist pieces for both arms cut out, spacers placed in both and then fiberglassed them. The rest of the arm assembly will be foam built, but these made more sense to create as hardened pieces.

Card stock pep (modified to be slightly 'longer' so he can grow a bit and still have these comfortably fit into the forearm pieces. The spacers were cut out of thin model-working wood pieces I had laying around. They helped the pieces keep their shape (the SAME shape for both).

I fiberglassed the outside first and then pulled the spacers out and fiberglassed the inside. The materials I used is actually an old black t-shirt of mine. I started leaving this overhang of material past the edge of the piece back during the cod piece build. I find it MUCH easier to fiberglass a piece beyond the edge and then cut/dremel the edge back to the pep lines than trying to keep that line even while dealing with sloppy resin-covered t-shirt material. :lol
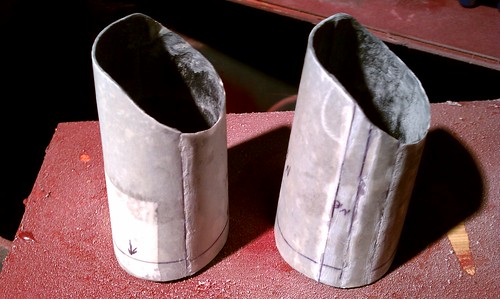
Here is a look at the wrist pieces after a quick dremel sanding. I'll probably just jump to using a finishing bondo or glazing putty to do some smoothing before primer and then final paint.
I also cut out all the foam parts I'll need for the two forearm pieces, and the last bicep piece. I have one of the forearms almost completely constructed and I also cut out the hard plastic connector pieces I'll use with my hardware to joint the forearm, elbow and bicep pieces.
Here is a look at the full arm assembly so far. I've got a final test fit planned for tonight, followed by the rest of the building of the last foam pieces this week.

I hope everyone had a GREAT weekend! :thumbsup
So much for finished up both arms this weekend. :rolleyes
First off, I got TOTALLY distracted when we decided to get my son's new toy out and test it in the back yard. Mikey has Sensory Integration Disorder (which means he doesn't process sensory experiences like most people). So, part of his therapy involves us providing him with a healthy 'sensory diet'. This giant inflatable ball was a virtual FEAST for Mikey's senses! In fact, play with it for 45 minutes on Monday morning calmed him down for the rest of the day. A win for everyone!

Why didn't WE have these when we were little!?!?
Back to the build...
I got the wrist pieces for both arms cut out, spacers placed in both and then fiberglassed them. The rest of the arm assembly will be foam built, but these made more sense to create as hardened pieces.

Card stock pep (modified to be slightly 'longer' so he can grow a bit and still have these comfortably fit into the forearm pieces. The spacers were cut out of thin model-working wood pieces I had laying around. They helped the pieces keep their shape (the SAME shape for both).

I fiberglassed the outside first and then pulled the spacers out and fiberglassed the inside. The materials I used is actually an old black t-shirt of mine. I started leaving this overhang of material past the edge of the piece back during the cod piece build. I find it MUCH easier to fiberglass a piece beyond the edge and then cut/dremel the edge back to the pep lines than trying to keep that line even while dealing with sloppy resin-covered t-shirt material. :lol

Here is a look at the wrist pieces after a quick dremel sanding. I'll probably just jump to using a finishing bondo or glazing putty to do some smoothing before primer and then final paint.
I also cut out all the foam parts I'll need for the two forearm pieces, and the last bicep piece. I have one of the forearms almost completely constructed and I also cut out the hard plastic connector pieces I'll use with my hardware to joint the forearm, elbow and bicep pieces.
Here is a look at the full arm assembly so far. I've got a final test fit planned for tonight, followed by the rest of the building of the last foam pieces this week.

I hope everyone had a GREAT weekend! :thumbsup
Graphic Jordan
Sr Member
Re: WIP Halloween Ironman Costume for my 5yr old - lots of pics
Looks great! Keep up the awesome work. I'll be following this build to the very end. Glad Mikey had some fun this weekend.
Looks great! Keep up the awesome work. I'll be following this build to the very end. Glad Mikey had some fun this weekend.
indiefilmgeek
Sr Member
Re: WIP Halloween Ironman Costume for my 5yr old - lots of pics
I'm hoping that the littlest guy (he's just turning 3 in June) will be about the right size for the costume in a year or two (minor adjustments where appropriate).
Eventually, it will go on display on the mannequin of Mikey we made. I don't know what you do with a 4ft high Ironman costume besides that! :confused
This is sooo cool. Too bad he'll probably grow out of it as soon as you've built it... What do you plan on doing with it afterwards?
I'm hoping that the littlest guy (he's just turning 3 in June) will be about the right size for the costume in a year or two (minor adjustments where appropriate).
Eventually, it will go on display on the mannequin of Mikey we made. I don't know what you do with a 4ft high Ironman costume besides that! :confused
indiefilmgeek
Sr Member
Re: WIP Halloween Ironman Costume for my 5yr old - updated pg #1
Very minor update... Sorry this build is happening at a snail's pace.
I'm doing one last application test for the foam pieces I'm building Mikey's arm armor out of. If this works well, then I will have locked down the application process and the arm piece I have built (as well as his leg pieces I still need to build) will all be handled the same way.
After building the foam piece (in this case a foam-built wrist piece I had laying around), I smooth out any rough spots or seams with gaps with latex caulk. Since the adhesive promoter doesn't work well over multiple surface materials, I've decided to make the first paint layer Plasti-dip.
Plasti-dip creates a consistent base coat and acts like a filler primer to cover any small gaps or rough spots on the piece.
After the Plasti-dip, I will apply 2-3 coats of the adhesive promoter and then (within 5-6 minutes of the last coat of AP), I'll hit the piece with the Dark Cherry Metallic auto paint (probably 2 coats).

This is a pic right after the base Plasti-dip coat is on. The REAL test is going to be how the adhesive promoter works between the Plasti-dip and the auto paint. If it work even CLOSE to how well it works over the raw EVA foam, we should be golden! :love
I'll post some pics tonight when I get a chance to apply the AP and final paint.
The only other tiny update is that I've almost finished the bondo smoothing for the fiberglassed wrist armor. I started to hit them with the filler primer, but ran out... which is crazy - since my car port looks like a freaking paint store (I have SO many cans of paint, under-coat treatments, post-coat treatments and a few other crazy aerosols I bought to test).
...all I have to say is, I'll be SO glad to have the 'testing' phase of my first build DONE! Future builds (and even additional pieces for this costume) should be MUCH faster, as I won't have to re-test all these materials (and paint).
Thanks for staying tuned. :thumbsup
Very minor update... Sorry this build is happening at a snail's pace.
I'm doing one last application test for the foam pieces I'm building Mikey's arm armor out of. If this works well, then I will have locked down the application process and the arm piece I have built (as well as his leg pieces I still need to build) will all be handled the same way.
After building the foam piece (in this case a foam-built wrist piece I had laying around), I smooth out any rough spots or seams with gaps with latex caulk. Since the adhesive promoter doesn't work well over multiple surface materials, I've decided to make the first paint layer Plasti-dip.
Plasti-dip creates a consistent base coat and acts like a filler primer to cover any small gaps or rough spots on the piece.
After the Plasti-dip, I will apply 2-3 coats of the adhesive promoter and then (within 5-6 minutes of the last coat of AP), I'll hit the piece with the Dark Cherry Metallic auto paint (probably 2 coats).

This is a pic right after the base Plasti-dip coat is on. The REAL test is going to be how the adhesive promoter works between the Plasti-dip and the auto paint. If it work even CLOSE to how well it works over the raw EVA foam, we should be golden! :love
I'll post some pics tonight when I get a chance to apply the AP and final paint.
The only other tiny update is that I've almost finished the bondo smoothing for the fiberglassed wrist armor. I started to hit them with the filler primer, but ran out... which is crazy - since my car port looks like a freaking paint store (I have SO many cans of paint, under-coat treatments, post-coat treatments and a few other crazy aerosols I bought to test).

...all I have to say is, I'll be SO glad to have the 'testing' phase of my first build DONE! Future builds (and even additional pieces for this costume) should be MUCH faster, as I won't have to re-test all these materials (and paint).
Thanks for staying tuned. :thumbsup
payton paison
Well-Known Member
Re: WIP Halloween Ironman Costume for my 5yr old - updated pg #1
Been following your thread, everything looks great. My young son has special needs and is a huge Iron Man fan. I am going to build a suit for him for display in his room as soon as I can clear some extra time. Hope is all goes well for you. You're a good father.
Been following your thread, everything looks great. My young son has special needs and is a huge Iron Man fan. I am going to build a suit for him for display in his room as soon as I can clear some extra time. Hope is all goes well for you. You're a good father.
indiefilmgeek
Sr Member
Re: WIP Halloween Ironman Costume for my 5yr old - updated pg #1
Thanks! My wife and I are foster parents and we are both very active in promoting and training new foster parents in our area. It's truly amazing to me the energy and love that parents with special needs kids pour into their children (adopted, foster or birth). We know many parents that have kids with severe special needs - those folks are definitely the REAL superheroes in our world! :thumbsup
And although we're familiar with the alphabet soup of disorders (ADHD, PTSD, SID, OCD, BP, etc), we feel lucky to be Mikey's mom and dad. To think that he started life born drug exposed and was found at 18 months old abandoned in a K-mart parking lot, you really have to give God credit for him even being alive!
The kid has definitely been dealt a rough hand, but he's such a wonderful, cool and VERY loving kid - it just makes any of his special needs seem like a small price to pay for getting to have him in our lives.
Good luck on your build and feel free to email or PM me anytime if you have questions!
Been following your thread, everything looks great. My young son has special needs and is a huge Iron Man fan. I am going to build a suit for him for display in his room as soon as I can clear some extra time. Hope all goes well for you. You're a good father.
Thanks! My wife and I are foster parents and we are both very active in promoting and training new foster parents in our area. It's truly amazing to me the energy and love that parents with special needs kids pour into their children (adopted, foster or birth). We know many parents that have kids with severe special needs - those folks are definitely the REAL superheroes in our world! :thumbsup
And although we're familiar with the alphabet soup of disorders (ADHD, PTSD, SID, OCD, BP, etc), we feel lucky to be Mikey's mom and dad. To think that he started life born drug exposed and was found at 18 months old abandoned in a K-mart parking lot, you really have to give God credit for him even being alive!
The kid has definitely been dealt a rough hand, but he's such a wonderful, cool and VERY loving kid - it just makes any of his special needs seem like a small price to pay for getting to have him in our lives.
Good luck on your build and feel free to email or PM me anytime if you have questions!
indiefilmgeek
Sr Member
Re: WIP Halloween Ironman Costume for my 5yr old - updated pg #1
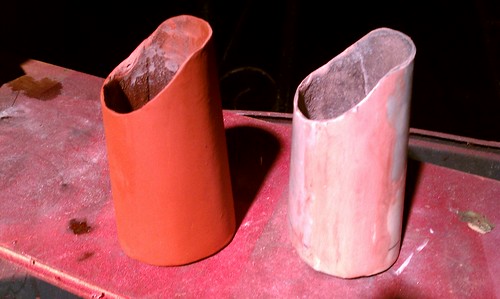
I'm hoping to have a better (longer) update by tomorrow. I've finished the wrist pieces, I have the first forearm piece in the paint application process with hardware included. I also have the hardware installed on the bicep piece, although I'm not painting that until I have the final bicep foam piece built from that example. I've also started to get the hard plastic and hardware parts installed on the elbow piece. I think before I install the binding post and drill a hole for the forearm binding post in the elbow, I'll have one more test fitting.... just to make sure everything is working ok.
I'll get some photos of the hardware I'm using as well as the epoxy/hot-glue methods I'm using for attaching everything, but for now here's a quick look at how the wrist piece came out.
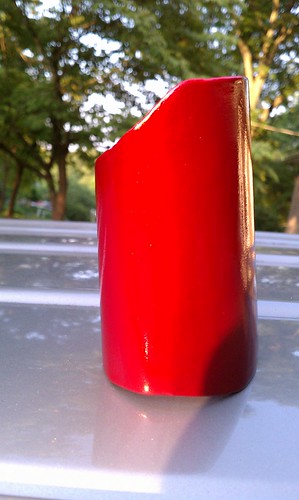
Boy, I wish my camera could capture the beautiful metallic flecks in this glossy paint. It's an awesome color!
I'm hoping to have a better (longer) update by tomorrow. I've finished the wrist pieces, I have the first forearm piece in the paint application process with hardware included. I also have the hardware installed on the bicep piece, although I'm not painting that until I have the final bicep foam piece built from that example. I've also started to get the hard plastic and hardware parts installed on the elbow piece. I think before I install the binding post and drill a hole for the forearm binding post in the elbow, I'll have one more test fitting.... just to make sure everything is working ok.
I'll get some photos of the hardware I'm using as well as the epoxy/hot-glue methods I'm using for attaching everything, but for now here's a quick look at how the wrist piece came out.

Boy, I wish my camera could capture the beautiful metallic flecks in this glossy paint. It's an awesome color!
Cbstudios
Sr Member
Re: WIP Halloween Ironman Costume for my 5yr old - updated pg #1
Mate, this build is fantastic! Its turning out unimaginably epic! Its going to be legendary once its finished!
The love you're showing to Mikey is unparralelled, he's very lucky to have parents who cares so much about him, and a Father who's willing to go above and beyond with a build like this!
Thanks! My wife and I are foster parents and we are both very active in promoting and training new foster parents in our area. It's truly amazing to me the energy and love that parents with special needs kids pour into their children (adopted, foster or birth). We know many parents that have kids with severe special needs - those folks are definitely the REAL superheroes in our world! :thumbsup
And although we're familiar with the alphabet soup of disorders (ADHD, PTSD, SID, OCD, BP, etc), we feel lucky to be Mikey's mom and dad. To think that he started life born drug exposed and was found at 18 months old abandoned in a K-mart parking lot, you really have to give God credit for him even being alive!
The kid has definitely been dealt a rough hand, but he's such a wonderful, cool and VERY loving kid - it just makes any of his special needs seem like a small price to pay for getting to have him in our lives.
Good luck on your build and feel free to email or PM me anytime if you have questions!
Mate, this build is fantastic! Its turning out unimaginably epic! Its going to be legendary once its finished!
The love you're showing to Mikey is unparralelled, he's very lucky to have parents who cares so much about him, and a Father who's willing to go above and beyond with a build like this!
Ironpredator
Active Member
Re: WIP Halloween Ironman Costume for my 5yr old - updated pg #1
Fantastic work my friend.really enjoying your build and your help
Fantastic work my friend.really enjoying your build and your help
Similar threads
- Replies
- 2
- Views
- 714
- Replies
- 1
- Views
- 573
- Replies
- 43
- Views
- 3,445
- Replies
- 7
- Views
- 807
