Re: WIP Ironman Costume for 5yr old - Arc Reactor Started!
Got some more work done on the reactor last night. Unfortunately, the evening ended with a spectacular short that blew several of the LED's... so, I've ordered another set of LED lights and will be re-doing some of this. :unsure
So, here's where we start...
After finishing the copper wire wrapping, I set the ring aside and started working on the center part of the reactor. For this, I just used some 1/16" model wood I had to cut out a ring and then attach it to a cut down black furniture cap I had. I drilled some holes around this inside ring just to give it some texture.
NOTE: this is a good picture regarding scale... each square on the work matte is 1 inch, so this whole thing pieces is less than 2" in diameter.
I then painted this and dry brushed some rub-n-buff on it. I think I might go back and reverse this coloring (paint it silver and dry brush a bit of black on it), but for now it looks like this.
After working on the center section, went back to the outer ring and cut out small pie-shaped section of matte-finished plastic (cover of a cheap folder I had laying around). I hot glued these piece onto the 'finished' side of the reactor ring (between the copper sections). The point of doing this is to blur the hot small round profile of the LED light - it's similar to what I did for the eyes in the helmet. You can see that three of these are done and the rest are cut and ready to be applied.
Next I flipped the bad-boy over and painted the backside of the copper wire black (to deter stray light from glowing through the copper wire). Then I marked and drilled-out two places for LED's per clear area of the ring. The LED's will be glued into place there.
Then, again, I flipped the thing over and glued tiny pieces of wood to each side of the copper wire to make it look (at quick glance) like the copper was wound within these brackets. A bit of rub-n-buff gives them that metallic look.
Then it was time to modify the sink plug by opening up some bigger holes for all the wiring to go through.
This allowed me to shove two LED's with wiring into each hole and then glue the LED's into their mounting spots in the outer ring.
Here's a look at it with all the LED's mounted - but before I pulled all the wires back to get the ring into place.
With just the ring in place, here is what it looked like seconds before I blew the LED's. Notice that two LED's had already shorted... ugh... I wish I would have realized what that meant before the other LED's blew.
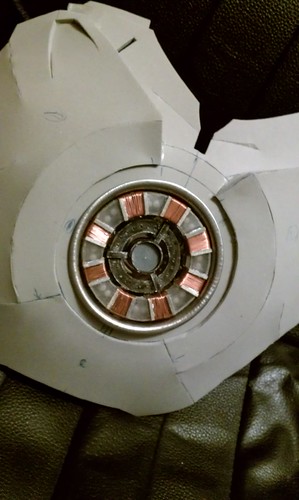
And here is what the whole things looks like (unlit obviously) right now.
Things to do now includes to re-wire the LED's. That involves making those holes in the sink drain plug bigger (as it was those sharp edges that cut a wire and shorted the thing). I also want to try reversing the color on the center piece... which also has LED's in it. Lastly, there will be a clear plastic cover over the reactor once it's all finished up.
For a dollar sink plug and some items I had laying around the house, I don't think it's turning out half bad.
")
:thumbsup