Ironman Arc Reactor build up from my kit. [IMG heavy + timelapse video]

Fine by me, I have this brewing...
F7lja.jpg


My Arc reactor from you is 3rd on my project list...lol. Did you ever get this piece off the ground? Any Junkyard plans for it?
 
I really want to get the "proof that tony stark has a heart" display going all in one shot. Is there any chance of all the pieces being available at one time? i.e. TC would you do the kit, back piece and a ring as one run? Basically Im trying to reproduce the same product as the think geek one that came out a few years ago which Im still kicking myself for missing.
 
While they would essentially be two separate kits, if they are both in stock at the same time there is no reason why I couldn't ship them together.

FUMOKWG.png
 
Looks good, which version are you doing? I'd say the outer ring probably needs to be thicker, though if it is one of the later versions I have not really studied them.
 
So, electronics question here...

I'm a total novice at this (IE, I know which end of the soldering iron to hold and can tin and solder wires pretty well). I snagged a 2 AA and a 4 AA battery holder at Radio Shack. The 2 AA powers the unit fine but I prefer the 4 AA unit as it has a built in power switch. I plan on running the power wire down inside my shirt and keeping the battery pack in my pocket. This way, I can just turn it on or off from the pocket.

If I'm understanding it correctly, if we follow TC's instructions, we're wiring the LED's in Parallel, so the 3V output from the two AA batteries will power them all. If I use 4 AA's, then I'm effectively throwing 6V at them which will also work, but burn out the 3.2-3.6v LED's. If my wild assed assumptions are correct, then I'll have to throw a resistor in there somewhere correct?

Thanks! So far, I'm loving this build. It's super quick and easy. The only thing I have left to do is the wire wrapping which is going to drive me nuts since I'm a perfectionist, and figuring out how to "wear" it.
 
Thanks I came up with another solution though. I modded the quad holder so it would run off of two AA's and will use the other two battery spots to carry spares ;)

Also, wire winding tip!

I wound off a bunch of the red wire onto a sewing machine bobbin. Those are the perfect size for holding enough wire to wrap the transformers and will pass through the center hole with tons of space to spare. I'd recommend 150-200 revolutions around the bobbin. I did 120 and came up two transformers short and had to splice in another length of wire to complete them.
 
So, electronics question here...

I'm a total novice at this (IE, I know which end of the soldering iron to hold and can tin and solder wires pretty well). I snagged a 2 AA and a 4 AA battery holder at Radio Shack. The 2 AA powers the unit fine but I prefer the 4 AA unit as it has a built in power switch. I plan on running the power wire down inside my shirt and keeping the battery pack in my pocket. This way, I can just turn it on or off from the pocket.

If I'm understanding it correctly, if we follow TC's instructions, we're wiring the LED's in Parallel, so the 3V output from the two AA batteries will power them all. If I use 4 AA's, then I'm effectively throwing 6V at them which will also work, but burn out the 3.2-3.6v LED's. If my wild assed assumptions are correct, then I'll have to throw a resistor in there somewhere correct?

Thanks! So far, I'm loving this build. It's super quick and easy. The only thing I have left to do is the wire wrapping which is going to drive me nuts since I'm a perfectionist, and figuring out how to "wear" it.

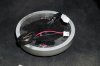
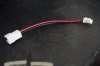
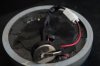
i used a cr2032 battery for my power source. i used some solderless led plugs so i can plug and unplug the battery as i please.
1391447_10103626129983293_1301513305_n.jpg

1385221_10103626130128003_1168152967_n.jpg

1383519_10103626130242773_1837880326_n.jpg
 

Attachments

  • 1391447_10103626129983293_1301513305_n.jpg
    1391447_10103626129983293_1301513305_n.jpg
    87.6 KB · Views: 203
  • 1385221_10103626130128003_1168152967_n.jpg
    1385221_10103626130128003_1168152967_n.jpg
    69.6 KB · Views: 196
  • 1383519_10103626130242773_1837880326_n.jpg
    1383519_10103626130242773_1837880326_n.jpg
    39.6 KB · Views: 189
Back
Top