Iron Man Mark IV Stand-in design for ASOE project: Torso build 26 gauge steel

ASOEdevo

Active Member
Hi all,

I stumbled across this site while doing research for a project of mine and found it incredibly helpful...

Progress has been delightfully quick, so I'm starting this thread to share some ideas

* if you decide to attempt this DON'T FORGET THE GLOVES! ... and band-aids *

I will eventually go back and post some behind-the-scenes pics/videos how I got to this point

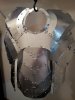
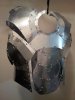
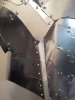
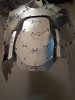
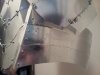
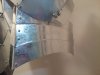
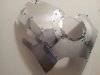
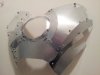
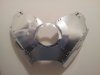
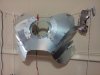
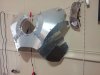
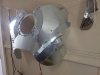
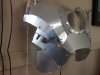
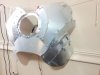
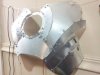
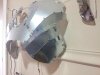
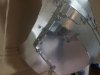
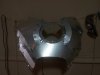
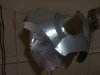
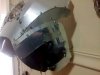
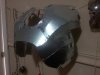
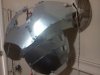
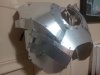
I used the Iron Man Mark4/6 MOD template by Robo3867 floating around out there... solved the issue of "phantom parts" by zooming way out on the 2-D menu... don't bother moving them in this program: download the free Pepakura Designer and drag em over that way... good luck with part identification (tip: you'll need to have the file open in both programs at once)
 

Attachments

  • 20131119_201256.jpg
    20131119_201256.jpg
    66.8 KB · Views: 358
  • 20131119_201304.jpg
    20131119_201304.jpg
    68.3 KB · Views: 368
  • 20131119_201318.jpg
    20131119_201318.jpg
    65.4 KB · Views: 340
  • 20131119_235229.jpg
    20131119_235229.jpg
    77.6 KB · Views: 327
  • 20131120_003709.jpg
    20131120_003709.jpg
    77.4 KB · Views: 331
  • 20131120_003714.jpg
    20131120_003714.jpg
    80 KB · Views: 414
  • 20131120_003725.jpg
    20131120_003725.jpg
    74.4 KB · Views: 317
  • 20131120_160218.jpg
    20131120_160218.jpg
    72.9 KB · Views: 310
  • 20131120_160240.jpg
    20131120_160240.jpg
    75.7 KB · Views: 307
  • 20131120_181640.jpg
    20131120_181640.jpg
    76.7 KB · Views: 326
  • 20131120_181713.jpg
    20131120_181713.jpg
    79.3 KB · Views: 309
  • 20131120_181731.jpg
    20131120_181731.jpg
    85.7 KB · Views: 319
  • 20131120_181756.jpg
    20131120_181756.jpg
    82.2 KB · Views: 296
  • 20131120_181814.jpg
    20131120_181814.jpg
    85.3 KB · Views: 317
  • 20131120_181826.jpg
    20131120_181826.jpg
    84.8 KB · Views: 304
  • 20131120_220307.jpg
    20131120_220307.jpg
    78.7 KB · Views: 299
  • 20131121_170338.jpg
    20131121_170338.jpg
    73.4 KB · Views: 303
  • 20131121_170404.jpg
    20131121_170404.jpg
    60.9 KB · Views: 313
  • 20131121_170415.jpg
    20131121_170415.jpg
    61.6 KB · Views: 291
  • 20131121_181444.jpg
    20131121_181444.jpg
    80.8 KB · Views: 309
  • 20131121_181535.jpg
    20131121_181535.jpg
    71 KB · Views: 301
  • 20131121_181615.jpg
    20131121_181615.jpg
    80.9 KB · Views: 323
  • 20131121_181653.jpg
    20131121_181653.jpg
    75.3 KB · Views: 346
  • 20131121_192650.jpg
    20131121_192650.jpg
    3.3 MB · Views: 336
Last edited:
Did the Abs today... After a good night's sleep, I came up with a much cleaner attachment method; can't believe I didn't think of this before.

20131123_030518.jpg20131123_030524.jpg20131123_030534.jpg20131123_030544.jpg20131123_030605.jpg
 
20131124_021259.jpg20131124_021347.jpg20131124_021359.jpg20131124_021410.jpg20131124_021430.jpg20131124_021520.jpg20131124_021614.jpg

Finished the obliques tonight... came up with another way to clean up the part junctions, much easier. Also, it's probably a good time to mention that this build ifs chocked full of mods; I've begun to combine many of the adjacent parts to use bends/breaks to simulate the original template. I'm also improvising all the attachment plates (not visible) by sketching them against the suit with while the parts are taped in place.

In this picture, the obliques are just attached through some existing holes (for storage) and I taped them into place for the photos.

Should be finished with the back portion by tomorrow night.

thanks, joberg
 

Attachments

  • 20131124_021259.jpg
    20131124_021259.jpg
    2.8 MB · Views: 274
  • 20131124_021347.jpg
    20131124_021347.jpg
    2.7 MB · Views: 269
  • 20131124_021359.jpg
    20131124_021359.jpg
    2.9 MB · Views: 267
  • 20131124_021410.jpg
    20131124_021410.jpg
    2.5 MB · Views: 257
  • 20131124_021430.jpg
    20131124_021430.jpg
    2.9 MB · Views: 267
  • 20131124_021520.jpg
    20131124_021520.jpg
    2.8 MB · Views: 251
  • 20131124_021614.jpg
    20131124_021614.jpg
    2.7 MB · Views: 243
***UPDATED MOVIE CLIP*** Teaser trailer for the hybrid build

Watch the open/close sequence mash-up here:
https://www.youtube.com/watch?v=OwbNWqcBcQY


Watch the cheesy teaser trailer if you want...
https://www.youtube.com/watch?v=JTysD55u2H8

the roman cover image.jpg

A little preview of where this is going...

*disclaimer 1* I'm aware of how cheesy the teaser trailer video is... but I had so much fun playing with windows movie maker for the first time

*disclaimer 2* Three months ago I had never heard of a Servo and I didn't own a pair of tin snips. I watched Iron Man for the probably the 300th time, looked over at my wife and said, "that's it, I'm doing it!" I went to the local Goodwill and bought all the remote control cars they had so I could figure out how this stuff works... then I went to ACE and Lowes and bought a bunch of hardware and got to work... This has BY FAR been the most fun I've ever had doing anything and I've learned SO much over the last 90 days that I feel like my head is about to explode, so here it is... my first working prototype for the forearm rockets. I can't wait to finish the torso and get back to fine tuning this model and engineering the mechanical / electrical for all the other systems.
 
Last edited:
Very nice, keep up the great work and keep up posted!
Until I start something of my own I have to live vicariously through the RPF members!
 
great build !
haven't you thought of using other way to connect pieces ? like pop rivets or even soldering to weld the pieces together ?!
good luck !
 
thanks!

yes, I plan to rivet them together until I can afford a welder (I made sure to get weldable material)... it's my first build and first time working with metal like this so I took the quick/easy route this go around and screwed 'em together... but I do have a shiny new Pop Rivet tool that I'm looking forward to trying out!
 
and by the way... amazing work on the MK VII files, your work has been very beneficial during all my research for this project, THANKS omarbou1
 
I hope you Galvanized that metal.

It's gonna suck to see such an awesome job all RUSTED out in the end. :cry

... I watched Iron Man for the probably the 300th time, looked over at my wife and said, "that's it, I'm doing it!"

Hey, Everyone needs a Hobby, and In My Opinion, you picked the Best One Out There.

Nice job.
 
It sure looks like fun...keep up the good work and eager to see what that rivet machine is going to achieve in terms of look:cool
 
and by the way... amazing work on the MK VII files, your work has been very beneficial during all my research for this project, THANKS omarbou1

that's great ! that metal armor is going to look even more awesome using the pop rivet and a welder !
thank you man ! im honored i've been usefull to your build !! i've studied alot how the suit works (not just the mark 7 ;)) so i'd be glad to help again if you need !
 
hmmm, good point... the steel is zinc plated, which can be pretty decent for rust protection. I've also used 4-5 coats of auto body primer on some other pieces to form an extra layer of protection. Just out of curiosity, I threw some scrap pieces out on the back patio after I read your comment to see how long it holds up. I will post an update later.

thanks for pointing that out
 
Well, I never did finish the back of the rib cage, I've just got a few parts to go though...
20131126_231955.jpg

I got anxious about starting the back - it looked much more complicated than the front... and it was.

Very slow progress in comparison, many more connections (I'm really wishing I had a welder about now).

Anyway, I stuck to the model as much as the metal would allow and then widened the shoulder harness so it would be large enough to house the heavier equipment.

20131130_020347.jpgthis ones.jpg
 
my next few steps:
20131201_230904.jpg20131201_230928.jpg20131201_230940.jpg20131201_235531.jpg

because I was working with metal, both sides required this tiny little part that foam builds probably can do without - loads of fun connecting this.
20131201_012625.jpg


Oh yeah, it stands on it's own now, thank goodness.
20131202_005559.jpg20131202_005616.jpg20131202_005625.jpg20131202_005633.jpg

Matched the over-sized shoulder harness / hardware cover and here it is (well, about 90% of it anyway). I still have to mod some parts to complete the shoulder enclosures and extend the straps on down the chest but you get the idea.

I made my own version of the shoulder indention out of a separate triangle that I folded in half (I got the one on the left correct. I need to redo the one on the right to match.
20131202_020105.jpg20131202_020128.jpg20131202_020138.jpg20131202_020411.jpg20131202_020422.jpg

It fits great and still very light.
 
Back
Top