Indiana Jones Voodoo Doll - Tutorial - FINISHED !

Alan Castillo

Master Member
RPF PREMIUM MEMBER
OK folks, I know some of you have been waiting for eons for me to do this.

I woke up full of enthusiasm this morning, and decided that I am going to start doing it.

Disclaimer : This will take time.

I have as yet to finish my prop room revamp, clear my 'work bench', dig the materials out of a box in the garage etc. Even then, this will not take a day or two to finish, as you will see, these are a MAJOR pain in the derriere to make.

To prove the point, I don't have one for myself at the moment, and haven't for almost 2 years.

Rather than make one, I had asked Relicmaker to make one for me, and he flatly turned me down (clever man) :lol

Also, since its been so long, bare with me eventually while I muddle through one and remember the exact details.

This OP is so that those who are interested in this can subscribe to this thread & be advised when there are updates.

I intend to start within the next 2 weeks, so stay tuned.
 
Last edited:
Re: Indiana Jones Voodoo Doll - Tutorial

This will only be a tutorial. I do not intend to make more than one, and I will keep it for myself.
 
Re: Indiana Jones Voodoo Doll - Tutorial - PAGING TAZVADER

This is a bump for TazVader, and here is a pair of spectacles as a gift

_O-O_


IndyTaz said:
well.....we'll have to keep bumping this thread till someone caves in and makes a tutorial lol

best
Taz

oh and BUMP


I caved in already mate !

:lol :lol :lol


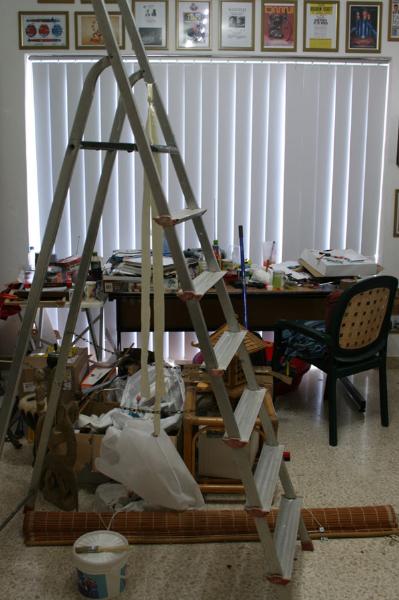
Here, just to show you I'm not kidding or procrastinating, I am almost finished with the prop room revamp ..... and will start clearing this tomorrow. See the thing that looks like a big desk ? Well that's my 'work bench' and I still have to dig it out first :lol :lol :lol


vdt3-399x600.jpg
 
Last edited:
Re: Indiana Jones Voodoo Doll - Tutorial - TAZVADER TO RECEPTION DESK PLEASE

woah...ask and ye shall recieve huh? Thanks for the glasses and "THREAD SUBSCRIBED," lol

best
Taz
 
Re: Indiana Jones Voodoo Doll - Tutorial

Oh yes, you remember very correctly !

Now you've gone and made me all nostalgic :lol

I used to make the Voodoo Dolls, 6 versions of Grails, and the Grail Knight Painting.

I only made stuff and sold them for a year or so. (and less than 20 Dolls in that time)

It started off as a way to pass the time, and when people started asking me to make more for them, I got hyper-excited and went off on a tangent making stuff :lol

I never had any dead-lines, time limits or anything of the sort. I used to make them at my leisure and at my own pace. It was fun.

Then it started to get 'bad', as I ended up having people emailing me and 'insisting' I make stuff for them, sometimes even falling to 'insults', as if they were dealing with a businessman / shop.

So come a point, I said to hell with it, and stopped everything, as it was no fun any more.

It was never about money, as I used to put what I finished on eBay at a VERY low starting price, and if they sold, cool, if not, cool as well.

In fact, what I didn't sell, I used to give away to friends of mine, so that I would have to make another one :lol I would never try to resell the same item.

Anywho, yes, I used to make stuff.

Here are some pics of what I used to make :)

I hope that when this tutorial is done, anyone can make a Voodoo Doll like this.

The 6 Grails I used to make are 'inspired' on several Grails, which are shown in the pics below, following each one I made.

IMG_3520-253x600.jpg


IMG_3530-253x600.jpg


IMG_3525-513x600.jpg


IMG_3537-592x600.jpg


IMG_3541-600x456.jpg


vdb-600x399.png


vdc-600x572.png


gv1-552x600.png


gv1sg-600x347.png


gv2-600x399.png


v2sg.jpg


gv3-600x554.png


gv3sg-495x540.png


gv4-584x600.png


gv4sg-438x600.png


gv5-525x600.png


v5sg.jpg


gv6-600x520.png


gv6sg-450x600.png


gnp-600x504.png


IMG_3484-500x600.jpg


IMG_3508-600x379.jpg
 
Last edited:
Re: Indiana Jones Voodoo Doll - Tutorial - Update - 22 April

OK. So the prop room clearing has improved ...... somewhat :confused


vdt5-600x399.jpg


But look what I found in the garage today :love


vdt4-600x551.jpg


Should clear & dig out that desk early next week, and I'll start.
 
Last edited:
Re: Indiana Jones Voodoo Doll - Tutorial - Update - 22 April

well we are getting closer and it is looking promising lol

Best
TAZ
 
Re: Indiana Jones Voodoo Doll - Tutorial - Update - 22 April

Oh yeah, I have one of your grails, and I love it... As I want to buy a doll you said that youre not making em anymore... So I've bought one from ebay later... Nice, too, but I think yours is a little bit closer...
 
Re: Indiana Jones Voodoo Doll - Tutorial - Update - 23 April

Before I start, let me say that whatever I say or do from here on, is by no means the only way to do this of course.

You can vary anything whatsoever at any point. This is just what I use, the way I do it, etc, and what I am comfortable with.

Anyway, the desk isn’t going to get any better than this, so let’s go through the list of ‘hardware’ you will need first.


vdt6-985x667.jpg


Top to bottom, left to right (ish).


-Small saw
-Small ruler
-Pencil
-Pen
-Thick permanent marker. Black.
-Thin marker. Black.
-2 safety pins
-Needles (20 or so)
-Sewing needle or 2.
-Balsa wood glue.
-Selotape
-Wood varnish – Walnut
-Matt Coat varnish
-Two brushes.
-Good pair of scissors
-Good hobby knife, with an extra blade.
-Tweezers
-Sandpaper. 80, 220 and 1000 grain
-Elastoplast. (aka bandaid for my friends across the pond). Don’t laugh. You’ll need it. (Anti-blister, and anti-blood. Yup, if you don’t bleed at least once, you’re not doing it right :lol)


Next Post will be the materials.

In the meantime, go raid the wife’s sewing box :lol


And for reference purposes, this is the front and back of the screen-used original.


combi-551x674.jpg
 
Last edited:
Re: Indiana Jones Voodoo Doll - Tutorial - Update - 23 April

Before the materials, I forgot one little thing in the 'hardware'.

3 nails, like so


vdt7a.jpg


They don't have to be of any particular size, so long as one of the tips is very small & sharp, and the other 2 are not round.


vdt7b.jpg


For reference, the small nail is around 1.5cms long.


Materials


vdt7c-982x697.jpg


Top to bottom, left to right.


Note : The materials I will use, are what I have chosen. They are not screen-accurate, as I allow myself plenty of licence to make this 'my style' and unique. To me, so long as the finished product instantly tells me where this replica is from, I'm A-OK with it :)


With regards to the 'cloth' materials, you don't need much at all. No material shop will probably sell you less than half a meter, and that's alot for this.


Off-white linen for the body, with matching thread.

A rough material for the trousers, with matching thread. (For screen accurate, you need a canvasy suade)

For the jacket and belt, leather, with matching thread. This is pseudo-leather. For screen-accurate, buy real leather.

Stuffing for the body. I use the lining they sell for pillows and quilts. It is sturdy, yet soft, so when the doll is ready, he will keep his shape and still be squishable.

For the hair - Plumber's thread, aka Hemp. (The 'old' straw-type material they use to wrap around socket-joints to prevent leaks before tightening.)

Cord for the whip. I use a nylon one. For screen-accurate, its a strip of leather.

A strip of Balsa Wood. 10cms X 3cms. You won't need much, so 30cms length will be OK. I bought this from my hobby shop. It's used to make model aeroplanes. They sell it in 1 meter strips. For screen accurate, however, use a block of solid wood. I just find balsa so soft and easy to manage, cut & shape.

And if I make a mistake, I don't say so many naughty words. It's 10 times tougher and more laborious to use a block of wood. A mistake there will have you seething due to the amount of time and effort taken. Doing it in Balsa is as easy and fast as peeling an apple :)
 
Last edited:
Re: Indiana Jones Voodoo Doll - Tutorial - Update - 23 April - 2

Looking forward to this. I bought cloth to make one ages ago, and got hung up on the wooden part. I went to a nearby home improvement chain, looking for a block of pine, which was suggested in another thread. I ended up with a large wooden sphere and pyramid, like you use to top a fencepost. When I brought them home, I realized there were long screws in the bottom, and I don't know if I'll be able to pull them out. I still might use them, just for trial and error's sake, but I think I'll be using the balsa wood suggestion when I do this for real.
Is there any chance you could just post the measurements for the wooden parts, so I know if the pieces I have are even close?
 
Re: Indiana Jones Voodoo Doll - Tutorial - Update - 23 April - 2

I don't have the measurements right now at this very moment, but when I start, I will be posting exact measurements, patterns, scales, etc. No worries :)

For the time being, if you calculate that for balsa you need 10X3X30cms, you're fine with any material.
 
Re: Indiana Jones Voodoo Doll - Tutorial

Lets start with the main body.


Save this pattern to your desktop. Re-size till the vertical where the distance between the top and bottom horizontal lines is 24.75cms. It will fit on an A4 paper. (Where the vertical 'leg split' ends, is where the thick line ends).


body-491x953.jpg


1 – Cut out a piece of material for the body, a little larger than a side-by-side double A4 size.


bd1-600x399.jpg


2 – Fold half the material over the pattern.


bd2-600x399.jpg


3 – Trace out the pattern on the material with the black pen.


bd3-600x399.jpg


4 – Remove the sheet. Insert pins roughly as shown here. It is important to do both sides of the arms and legs, not a single line down the middle.


bd4-600x399.jpg


5 – Cut the vertical left side of the previously overlapped material.


bd5-600x399.jpg


6 – Cut out the body. Not the legs yet, or you won’t be able to fully control the main body while cutting it out. (well you can, but it’ll be a major pain :lol)


bd6-600x399.jpg


7 – THEN cut the legs open.


bd7-600x399.jpg


8 – Sew the outer edge of the body, around 2mm from the edge. Use the out and in method, not the over and under. ie, the stitches have to grasp the outside. For sturdiness.


bd8-600x399.jpg


9 – As you sew along, remove the pins one at a time, to the distance you reach.


bd9-600x399.jpg


10 - Make a special emphasis on doing double stitching on the crotch and armpits (ie go back and forth twice over the same place). These are the weakest points …. even for a doll


bd10-600x399.jpg


11 - When stitching the edges of the hands and the feet, don’t be too precise in following the curve. Remember, this is a rough voodoo doll, not a Pierre Cardin mannequin.


bd11-600x399.jpg


12 – Once ready, it should look like this. Needless to say, do not sew the neck. Stop on both sides towards the top, approximately at the vertical level of the armpits.


bd12-398x600.jpg


13 - Start inverting the body inside-out. This is just the torso.


bd13-600x399.jpg


14 - Extract the arms and legs with the tweezers. Gently.


bd14-600x399.jpg


15 - Et voila. It should now look like it needs to pee.


bd15-398x600.jpg


16 - While its need to pee worsens, lay out the stuffing material. This material I use is thick, so I split it in two sheets.


bd16-600x399.jpg


17 - Now it REALLY needs to go. So lets hurry up and cut out strips roughly as shown. This is for the legs.


bd17-600x399.jpg


18 - Fold a part horizontally on itself.


bd18-600x399.jpg


19 - Then vertically.


bd19-600x399.jpg


20 - Place the centre of the folded stuffing around the tip of a piece of wood or something. In this case, a paintbrush bottom. A chopstick will do just as fine, which is what I used to use, but I can't find it :lol.


bd20-600x476.jpg


21 - Insert it into the body.


bd21-600x399.jpg


22 - Push it right down to the bottom of the leg. Push gently, and compact it with the tip of wood till it is neither too compact, nor loose. ‘Springy’ I would call it.


bd22-600x399.jpg


23 - That one piece used filled this amount of leg. For guidance.


bd23-600x399.jpg


24 - Repeat the above till both legs are filled, and reach a level ABOVE the legs. Till so. This is all leg stuffing, so there is an empty space from the crotch area till this level.


bd24-600x399.jpg


25 - Now the torso. Cut strips as shown, wider than the leg ones. Then cut in half.


bd25-600x399.jpg


26 - Fold over itself horizontally, once. No vertical fold this time.


bd26-600x399.jpg


27 - As before, place on the stick.


bd27-600x399.jpg


28 - When inserted and compacted, it should look like this on the inside. The irregular shape is important, as it will give it that rough artisan look, not Gucci.


bd28-600x399.jpg


29 - Continue till you fill the belly and chest till you reach ABOVE the armpits.


bd29-600x399.jpg


30 - THEN fill the arms, just as we did for the legs.


bd30-600x399.jpg


31 - Continue filling the top part of the torso till the neck. Put the neck-pin back in place ..... and now he can go and pee.

bd31-462x600.jpg


Next step – Trousers. Sometime next week :)

Happy crafting :thumbsup


Feel free to ask anything you wish.
 
Last edited:
Re: Indiana Jones Voodoo Doll - Tutorial - Update - 24 April -The Body

That's great Alan! I'll continue my translation for my board ;)
 
Re: Indiana Jones Voodoo Doll - Tutorial - Update - 24 April -The Body

Hey pal, so that's how you did it!!! I have two of Alans Voodoo dolls. One I boutht on Ebay and one that he tossed in when I bought one of his Voodoo pins. Both are very cool.

I've said it many, many times... Alan is a very talanted guy and he loves to show how he creates these little masterpieces.

Mike
 
Last edited:
Re: Indiana Jones Voodoo Doll - Tutorial - Update - 24 April -The Body

Great tutorial thanks for sharing, as I go to raid my wife's sewing basket..
 
This thread is more than 3 years old.

Your message may be considered spam for the following reasons:

  1. This thread hasn't been active in some time. A new post in this thread might not contribute constructively to this discussion after so long.
If you wish to reply despite these issues, check the box below before replying.
Be aware that malicious compliance may result in more severe penalties.
Back
Top