I ROBOT Spooner ID and Badge

Yeah, sorry, spine of the case. I want something durable and an easy way to attach. I think normaly it would just be the whole outer cover of the case, but I don't want to add any thickness to the badge and I will also need to leave access to the batteries.

Also fixed the video, so it should work fine now.
 
<div class='quotetop'>(Jmtwo @ Aug 19 2006, 03:29 PM) [snapback]1303402[/snapback]</div>
I want something durable and an easy way to attach. I think normaly it would just be the whole outer cover of the case, but I don't want to add any thickness to the badge and I will also need to leave access to the batteries.[/b]
Is the case a solid piece of Kydex, or did you build it up in layers? If it's layers, would there by any way to sandwich a rectangle of material between the layers along the sides of the two halves of the case in order to create a spine? Then you'd still be able to access the battery panel easily.

How was the original case constructed? Did it allow for replacement of the batteries? Are you going for screen-accurate or idealized?

<div class='quotetop'>(Jmtwo @ Aug 19 2006, 03:29 PM) [snapback]1303402[/snapback]</div>
Also fixed the video, so it should work fine now.[/b]
It works.

Man, that's way too cool. It looks GREAT. :D

Will you be able to configure the power switch so that it works more easily? It looked as if you had a little trouble turning it on (though no trouble turning it off).

Very nice work, Jmtwo. :thumbsup
 
It's sweet to see this topic is alive and kicking. Great work. I've been watching this one eargerly for a while. Look forward to more info.

-Cory
 
That looks stunning. My wife attempted this a couple of years ago, not accurate, but fun:

irobotill.jpg


irobotill3.jpg


By the way this isn't intended to be a hi-jack, I would be interested in the version you're making when complete. :D
 
I thought there was some EL like material you could cut to size? I think that would work really well vs LEDs.

Looks great though.

-Deric
 
<div class='quotetop'>(irishjedi @ Mar 16 2006, 12:24 PM) [snapback]1207135[/snapback]</div>
Maybe these are helpful - I took them at a recent meseum prop display (iRobot was heavily featured):

IMG_0327.jpg


Enjoy.
Todd
[/b]

I'm trying to make out the pattern on the hologram. I can't decide if it is a random pattern or possibly has some lettering in there as well. Anybody got any ideas?
 
The ID is getting there (except for the off-center chip on the hologram).

holo01in3.jpg

holo02xh0.jpg


The badge is almost there too. Now has the correct look when powered off and the lettering is placed better and cleaner. Just a few more tweaks and it should be done also.

nbadge01wi6.jpg


I have also transfered the batteries into the ID side of the case, but I am still having trouble thinning the badge side out. As suggested by Deric, I have an EL sheet I pulled from a nightlight awhile ago, but I have no idea how to power it.

el01rg0.jpg


The two tabs on the sheet hooked directly to the plug and then straight into the wall when it was a nightlight, but I need to know if I can power it with the three LR44 button cells I currently have set up. The only markings on the EL sheet are H3200G on the back and 743 and 33 on the front. I would like to integrate the EL sheet into my current setup in place of the LED.

If anyone has thoughts on this, it would be most helpful.
 
temponaut, thanks for the links. I'm quickly getting the idea that the inverters for most of the EL is going to make them impractical for this project.
 
JM2 that looks awesome.

are your leds behind the badge? I was thinking that the badge might have some recesses where the LEDs fit in, at least in the some of the screen caps they look very distinct and separate.

have you though about binding cardstock with leather for the spine and cover of the wallet? it would also give you the chance to replicate the wires running accross the spine. seems like most of the structure for the wallet comes from the plastic recesses so you can get away with a thin leather cover.

and where do you get the plastic stuff (kydex?) did you free hand all those cuts?
 
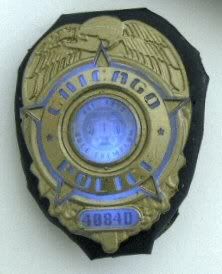
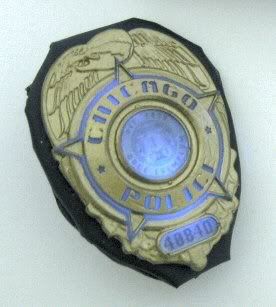
Thanks for all the input. I think for the lighting I will get some 3mm LEDs and spread them around the badge. While the 5mm works great, it's a little too large and multiple 3mm will probably be more screen accurate. The surface mount LEDs would fit well, but I think they would create a hotspot problem since they would have to be oriented straight up. So we'll see how the 3mm work out.

I like the idea of the cardstock\leather for the spine. Just have to find something that matches the texture of the case. Also, this will be a somewhat "idealized" version, since most of the screen-used pieces I have seen have the battery pack visible in some form. I want this to look like a "production" piece that could be used.

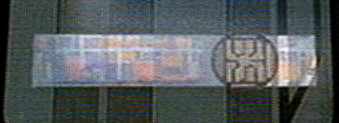
All the parts are scratchbuilt. The badge is cnc machined and then cast in clear, the ID is lasercut plex, holofilm, and photo-prints with a silkscreen. The case is lasercut plex and ABS, and the light and switch came from a nifty little booklight.
 
<div class='quotetop'>(temponaut @ Sep 11 2006, 11:35 AM) [snapback]1317869[/snapback]</div>
Jonesing for a Spooner badge fix. Anything shakin' here? B)
[/b]


Gettin' there. I've got both halves of the case down to .47" thick which seems to be in line with the screen-used. But I just found a new light source that might allow me to thin it more, so I am messing with that right now. You can see the new thinner case in front of the old case below.

irb08cv3.jpg


I'm also messing with a display plaque. The one shown here was done quickly on painted plex and engraved way too deep, but gets the general idea across.

irb09yi4.jpg


I should have the correct brushed silver plaque material in hand sometime this week to produce a good plaque.
 
Beautiful progress, Jmtwo. Great shot of the two cases together. Excellent work on getting the case slimmed down like that. Looking forward to more developments.

Thanks for coming through with my fix. I feel much better now. :p
 
SWEET. It is nice to see the thickness reduced... that is really starting to look awesome.

Keep up the great work on this. :)

-Bryan
 
Agreed. That is awesome layered on cool, with some neato frosting slathered all over it.

Damn, I must be hungry . . .

Whatever, it's fine work, and I love seeing these pics. Do you have any more progress/building pics you care to share with us? I'm a big fan of that stuff too. :thumbsup

Njc---------------------------
 
The only thing that stands out to me on your replica ID, is that the text isn't justfied. It should all line up on the left. Other than that: WOW. Nice work.

Chris
 
This thread is more than 7 years old.

Your message may be considered spam for the following reasons:

  1. This thread hasn't been active in some time. A new post in this thread might not contribute constructively to this discussion after so long.
If you wish to reply despite these issues, check the box below before replying.
Be aware that malicious compliance may result in more severe penalties.
Back
Top