Hunk a Junk's Mando N-1 Hasbro toy conversion build log

I'm considering it. The digital models are embarrassingly easy though. It's just combining basic shapes and stretching/squashing them until they're in the right position. And Tinkercad is free. Always in motion is the future...
Thanks for the response... Other than SketchUp which I use a lot for work, my limited foray into 3D modeling for print is in Fusion 360. I haven't tried Tinker Cad but maybe I should.
"We will watch your "progress" with great interest..."

Cheers!
 
Tinkercad is so basic I imagine Nelson Muntz mocking me for using it. But hey, it works.
Screen Shot 2022-03-22 at 4.12.30 PM.png
 
Started working on the cockpit. The flight displays will be lit. I need to change out the FEP on my printer so I can start getting these in physical form. The Mars won't be able to print most of the smaller detail, but I'm putting it in there in the hopes I'll get lucky on some of it.
Screen Shot 2022-03-23 at 12.20.40 PM.png
Screen Shot 2022-03-23 at 12.21.27 PM.png


Thanks for looking!
 
Great work, I'm amazed at your 3d modeling, despite your own self described deficiencies. I've been trying to learn Blender for 3d modeling but I've mostly used it for sculpting. I haven't gotten the hang of being able to model inorganic objects - seems like it never works exactly the way I want it to, so I ebd up spending way too much time and getting frustrated. I looked at CAD programs and thought Tinkercad would be too basic to make complex objects, but you're proving me wrong! I wouldn't worry about what people think - it's the results that matter. I've had various PC programs over the years where I would use older, less-featured ones rather than the "better" or more "professional" ones simply because I could make them do what I wanted to more quickly.

And you mentioned that the smaller details of your cockpit model possibly not showing up - I agree that you should still put those details in. Even if they don't show on your printers, there's always the option of using higher resolution printers - you might decide to upgrade or send them to shapeways in the future. Plus, you may decide you want to do a larger scale print in the future, so those extra details would be worth having.

I don't know if you need any tips on 3d printing, especially because I'm not the most experienced either, but for the filament prints, you may want to enlarge the models slightly and exaggerate some of the details to accommodate for the loss of details when sanding. I also found that skimming/filling the layer lines can help eliminate the need to sand those layer lines all the way down to their lowest point. I mostly used Tamaya white, but I actually used White Out to some success as well. It brushes on, dries quick, and seems to take paint and primer well.
 
Good tips on the printing. I have some new resin and FEP shipping in so I should be able to do some test prints soon. If the details I want to see are too small, I'll bump up the size for the final print. Right now I'm trying to be as accurate as possible to the reference photos.

I did some more work on the open engine compartment where the 'engine thingy' will be mounted. I'll be adding some greeblie detail to the bottom section underneath the trapezoid panels. I'm designing the pieces to fit together like a kit. We'll see if it works. It would be great if I could do some of these details, like the panels, in photoetched brass, but that's a technology outside my skill set (for now).
Screen Shot 2022-03-24 at 12.10.10 PM.png
Screen Shot 2022-03-24 at 1.27.45 PM.png
Screen Shot 2022-03-24 at 1.27.59 PM.png
Screen Shot 2022-03-24 at 1.28.39 PM.png


Thanks for looking!
 
New bottle of goo! After work I'm changing out my printer FEP and then I'll have some test prints to show this weekend. I've noticed that as I get to the end of a bottle of resin that my print fail rate increases significantly. Hopefully a nice fresh bottle and a nicely lubed FEP (that's what she said) will yield some crisp test prints. Fingers crossed.
IMG_0467.jpg
 
Added greeblie detail to the bottom compartment. It's my first real attempt at digital scratch building. I took a cue from one of the photos in Moffeaton's probe droid thread showing an internal mechanical device. It helps the realism if the greeblie has some unique functionality pieces to make it look like a specific device rather than just random shapes stuck in there. I tried to create, for example, a space transmission case. I'm anxious to see the print.
Screen Shot 2022-03-25 at 3.26.39 PM.png
Screen Shot 2022-03-25 at 3.27.03 PM.png
Screen Shot 2022-03-25 at 3.27.44 PM.png
Screen Shot 2022-03-25 at 3.28.04 PM.png


Thanks for looking!
 
I love it. Adds a lot of depth and purpose to the part.

Great job! I can’t wait to see the print either!
 
Thanks for that, LadyFerry! Yep, I tacked that photo up on the wall for reference.

Spent the entire day yesterday working on prints. During down time I continued working on the cockpit. Since there are some major differences between the Ep.1 cockpit and the Mando version, I decided I'll do a full replacement including a section of the external hull. Hopefully it will be simpler. Here's where I'm at:
Screen Shot 2022-03-27 at 5.32.46 PM.png
Screen Shot 2022-03-27 at 5.32.19 PM.png
Screen Shot 2022-03-27 at 5.33.19 PM.png


On to the prints. I had several failures. I changed my FEP, re-positioned the models. Very frustrating. Finally thickened the models slightly and that did the trick. Here was the final digital file:
Screen Shot 2022-03-27 at 1.18.54 PM.png


And this is the print:
IMG_0477.jpg
IMG_0483.jpg
IMG_0481.jpg


There are some layer lines, but overall I'm really happy. Most of this will be partially hidden below the the screen piece above it. A shot of Tamiya black, some dry brushing and it'll be good to go.

And here is it in place on the hull. I'm REALLY happy that my 'measure 800 times, print once' approach worked because it fits like a glove!
IMG_0489.jpg
IMG_0487.jpg
IMG_0493.jpg


I'm printing the Turbonic Venturi Power Assimilator (i.e. the "Hood engine thingy") right now, so I'll update tonight as soon as it finishes.

Thanks for looking!
 
A larger and more detailed look:
View attachment 1560244
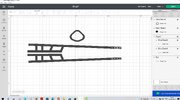
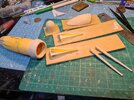
Hi friend ,I'm based in the UK and making one of these as well but I'm not that good with CAD and have no resin printer, so I'm doing it the old 'analogue' way of scratch building, vacforming etc. I can stretch as far as a Cricut cutter to make some parts. attached photos of tail spar cutting and cockpit light test
 

Attachments

  • tail componants.JPG
    tail componants.JPG
    154.8 KB · Views: 142
  • 20220315_172820.jpg
    20220315_172820.jpg
    2.6 MB · Views: 161
Hi friend ,I'm based in the UK and making one of these as well but I'm not that good with CAD and have no resin printer, so I'm doing it the old 'analogue' way of scratch building, vacforming etc. I can stretch as far as a Cricut cutter to make some parts. attached photos of tail spar cutting and cockpit light test

Oooooh! That looks great! How is it using the Cricut cuter? What materials can it cut and how thick? What kind of vacforming machine do you use? I'm beginning to suspect I need to replace the canopy bubble that came with the toy since it's a very different shape than the real one, but I would need to vacuform it -- and that's something I don't have.
 
Oooooh! That looks great! How is it using the Cricut cuter? What materials can it cut and how thick? What kind of vacforming machine do you use? I'm beginning to suspect I need to replace the canopy bubble that came with the toy since it's a very different shape than the real one, but I would need to vacuform it -- and that's something I don't have.
Hi, The cutter cuts styrene easy ,which is the main material I used for the the exposed ribs, I'd say it cuts anything up 1mm or so any thicker and you can finish off with a xato. Theres a bit of trial and error built into using a cutter but it saves time. The toy's canopy is to big and is quite thick, so I made a Vacform buck for it and also one for Grogu's bubble.
I made my own vacform box, its not that hard if you have time and you can use your oven or grill to heat the plastic. I'm using clear acetate.
 

Attachments

  • vacform bucks.jpg
    vacform bucks.jpg
    2.9 MB · Views: 143
Let me know what brand of cutter you use. I'll have to start some research into maybe getting one. I'd love to see your DIY vacform rig if you have a shot.
 
Back
Top