You are using an out of date browser. It may not display this or other websites correctly.
You should upgrade or use an alternative browser.
You should upgrade or use an alternative browser.
HMS Pegasus, 1776
- Thread starter orthofox
- Start date
orthofox
Well-Known Member
Question: Does she float?
Fantastic job so far! The boiled linseed oil really knocked it up a notch...
The only water that has touched her is the occasional tear borne from my frustration. Other than that, she remains dry docked on a red velvet pillow at night.
Holy Cow! I must have some finger planes now!
After seeing that photo, I immediately Googled finger planes. Too cool!
Would it have made sense to thicken the stern post a little, rather than shaving down the stern planking as far?
Kinda' like: Instead of raising the bridge, lower the river?
Or would that have led to further issues? Like not matching the rudder?(Since we can't read 5 steps ahead on the instructions)
I had the exact same thought. The problems were that the stern post fits snugly in the lower counter section (more on that in the next post) leaving no room for thickening AND as you accurately guessed, the forthcoming rudder needs to match the stern post in thickness. So thickening of the stern post would have a cascading effect on subsequent pieces.
So is that a bulge in your stern planking, or are you just happy to see us ?
Seriously awesome build though, especially at that scale! I once contemplated trying to build one of those, but now I'm pretty scared
I was (and remain) pretty intimidated by this entire thing as well. I still am wondering if I'll be able to pull of something that will be even remotely decent in the end having no experience and no prior working knowledge of wooden ship building. In a way, that was kind of the point of this. Yes, I really love these ships and wanted to learn more about them and their construction, but secondly, this was kind of an experiment. Could an average schmuck like me buy one of these kits and assemble them to match what they are supposed to look like? The jury will be out on that for a while as I've got a long way to go. But what I have learned already is the average schmuck (ie, me) is NOT able to buy a kit like this and use the enclosed directions ONLY to construct it. Not even remotely possible.
So where did you pick up your finger planes?
orthofox
Well-Known Member
orthofox
Well-Known Member
Friezes!
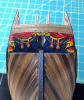
So, as I am now in the phase where I can start thinking about the more detailed elements of the of the hull, I went exploring what I should do about the big, blank stern counter.

In most of the other models of Pegasus I've found online, this is painted black - simple and straightforward. As I was looking through the Pegasus bible, however, I happened to flip the book over and look at the back side of the dust jacket. And sure enough, there are two photographs of images which the author speculates might have been the sort of thing that was painted on her stern counter.

So, I reached out to the author, Dr. Greg Herbert, again and inquired about the authenticity of this representation. He replied that, yes, although we'll never know what, if any, painting Pegasus might have been adorned with on her stern counter, this type of decoration would be absolutely consistent with how she may have been painted when she was first launched. He included a bit more information regarding such paintings, also known as friezes.
"Decorative friezes were long a part of the embellishment of English warships. From the earlier geometric patterns on Elizabethan and Jacobean vessels to the elaborate garlands and trophies of the mid-eighteenth century, these were a less expensive method of decoration than carved works. From a distance, however, they still gave a very rich impression." from the Admiralty Model Frieze painting and flag workship, May 2015. Dr. Greg Herbert.
Doing a bit more research, I happened upon an entire book entitled: The Colour Blue in Historic Shipbuilding, From Antiquity to Modern Times, by Joachim Mullerschon. On page 138, there is a photo of a model built by Dr. Herbert's business and modeling partner David Antscherl of the 1783 ship HMS Comet. In the photo, you can see the highly elaborate stern decorations including both hand carved elements and decorative friezes, especially on the stern counter through which the stern post and rudder fit.

Despite the relatively smaller size of my Pegaus (1:64th scale) versus the one Dr. Herbert builds in his book (1:48th scale), I thought I would try some frieze work myself. The strategy was to paint a replica of the frieze on the back of the Herbert book on a piece of paper which then would be transferred to the stern counter. Dr. Herbert warned me about the paper wanting to buckle with the wetness of acrylic paints, so I chose to use some acid-free paper that is specially sized for watercolors and acrylics. Essentially, this means that the paper has a gelatin additive which doesn't allow distortion or buckling when it gets wet. I traced the cutout of the stern counter from the sheet of plywood where this element had been laser cut.

Then I began to freehand the decoration from the reference onto my pattern in pencil.

After the entire thing was penciled in, I mixed some acrylics in colors to match the provided reference pallet that is also featured below the reference illustration and went to work until I got it as close as I could to the original.

Then I cut it out with an Xacto blade and blackened the edges of the white paper with black magic marker.

Finally, I used some water to thin my PVA glue and coated the entirety of the stern counter making sure I didn't have any voids - especially along all the edges. Then I placed the painting on and pressed gently all over to make sure I had a secure fit and that it wasn't lifted up anywhere.

The challenge, once again, was the small size. For reference, the individual planks above the frieze in the above photo are 4mm wide. This really hampers my ability to improve on detail and artistry. Have I yet mentioned that If I ever build another ship model, it will be a larger scale???
It looks a little goofy, I think, because I don't yet have any other decoration on the back - so it's kind of sticking out like a gaudy sore thumb, but I'm hoping once some additional elements get added on that it will all come together. But as it is, I'm kind of stuck with it now. After a few little touch ups I think it needs after viewing it in these photos, I'm going to apply a thin clear coat to protect it. Some additional moulding will be applied to the bottom edge as well to help conceal the transition between the frieze and the hull planking.
Next up - More hull decorations
So, as I am now in the phase where I can start thinking about the more detailed elements of the of the hull, I went exploring what I should do about the big, blank stern counter.
In most of the other models of Pegasus I've found online, this is painted black - simple and straightforward. As I was looking through the Pegasus bible, however, I happened to flip the book over and look at the back side of the dust jacket. And sure enough, there are two photographs of images which the author speculates might have been the sort of thing that was painted on her stern counter.
So, I reached out to the author, Dr. Greg Herbert, again and inquired about the authenticity of this representation. He replied that, yes, although we'll never know what, if any, painting Pegasus might have been adorned with on her stern counter, this type of decoration would be absolutely consistent with how she may have been painted when she was first launched. He included a bit more information regarding such paintings, also known as friezes.
"Decorative friezes were long a part of the embellishment of English warships. From the earlier geometric patterns on Elizabethan and Jacobean vessels to the elaborate garlands and trophies of the mid-eighteenth century, these were a less expensive method of decoration than carved works. From a distance, however, they still gave a very rich impression." from the Admiralty Model Frieze painting and flag workship, May 2015. Dr. Greg Herbert.
Doing a bit more research, I happened upon an entire book entitled: The Colour Blue in Historic Shipbuilding, From Antiquity to Modern Times, by Joachim Mullerschon. On page 138, there is a photo of a model built by Dr. Herbert's business and modeling partner David Antscherl of the 1783 ship HMS Comet. In the photo, you can see the highly elaborate stern decorations including both hand carved elements and decorative friezes, especially on the stern counter through which the stern post and rudder fit.
Despite the relatively smaller size of my Pegaus (1:64th scale) versus the one Dr. Herbert builds in his book (1:48th scale), I thought I would try some frieze work myself. The strategy was to paint a replica of the frieze on the back of the Herbert book on a piece of paper which then would be transferred to the stern counter. Dr. Herbert warned me about the paper wanting to buckle with the wetness of acrylic paints, so I chose to use some acid-free paper that is specially sized for watercolors and acrylics. Essentially, this means that the paper has a gelatin additive which doesn't allow distortion or buckling when it gets wet. I traced the cutout of the stern counter from the sheet of plywood where this element had been laser cut.
Then I began to freehand the decoration from the reference onto my pattern in pencil.
After the entire thing was penciled in, I mixed some acrylics in colors to match the provided reference pallet that is also featured below the reference illustration and went to work until I got it as close as I could to the original.
Then I cut it out with an Xacto blade and blackened the edges of the white paper with black magic marker.
Finally, I used some water to thin my PVA glue and coated the entirety of the stern counter making sure I didn't have any voids - especially along all the edges. Then I placed the painting on and pressed gently all over to make sure I had a secure fit and that it wasn't lifted up anywhere.
The challenge, once again, was the small size. For reference, the individual planks above the frieze in the above photo are 4mm wide. This really hampers my ability to improve on detail and artistry. Have I yet mentioned that If I ever build another ship model, it will be a larger scale???
It looks a little goofy, I think, because I don't yet have any other decoration on the back - so it's kind of sticking out like a gaudy sore thumb, but I'm hoping once some additional elements get added on that it will all come together. But as it is, I'm kind of stuck with it now. After a few little touch ups I think it needs after viewing it in these photos, I'm going to apply a thin clear coat to protect it. Some additional moulding will be applied to the bottom edge as well to help conceal the transition between the frieze and the hull planking.
Next up - More hull decorations
Attachments
Last edited:
orthofox
Well-Known Member
Still Friezing!
I've decided to continue on with some external work on hull details before working on adding any of the deck assemblies. This is mostly because in working on the various hull elements, I'm forced to repeatedly invert the body of the ship and am worried I will damage any details I add to the deck by turning her over so frequently. So, that said, I'm carrying on with more of the frieze work along the bulwarks and am starting at the aft end.

The instructions describe that at the time of her launching, HMS Pegasus was fully decorated with intricate paintings, but that these would have likely faded with time and use. So I have options in how elaborate I want to adorn her bulwarks with friezes. If I want to give her the impression of being a bit more war-weary I could leave off the paintings and mute the colors of the horizontal rails along her side. And whereas I do love the look of a weathered and distressed model, I've never built a wooden ship replica before so am inclined to construct this first one as a pristine representation of what she might have looked like when first launched from Chatham. So I'll be applying all of the decoration as outlined in the instructions.

The included plans are quite detailed in how this is to be applied. The frieze work is actually represented by photoetched brass elements which is to be painted and then applied. This will give the "paintings" a three-dimensional feel, which was actually how the original friezes were painted - with a classical technique called chiaroscuro, literally meaning light and dark. This is the process of adding highlights and shadows to give the paintings some dimension. By adding the 0.5mm photoetched frieze elements, they will automatically cast a subtle shadow achieving a similar effect.
https://flic.kr/p/24xuwy8

Before I could apply the photoetching, however, I needed to decide on what color they should be as well as the color of the background. The instructions suggest the bulwark be painted black while the frieze be painted yellow ochre or left gold. I've decided to shake things up a bit after researching the various colors of blue that were utilized on British ships-of-war of this period. The bullwarks will be painted a light grey-blue to contrast with the dark walnut of the planking, with some red highlights to complement the inside of the bulwarks. Then I'll paint the friezes and rails (made from either 1x1mm or 2x1mm walnut strip) yellow ochre.
https://flic.kr/p/24xuwxB
First up, measuring from the plans and blocking in the background.
https://flic.kr/p/24xuwxB

Then the photoetched frieze elements and walnut rails were lightly sanded, primed, painted and applied one-by-one.
https://flic.kr/p/2f5kuqG

One would think this process would move along quickly, but it does not. Again, there are no provided measurements as to where exactly each of these rails is to be affixed or where precisely to put the friezes. And, as ever, so many additional elements will be added over and around all of this - so their position really is important. So I continued to take measurements directly from the plans and matching them to the best of my ability on the model.
https://flic.kr/p/2dL9d3H

A blank place is left toward the back of the bulwark which will accommodate the starboard quarter badge - which is an elaborately decorated window that looks in on the captain's quarters. That will coming up soon.
https://flic.kr/p/2f5kuoC


She is going to be a gaudy thing and I'm still a bit worried about this color selection - but it is what it is at this point. And as Sourdough has stated, most of this will be overshadowed by all the rigging. At the rate this build is progressing, I'm hoping I can get to the rigging by this time next year.
Up Next - Quarter Badges!
I've decided to continue on with some external work on hull details before working on adding any of the deck assemblies. This is mostly because in working on the various hull elements, I'm forced to repeatedly invert the body of the ship and am worried I will damage any details I add to the deck by turning her over so frequently. So, that said, I'm carrying on with more of the frieze work along the bulwarks and am starting at the aft end.
The instructions describe that at the time of her launching, HMS Pegasus was fully decorated with intricate paintings, but that these would have likely faded with time and use. So I have options in how elaborate I want to adorn her bulwarks with friezes. If I want to give her the impression of being a bit more war-weary I could leave off the paintings and mute the colors of the horizontal rails along her side. And whereas I do love the look of a weathered and distressed model, I've never built a wooden ship replica before so am inclined to construct this first one as a pristine representation of what she might have looked like when first launched from Chatham. So I'll be applying all of the decoration as outlined in the instructions.
The included plans are quite detailed in how this is to be applied. The frieze work is actually represented by photoetched brass elements which is to be painted and then applied. This will give the "paintings" a three-dimensional feel, which was actually how the original friezes were painted - with a classical technique called chiaroscuro, literally meaning light and dark. This is the process of adding highlights and shadows to give the paintings some dimension. By adding the 0.5mm photoetched frieze elements, they will automatically cast a subtle shadow achieving a similar effect.
https://flic.kr/p/24xuwy8
Before I could apply the photoetching, however, I needed to decide on what color they should be as well as the color of the background. The instructions suggest the bulwark be painted black while the frieze be painted yellow ochre or left gold. I've decided to shake things up a bit after researching the various colors of blue that were utilized on British ships-of-war of this period. The bullwarks will be painted a light grey-blue to contrast with the dark walnut of the planking, with some red highlights to complement the inside of the bulwarks. Then I'll paint the friezes and rails (made from either 1x1mm or 2x1mm walnut strip) yellow ochre.
https://flic.kr/p/24xuwxB
First up, measuring from the plans and blocking in the background.
https://flic.kr/p/24xuwxB
Then the photoetched frieze elements and walnut rails were lightly sanded, primed, painted and applied one-by-one.
https://flic.kr/p/2f5kuqG
One would think this process would move along quickly, but it does not. Again, there are no provided measurements as to where exactly each of these rails is to be affixed or where precisely to put the friezes. And, as ever, so many additional elements will be added over and around all of this - so their position really is important. So I continued to take measurements directly from the plans and matching them to the best of my ability on the model.
https://flic.kr/p/2dL9d3H
A blank place is left toward the back of the bulwark which will accommodate the starboard quarter badge - which is an elaborately decorated window that looks in on the captain's quarters. That will coming up soon.
https://flic.kr/p/2f5kuoC
She is going to be a gaudy thing and I'm still a bit worried about this color selection - but it is what it is at this point. And as Sourdough has stated, most of this will be overshadowed by all the rigging. At the rate this build is progressing, I'm hoping I can get to the rigging by this time next year.
Up Next - Quarter Badges!
orthofox
Well-Known Member
A Quarter Badge with Frieze, please.
So, things have been disturbingly unproductive in the Orthofox shipyards as of late. My job has gotten frustratingly busy, and my house has become a never ending restoration project in its own right. A woodpecker is tormenting my house and dog, my gutters are leaking and the storm drain has a giant crack in it. Ahhhhh springtime for home ownership - what a joy. Thus, too much time has been spent at my real job and doing home repairs. I know, I know - not cool. But until someone wants to pay me money to sit around and build miniature wooden ships all day, this is the way it will be for a bit. Little, mini, baby steps. (How long until I can retire???)
At any rate, as previously written, the next step I wanted to work on was to assemble and mount the quarter badge on the starboard side. We will be using the term "quarter" a lot in future posts as more and more work is done on this part of the ship. The term quarter essentially refers to anything on the after part of the ship - quarter deck, quarter rail, quarter gallery, etc. In this particular case, we'll be working on the starboard quarter badge, which is a window, often outcropped, from the quarters of a ship. This was a devolution from what were quarter galleries, or elaborate balconies that would hang from the sides and stern of older, more ornate vessels.
Here is an example of a quarter badge on a full-sized replica of HMS Endeavor:

Note how the woodwork which frames the window is ornately carved and sits proud of the hull.
The quarter badge of the HMS Pegasus is even more ornate, and the blueprints highlight how it is composed of 17 parts, both wooden and brass:
https://flic.kr/p/Tb5hFh

So, the first step was to cut free all the parts and arrange them.
https://flic.kr/p/2dVpR9c


I decided to follow the instruction's with respect to color selections for each of the components, so sanded, primed and painted each part first, before beginning the assembly. Essentially, the colors used would match what is already on the ship, black, white, yellow ochre and blue. The other addition I decided to make was to put clear acrylic behind the frames to simulate glass. This is not included in the model, but I wanted to have the realistic reflection of glass panes.
https://flic.kr/p/2dVpR5K

After gluing the acrylic to he backs of the white-painted mullions, that assembly fit really snugly within the wooden frame. I cannot say enough about the precision of the fit of some of these pieces - especially as they are mixing two different materials: wood and metal. Everything in this part of the build was just spot-on.
https://flic.kr/p/RxWbbx
The frame assembly fit perfectly over the larger wooden badge.
https://flic.kr/p/RxWbbx

Next up were the decorative columns between windows and the header and sill, with more decorative elements.
https://flic.kr/p/2dVpR4n

And then finally the multi-layered brass elements which will look like relief carvings both above and below the window. These looked really plain just painted with the yellow ochre, so I applied a light black wash over each to enhance their depth and dimensionality.
https://flic.kr/p/2edokc7

Next up was to prepare the hull for the badge. First step was to remove sections of the previously placed quarter rails.
https://flic.kr/p/2dVpR3v

Now obviously, in a real ship, this window would look in upon the captain's quarters. However in this model, there is no internal modeling for said quarters, and this space is taken up by internal walls, balsa fillers and bulkheads utilized to fashion the double hull planking, bullwarks and the future quarter deck above. Thus, I have to create the illusion that the window does look in upon a dark quarters. So I painted the segment that the window will overlap black.
https://flic.kr/p/2edokb5

I'm already not pleased with this, and sort of wish I had custom modeled a complete captain's quarters internally for this window to look in upon. But, seeing as how I was already intimidated by getting through just the basic construction of this entire project, that proverbial ship has sailed. Next time, though....
https://flic.kr/p/2dVpR1X
Then, finally, the badge was secured, two more decorative "carvings" were applied to conceal gaps between the rails and the badge edges and everything was given a final touch up.
https://flic.kr/p/2dVpR1X


It's funny how this little assembly represents one of the better, and most stress-free afternoons I've had in several weeks and has left me wanting the time to do more. But alas, I'm away for three weeks now to attend several conferences. It's hard to pull myself away from this little wooden slice of escapism, but as many guns as she will carry one day, this little Pegasus isn't quite yet fit for marauding and being able to pay for the groceries just yet. So until next time...
So, things have been disturbingly unproductive in the Orthofox shipyards as of late. My job has gotten frustratingly busy, and my house has become a never ending restoration project in its own right. A woodpecker is tormenting my house and dog, my gutters are leaking and the storm drain has a giant crack in it. Ahhhhh springtime for home ownership - what a joy. Thus, too much time has been spent at my real job and doing home repairs. I know, I know - not cool. But until someone wants to pay me money to sit around and build miniature wooden ships all day, this is the way it will be for a bit. Little, mini, baby steps. (How long until I can retire???)
At any rate, as previously written, the next step I wanted to work on was to assemble and mount the quarter badge on the starboard side. We will be using the term "quarter" a lot in future posts as more and more work is done on this part of the ship. The term quarter essentially refers to anything on the after part of the ship - quarter deck, quarter rail, quarter gallery, etc. In this particular case, we'll be working on the starboard quarter badge, which is a window, often outcropped, from the quarters of a ship. This was a devolution from what were quarter galleries, or elaborate balconies that would hang from the sides and stern of older, more ornate vessels.
Here is an example of a quarter badge on a full-sized replica of HMS Endeavor:
Note how the woodwork which frames the window is ornately carved and sits proud of the hull.
The quarter badge of the HMS Pegasus is even more ornate, and the blueprints highlight how it is composed of 17 parts, both wooden and brass:
https://flic.kr/p/Tb5hFh
So, the first step was to cut free all the parts and arrange them.
https://flic.kr/p/2dVpR9c
I decided to follow the instruction's with respect to color selections for each of the components, so sanded, primed and painted each part first, before beginning the assembly. Essentially, the colors used would match what is already on the ship, black, white, yellow ochre and blue. The other addition I decided to make was to put clear acrylic behind the frames to simulate glass. This is not included in the model, but I wanted to have the realistic reflection of glass panes.
https://flic.kr/p/2dVpR5K
After gluing the acrylic to he backs of the white-painted mullions, that assembly fit really snugly within the wooden frame. I cannot say enough about the precision of the fit of some of these pieces - especially as they are mixing two different materials: wood and metal. Everything in this part of the build was just spot-on.
https://flic.kr/p/RxWbbx
The frame assembly fit perfectly over the larger wooden badge.
https://flic.kr/p/RxWbbx
Next up were the decorative columns between windows and the header and sill, with more decorative elements.
https://flic.kr/p/2dVpR4n
And then finally the multi-layered brass elements which will look like relief carvings both above and below the window. These looked really plain just painted with the yellow ochre, so I applied a light black wash over each to enhance their depth and dimensionality.
https://flic.kr/p/2edokc7
Next up was to prepare the hull for the badge. First step was to remove sections of the previously placed quarter rails.
https://flic.kr/p/2dVpR3v
Now obviously, in a real ship, this window would look in upon the captain's quarters. However in this model, there is no internal modeling for said quarters, and this space is taken up by internal walls, balsa fillers and bulkheads utilized to fashion the double hull planking, bullwarks and the future quarter deck above. Thus, I have to create the illusion that the window does look in upon a dark quarters. So I painted the segment that the window will overlap black.
https://flic.kr/p/2edokb5
I'm already not pleased with this, and sort of wish I had custom modeled a complete captain's quarters internally for this window to look in upon. But, seeing as how I was already intimidated by getting through just the basic construction of this entire project, that proverbial ship has sailed. Next time, though....
https://flic.kr/p/2dVpR1X
Then, finally, the badge was secured, two more decorative "carvings" were applied to conceal gaps between the rails and the badge edges and everything was given a final touch up.
https://flic.kr/p/2dVpR1X
It's funny how this little assembly represents one of the better, and most stress-free afternoons I've had in several weeks and has left me wanting the time to do more. But alas, I'm away for three weeks now to attend several conferences. It's hard to pull myself away from this little wooden slice of escapism, but as many guns as she will carry one day, this little Pegasus isn't quite yet fit for marauding and being able to pay for the groceries just yet. So until next time...
Badges?!! We don't need no steeenking badges!
Looks Fantastic!
I totally know what you mean about jobs getting in the way of fun projects.
We can't wait for the next installment (in three weeks or so).
Looks Fantastic!
I totally know what you mean about jobs getting in the way of fun projects.
We can't wait for the next installment (in three weeks or so).
It's funny how this little assembly represents one of the better, and most stress-free afternoons I've had in several weeks and has left me wanting the time to do more. But alas, I'm away for three weeks now to attend several conferences. It's hard to pull myself away from this little wooden slice of escapism, but as many guns as she will carry one day, this little Pegasus isn't quite yet fit for marauding and being able to pay for the groceries just yet. So until next time...[/QUOTE]
Are you back from your conferences yet? We miss your stories of nautical discovery, Captain!
Are you back from your conferences yet? We miss your stories of nautical discovery, Captain!
Similar threads
- Replies
- 31
- Views
- 3,037
- Replies
- 24
- Views
- 1,822
- Replies
- 17
- Views
- 863