Unfortunately I haven’t had a chance to work on it yet but hope to soon and I will report back and start a build thread. If they work well then I may offer a run of them.
You are using an out of date browser. It may not display this or other websites correctly.
You should upgrade or use an alternative browser.
You should upgrade or use an alternative browser.
Hasbro U-Wing modification
- Thread starter Analyzer
- Start date
Ok I've started in earnest on my own U-wing conversion. I'm going to include a cockpit and open up one of the side doors to show the seating for the troops inside as well. So far I've got the side door off (which took many hours and many of those tiny razor saw blades), and I've started working out how to do the cockpit. I couldn't find any shots from the film which actually show the cockpit interior so I guess I'll make it up. I'm planning to have a hatch at the back with a ramp or ladder that leads down to the main bay. And I'm going to be lighting up the engines, cockpit etc.
Couple of pictures attached showing what I've done with the main bay so far.


Couple of pictures attached showing what I've done with the main bay so far.
Analyzer
Master Member
Ok I've started in earnest on my own U-wing conversion. I'm going to include a cockpit and open up one of the side doors to show the seating for the troops inside as well. So far I've got the side door off (which took many hours and many of those tiny razor saw blades), and I've started working out how to do the cockpit. I couldn't find any shots from the film which actually show the cockpit interior so I guess I'll make it up. I'm planning to have a hatch at the back with a ramp or ladder that leads down to the main bay. And I'm going to be lighting up the engines, cockpit etc.
Couple of pictures attached showing what I've done with the main bay so far.
View attachment 1303714View attachment 1303715
Watching with great interest!
Here is a link to a high res scan of the U-Wing cross section I was planning on following
Amazing, thanks for that! Ok the cockpit is going to be easier in some ways, and more difficult in others. I didn’t even realise it had windows in the lower hull.
edit: I’ve been doing several things at once on this - when I get tired of cutting the slightly awful plastic (flashbacks to when I did the Hasbro Falcon and Slave 1) in order to make the lower hull windows and door windows I’ve been building the frame that the pilot seats go on. I also started trying to drill out the little holes in the engine nacelles so that they can be lit up, but soon realised it was going to look a bit rubbish, so I decided to make a mould of the nacelles and cast them in clear resin, which I can then paint. I have a hit rate of about 20% on casting things so it may take some time to get 4 that look good enough.


edit: I’ve been doing several things at once on this - when I get tired of cutting the slightly awful plastic (flashbacks to when I did the Hasbro Falcon and Slave 1) in order to make the lower hull windows and door windows I’ve been building the frame that the pilot seats go on. I also started trying to drill out the little holes in the engine nacelles so that they can be lit up, but soon realised it was going to look a bit rubbish, so I decided to make a mould of the nacelles and cast them in clear resin, which I can then paint. I have a hit rate of about 20% on casting things so it may take some time to get 4 that look good enough.
Last edited:
OK, a couple more questions which I hope you guys can help with: anyone know a source for 1/48 (or close) pilot figures (for the cockpit) or seated figures (for the troop bay)? I currently have a Bandai snowspeeder pilot in mind, but I don’t really want to have to buy another snowspeeder each time I mod a hasbro toy. And I have a revell T-70 x-wing in the stash which is going to have the other snowspeeder pilot (as it comes without a pilot) in it, so currently the U-wing co-pilot seat is going to be empty.
I’ve looked on Shapeways and can’t find anything useful. I’m happy modding pilots from planes etc but can’t find much in 1/48 or similar.
P.S. I’m also planning to do a conversion of the hasbro value Tie Striker (which looks about 1/48) And the tie silencer so also looking for pilots for those.
Second question: I want to keep the mechanism that moves the wings but this will mean bringing the rear bulkhead in the troop compartment forward to about 10mm in front of the door opening. It won’t be visible on the side with the open door, as the door overlaps the opening even when fully open, but you’ll be able to see it on the side with the closed door. Do you think this will look really bad?
Analyzer
Master Member
OK, a couple more questions which I hope you guys can help with: anyone know a source for 1/48 (or close) pilot figures (for the cockpit) or seated figures (for the troop bay)? I currently have a Bandai snowspeeder pilot in mind, but I don’t really want to have to buy another snowspeeder each time I mod a hasbro toy. And I have a revell T-70 x-wing in the stash which is going to have the other snowspeeder pilot (as it comes without a pilot) in it, so currently the U-wing co-pilot seat is going to be empty.
I’ve looked on Shapeways and can’t find anything useful. I’m happy modding pilots from planes etc but can’t find much in 1/48 or similar.
P.S. I’m also planning to do a conversion of the hasbro value Tie Striker (which looks about 1/48) And the tie silencer so also looking for pilots for those.
Second question: I want to keep the mechanism that moves the wings but this will mean bringing the rear bulkhead in the troop compartment forward to about 10mm in front of the door opening. It won’t be visible on the side with the open door, as the door overlaps the opening even when fully open, but you’ll be able to see it on the side with the closed door. Do you think this will look really bad?
Your best bet might be to make a mold of the Bandai pilots. For the seated figures, you can always cut apart and reposition some of the Star Wars Legion figures
Not sure about the door mechanism. I'd have to pull it out and take a look
Just bought a bunch of 1/48 modern US Military seated figures and several cheapish airfix kits with British soldier figures (seated and otherwise) so hopefully they’ll be decent quality and I can find some that I can use.
I got a set of modern (quite sci-fi looking) guns (Called “tavor CTAR and GTAR”) for the figures to use, which may need a bit of modding to look appropriately Star Wars-esque.
the airfix models also include a helicopter, which I think I can steal the passenger seats for the U-wing’s troop bay, and various mounted machine guns which I should be able to mod to make a door gun.
Analyzer
Master Member
Just bought a bunch of 1/48 modern US Military seated figures and several cheapish airfix kits with British soldier figures (seated and otherwise) so hopefully they’ll be decent quality and I can find some that I can use.
I got a set of modern (quite sci-fi looking) guns (Called “tavor CTAR and GTAR”) for the figures to use, which may need a bit of modding to look appropriately Star Wars-esque.
the airfix models also include a helicopter, which I think I can steal the passenger seats for the U-wing’s troop bay, and various mounted machine guns which I should be able to mod to make a door gun.
Helicopter interior bits do seem like they would be really useful for this build.
Making some steady progress on this, but every time I think I've got somewhere I realise there's another detail that the Hasbro doesn't have, that I need to fix. I didn't even realise until recently that the back end of the ship is entirely the wrong shape (well, not any more)

On that note, I also took some reference shots from Battlefront 2 (at which point I realised I would need to cut a big hole in the new rear end of my U-wing, to get the recess right)


I did some more work on the pilot seats

and the troop bay seats (part is from a 1/48 Airfix lynx helicopter, with the seats cut out and replaced with Tamiya tape)

and I started work on the co-pilot - in a previous life he was the driver in an Airfix Land Rover kit.

oh and I also took a reference shot of the landing gear bay doors. I'm toying with whether to make the landing gear (and gear bay doors) detachable with magnets, or just ditch all the landing gear - I think in Rogue One the U-wings just land on their belly without putting the gear down.

On that note, I also took some reference shots from Battlefront 2 (at which point I realised I would need to cut a big hole in the new rear end of my U-wing, to get the recess right)
I did some more work on the pilot seats
and the troop bay seats (part is from a 1/48 Airfix lynx helicopter, with the seats cut out and replaced with Tamiya tape)
and I started work on the co-pilot - in a previous life he was the driver in an Airfix Land Rover kit.
oh and I also took a reference shot of the landing gear bay doors. I'm toying with whether to make the landing gear (and gear bay doors) detachable with magnets, or just ditch all the landing gear - I think in Rogue One the U-wings just land on their belly without putting the gear down.
Attachments
Very inspiring. I really need to get back to mine. I am stuck on the Revell Republic Gunship currently
And thanks for the battlefront screen caps! Great ref for some lesser documented areas.
Looking forward to seeing more
Yes, your gunship looks awesome. So much detail on it - I do not have the skills or patience to make this project that detailed, I’m just aiming for something that has the ‘look’ of a Star Wars ship, as opposed to being a 100% accurate model. Plus I like my hasbro conversions to be sturdy enough for kids to play with a bit, which is a bit of a limitation.
I forgot to put this in my last post: I also did some greebling on the engine bit. At first o massively overgreebled it, so I took a few bits off. I still think it has too many bits sticking out but doubtless many of them will fall off before I get round to painting it.

A bit of an update. I cut out the back end and then added styrene around the edges of the square hole to make it the right shape - first a layer of 0.5mm styrene on the inside and then a layer of 1mm on the outside.

I used Mr Surfacer 500 to fill in the gaps and then sanded (repeat lots of times) and eventually I think it looks OK. Needs the panel lines rescribing still. Plus I sanded off/cut away a few of the little square panel greeblies, which I will replace with .5mm styrene eventually.


I then built a box from .5mm styrene to sit behind the hole, which will have the 14 radiator fins (1mm styrene) set into it, like so.


I finished making this and then realised it would get in the way of the internal wing mechanism, so had to completely rip it apart and change the dimensions at the rear end. Which also means I'll need to reprofile each of the 14 radiator fins.
All in all this doesn't look like much progress, but it has taken me forever, as I'm very new to scratch building parts.
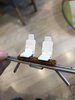
Then I got my new 3D printer and started playing around with it. I printed some new pilots (from Thingiverse - Jace 1969) and pilot seats, which are probably less accurate than the ones I built, but look cooler. They're from a Razor Crest model on Thingiverse by Fine_Engineer. I also printed some blasters which I intend to put in a rack on the troop bay wall and various control panels. The two guys sitting on the bench are from Shapeways.

Then I thought I should actually have a go at making a 3d model myself, and seeing as I wasn't happy with the cockpit seat support I made one on Tinkercad. It's currently printing.

Edit: I forgot - the casts I made of the engine nacelles didn't work - the resin never fully cured so they were unusable. I was to start drilling out the centre of the nacelles to just cover with transparent acrylic, but then I decided to have a go at 3D printing the whole nacelle instead.

The seat frame printed OK, but it didn't have enough support so parts of it failed. I'm now printing again with more supports added manually.

I used Mr Surfacer 500 to fill in the gaps and then sanded (repeat lots of times) and eventually I think it looks OK. Needs the panel lines rescribing still. Plus I sanded off/cut away a few of the little square panel greeblies, which I will replace with .5mm styrene eventually.
I then built a box from .5mm styrene to sit behind the hole, which will have the 14 radiator fins (1mm styrene) set into it, like so.
I finished making this and then realised it would get in the way of the internal wing mechanism, so had to completely rip it apart and change the dimensions at the rear end. Which also means I'll need to reprofile each of the 14 radiator fins.
All in all this doesn't look like much progress, but it has taken me forever, as I'm very new to scratch building parts.
Then I got my new 3D printer and started playing around with it. I printed some new pilots (from Thingiverse - Jace 1969) and pilot seats, which are probably less accurate than the ones I built, but look cooler. They're from a Razor Crest model on Thingiverse by Fine_Engineer. I also printed some blasters which I intend to put in a rack on the troop bay wall and various control panels. The two guys sitting on the bench are from Shapeways.
Then I thought I should actually have a go at making a 3d model myself, and seeing as I wasn't happy with the cockpit seat support I made one on Tinkercad. It's currently printing.
Edit: I forgot - the casts I made of the engine nacelles didn't work - the resin never fully cured so they were unusable. I was to start drilling out the centre of the nacelles to just cover with transparent acrylic, but then I decided to have a go at 3D printing the whole nacelle instead.
The seat frame printed OK, but it didn't have enough support so parts of it failed. I'm now printing again with more supports added manually.
Last edited:
Amazing work!
Thanks guys. The 3D printer has really changed my plan for this model. I’ve made some greeblies for the rear

and also started on the internal bulkheads. The cross-section drawing gives a bit of detail on how the bulkheads look, but in the model there are significant constraints on how accurately they can be depicted. So I just decided to have a go at making something that has the same “look and feel” without actually being accurate. I did two versions and haven’t quite decided which one to use yet:


Next I’m going to model the cockpit control panels and the rear bulkhead
and also started on the internal bulkheads. The cross-section drawing gives a bit of detail on how the bulkheads look, but in the model there are significant constraints on how accurately they can be depicted. So I just decided to have a go at making something that has the same “look and feel” without actually being accurate. I did two versions and haven’t quite decided which one to use yet:
Next I’m going to model the cockpit control panels and the rear bulkhead
Thanks - I agree and I went back and added a whole load of greeblies, screens and buttons. It printed OK, although it is quite thin and it warped a bit whilst it was curing. I may print a new one and leave it on the supports until it has cured to see if that works better.

I also did. the cockpit consoles (I gave them a grey base coat, and then realised I plan to light up the screens and buttons so I used alcohol to strip the paint back off):

I also (nearly) finished what I thought would be the hardest bit - the radiator fins on the underside. Each one is cut from 1mm styrene. If I could go back in time, honestly I would 3D print this whole lot, with the recess they fit in. I thought I had finished, and then realised that the fins should be square at the back, rather than stepped. So I'll have to cut a whole load more bits of styrene to fill in those bits.


I also spent hours modelling the rear bulkhead, based on the cross section drawing. Currently being printed. I did it all in one piece, which was probably not a great idea, but hopefully it will work out. If not I can just cut it up (digitally) and try again.

I also did. the cockpit consoles (I gave them a grey base coat, and then realised I plan to light up the screens and buttons so I used alcohol to strip the paint back off):
I also (nearly) finished what I thought would be the hardest bit - the radiator fins on the underside. Each one is cut from 1mm styrene. If I could go back in time, honestly I would 3D print this whole lot, with the recess they fit in. I thought I had finished, and then realised that the fins should be square at the back, rather than stepped. So I'll have to cut a whole load more bits of styrene to fill in those bits.
I also spent hours modelling the rear bulkhead, based on the cross section drawing. Currently being printed. I did it all in one piece, which was probably not a great idea, but hopefully it will work out. If not I can just cut it up (digitally) and try again.
Thanks! It printed really well. I actually let chitubox do the supports and they were very good. Unfortunately I must have mis-measured something because the part where the bottom hull meets the top hull is nearly 5mm out. I could fill with styrene, but it's an easy fix on the 3D model so might as well print another!

I also realised that, when I started this I thought there would be plenty of room in the tail end for all the electronics and wiring, and I was hoping to include a lipo battery so it can light up without being plugged in. Now with the bulkhead and the rear radiator fin box its all of a sudden looking quite tight in there. Hopefully will still have room for everything. I may be able to put a battery under the floor in the troop bay.
I also realised that, when I started this I thought there would be plenty of room in the tail end for all the electronics and wiring, and I was hoping to include a lipo battery so it can light up without being plugged in. Now with the bulkhead and the rear radiator fin box its all of a sudden looking quite tight in there. Hopefully will still have room for everything. I may be able to put a battery under the floor in the troop bay.
Last edited: