Hasbro Jedi starfighter with docking ring repaint and lighting conversion

thebeans

Well-Known Member
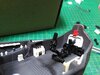
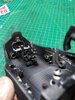
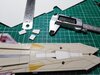
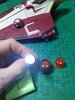
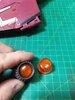
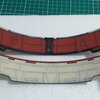
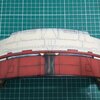
Hey all i started this last year , i began with the cockpit detailing and repaint , i will be posting regular updates on my progress. Ihope you all enjoy the build, Many of the details in the cockpit are phone and laptop guts along with any other plastic parts i find will work
IMG_20190502_205215.jpg
 

Attachments

  • IMG_20190430_205701.jpg
    IMG_20190430_205701.jpg
    2.7 MB · Views: 240
  • IMG_20190502_205144.jpg
    IMG_20190502_205144.jpg
    3 MB · Views: 222
Getting rid of the landing gear and adding new panels with styrene sheet, once the ship is wired up and fibre optics are installed i will cover the screw holes with styrene too
 

Attachments

  • IMG_20190530_202328.jpg
    IMG_20190530_202328.jpg
    3.3 MB · Views: 252
I love Hasbro toy conversions. Which version are you starting with? And do you know what scale it works out at?
 
I love Hasbro toy conversions. Which version are you starting with? And do you know what scale it works out at?
I believe this is a Hasbro toys are us exclusive, i haven't thought about what the scale would be but it's sold with the 1/18 scale figures line
 
Lighting the engines on the arrow head section of the ship i'll use bright white 10mm leds and a translucent lense from a toy fire engine. the necells had to be hollowed out first
 

Attachments

  • IMG_20190429_210538.jpg
    IMG_20190429_210538.jpg
    3 MB · Views: 276
  • IMG_20190429_210555.jpg
    IMG_20190429_210555.jpg
    3.1 MB · Views: 225
  • IMG_20190429_210359.jpg
    IMG_20190429_210359.jpg
    3.1 MB · Views: 234
Next move is to remove material from the hyperspace engine outlets and burn test some leds before fitting, and whilst i have the main section of the ring engine apart i will install .75mm fibre optics.
 

Attachments

  • IMG_20190606_155424.jpg
    IMG_20190606_155424.jpg
    2.5 MB · Views: 259
  • IMG_20190603_210025.jpg
    IMG_20190603_210025.jpg
    3 MB · Views: 269
  • 20190624_223011.jpg
    20190624_223011.jpg
    2.8 MB · Views: 261
I've cut off the hinge pieces no need for these and replaced them with styrene
 

Attachments

  • 20190614_231130.jpg
    20190614_231130.jpg
    2.6 MB · Views: 251
  • 20190614_220231.jpg
    20190614_220231.jpg
    1.4 MB · Views: 243
Hyperdrive engine lights and fibre optics installed along with some paneling to cover the original seemage , engine lights and fibres are done on the Delta 7 ship also.I've replaced the rear rubber fin on the Delta 7 , Its on to paint now
 

Attachments

  • 20190706_200146.jpg
    20190706_200146.jpg
    2 MB · Views: 240
  • 20190624_223113.jpg
    20190624_223113.jpg
    2.8 MB · Views: 296
  • 20190624_221954.jpg
    20190624_221954.jpg
    2.4 MB · Views: 257
Painting has begun on the ring sections both top and bottom , typical process of primer ,base colour preshade as well as highlights then final colour then ultimately weathering and sealing in with dull coat. I'm using enamels mostly, applied with airbrush. Masking ...masking followed by masking.....masking and bit more masking.
 

Attachments

  • 20190923_213026.jpg
    20190923_213026.jpg
    1.3 MB · Views: 228
  • IMG_20190710_143834_081.jpg
    IMG_20190710_143834_081.jpg
    84.2 KB · Views: 193
  • IMG_20190710_143834_082.jpg
    IMG_20190710_143834_082.jpg
    96.4 KB · Views: 191
  • 20190707_193710.jpg
    20190707_193710.jpg
    2.4 MB · Views: 223
  • 20190707_193636.jpg
    20190707_193636.jpg
    2.8 MB · Views: 180
Love the weathering. That last picture shows the classic Star Wars weathering effect of the cream/white chipping underneath a grimey top colour really well. How did you achieve that effect? Is it a base colour of cream with the grey airbrushed over the top and then chipped off using maskol or similar?
 
Back
Top