grausmaster
New Member
Hi guys,
first time posting here...and in fact my first prop project. After seeing mr.Savage being so enthusiastic about the Hasbro Nerf pulse rifle and mentioning a repaint I knew I needed to have a go at it myself. I am not an experienced prop maker or modder but this great community showed many fine examples of how it can be done. Also I am an experienced graphic designer for over 20 years so there is some knowledge about the creative process.
Ever since seeing Aliens at the age of ten I was in awe of the Colonial Marines, their tech and aesthetic. The drop ship, the App and pulserifles were just too cool and felt real with a futuristic touch. And now Nerf, Hasbro gives us the opportunity to go and make a Pulserifle to work with...count me in!
So after gathering lots of reference here (thanks KramStaar and Hanotron) and on YouTube I knew what I wanted as a end result. Not a screen accurate prop but an object that certainly gives the impression of a "real" M41A. And it needed to feel used and lived in for sure. And a final consideration was to make it "mine"...so adding and modding to my personal taste.
what I did:
• added real metal hardware where I thought it was appropriate (lots of screws, bolts, rings etc also to add weight)
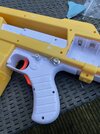
• took it apart to paint (I did not like the idea of masking the whole thing)
• took off Nerf and Aliens logo's
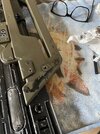
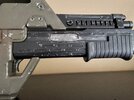
• full repaint with matt black and green (Mr. hobby, Mr.color 12 Olive drab)
• painted the handle to look like wood
• custom vinyl cut ARMAT and USMC badge stickers
• custom personalised art (xenomorph skull and bones)
• custom modeltype plate with a few easter eggs
• weathered the hell out of it
• damaged parts of the gun to feel like it has been in a few xenobattles (deep scratches in the plastic before painting)
• filled holes (some invisible, others to look like rivets or screw holes)
• drilled out trigger
all in all it was a great journey of a about 50 hrs, learning how to hide crimes and keep going after setbacks. And most of all: I love the weathering process! I hope you like it...here's some pictures of the build!


first time posting here...and in fact my first prop project. After seeing mr.Savage being so enthusiastic about the Hasbro Nerf pulse rifle and mentioning a repaint I knew I needed to have a go at it myself. I am not an experienced prop maker or modder but this great community showed many fine examples of how it can be done. Also I am an experienced graphic designer for over 20 years so there is some knowledge about the creative process.
Ever since seeing Aliens at the age of ten I was in awe of the Colonial Marines, their tech and aesthetic. The drop ship, the App and pulserifles were just too cool and felt real with a futuristic touch. And now Nerf, Hasbro gives us the opportunity to go and make a Pulserifle to work with...count me in!
So after gathering lots of reference here (thanks KramStaar and Hanotron) and on YouTube I knew what I wanted as a end result. Not a screen accurate prop but an object that certainly gives the impression of a "real" M41A. And it needed to feel used and lived in for sure. And a final consideration was to make it "mine"...so adding and modding to my personal taste.
what I did:
• added real metal hardware where I thought it was appropriate (lots of screws, bolts, rings etc also to add weight)
• took it apart to paint (I did not like the idea of masking the whole thing)
• took off Nerf and Aliens logo's
• full repaint with matt black and green (Mr. hobby, Mr.color 12 Olive drab)
• painted the handle to look like wood
• custom vinyl cut ARMAT and USMC badge stickers
• custom personalised art (xenomorph skull and bones)
• custom modeltype plate with a few easter eggs
• weathered the hell out of it
• damaged parts of the gun to feel like it has been in a few xenobattles (deep scratches in the plastic before painting)
• filled holes (some invisible, others to look like rivets or screw holes)
• drilled out trigger
all in all it was a great journey of a about 50 hrs, learning how to hide crimes and keep going after setbacks. And most of all: I love the weathering process! I hope you like it...here's some pictures of the build!
Attachments
Last edited:
