You are using an out of date browser. It may not display this or other websites correctly.
You should upgrade or use an alternative browser.
You should upgrade or use an alternative browser.
Han Solo Holster - Screen Accurate Pattern
- Thread starter ImperialWalker
- Start date
ImperialWalker
Well-Known Member
Following the posts here and on Rebel Legion. Unfortunately, I'm not so well versed on the finer details as you're doing, but this is some fantastic research. Hoping that all is going well with your timeframe nearing its end.
Thank you.

At this very moment I just finished sewing some foam test pouches, and am attempting to match it up with some photos to see how close I am. If the measurements work out, I should be getting ready for the final push.
ImperialWalker
Well-Known Member
Smugglers Holster
v 1.0
Measurements & Pouches
Okay.....so I think this should turn out to be a pretty significant post.
...
Over the last few weeks one of the major parts I've been able to finish is, this.
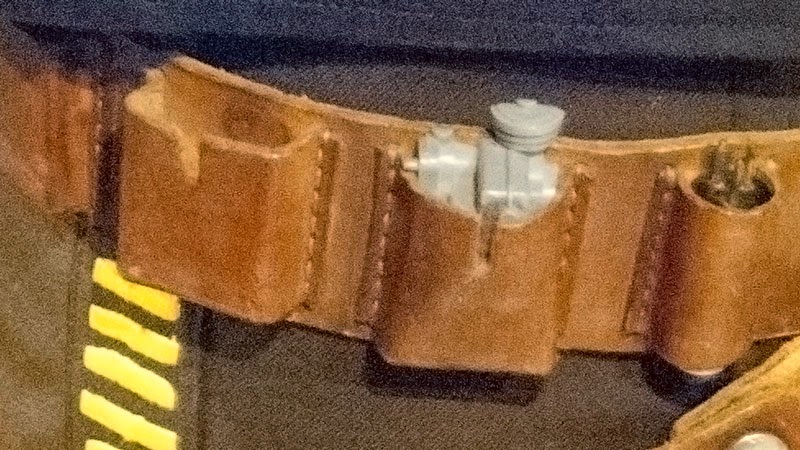
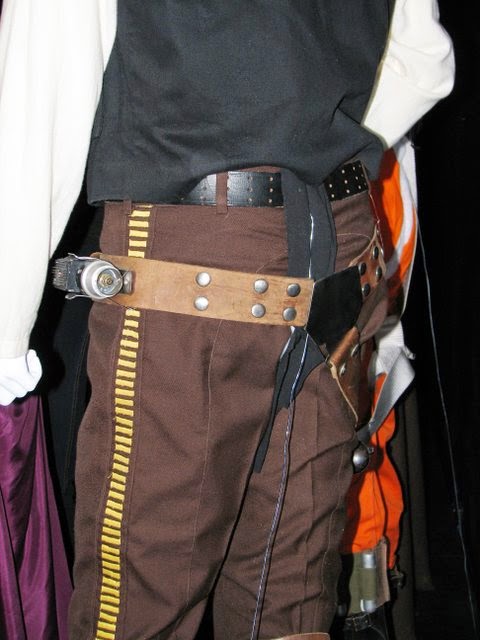
The Greeblie
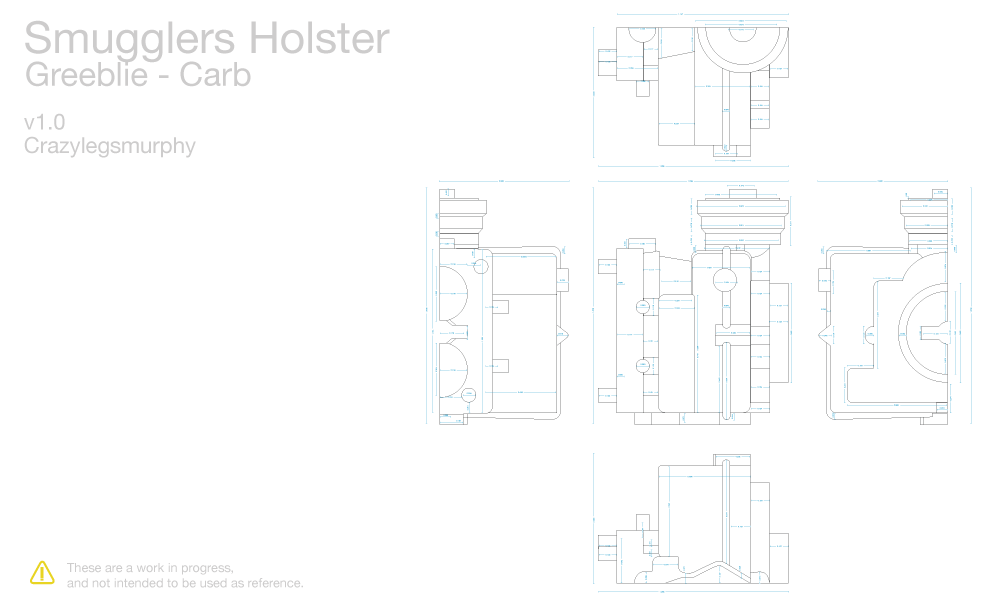
Since this is the best thing I have for determining the measurements of everything else, I decided to make sure it was done as accurately as possible. Using digital callipers, I measured every surface to ensure that no wrong measurements would throw things off.
Horseshoes & Hand Grenades
So, how close was I when I put the finalized Greeblie onto my pouch patterns?
Close...so close, but also about as accurate as using a french baguette to make Darth Maul's lightsaber.
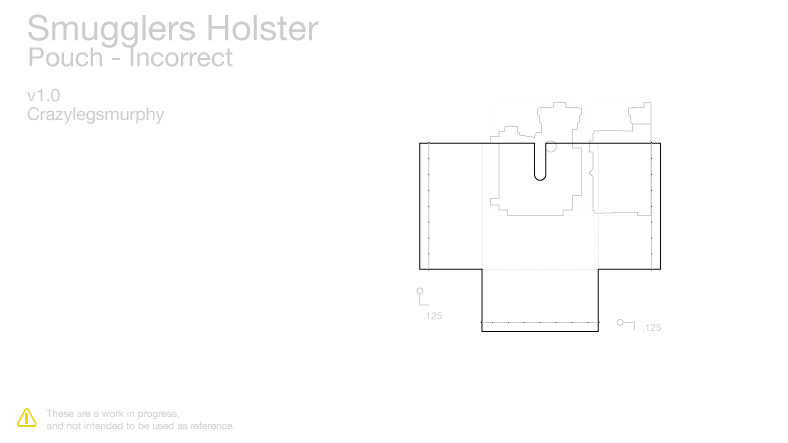
The original pouch measurements were way too wide, and deep. This is why my pouches kept bothering me as none of the reference photos show it to be exactly square. Using the Greeblie, and the following images, I was able to rework the pouch size to be more accurate.
(I have like 12 images, but I didn't show them all here).

What I noticed that when looking from multiple angles, the Greeblie sort of sits in the pouch with about 1/8" (3.175 mm) on each side. What is a bit tricky is that the pouch is not as deep as the Greeblie is, and so it kinda bows out a bit. This also is becomes a bit complicated since the thickness of the leather is not all that consistent in thickness.
The exact measurement needs to account for the gap, leather, and the depth. Since the short depth is what forces the front out, it doesn't come off the sides straight, which is why the leather is snug under that little protrusion on the left side.
All n' all it is a bit of a pain.
By a Thread
In an attempt to double check the measurement, I integrated the thread count into the pattern. Now, I don't know exactly how long each stitch is, but I do know that there are 8 on the sides, and 7 on the bottom.
In my original pattern, I didn't have reference shots for the bottom stitching, so I guessed. Now that I have adjusted for the thread count, and cross referenced that with the Greeblie measurements, I was able to rework the pattern to be much closer to the actual holster.
Following The Pattern
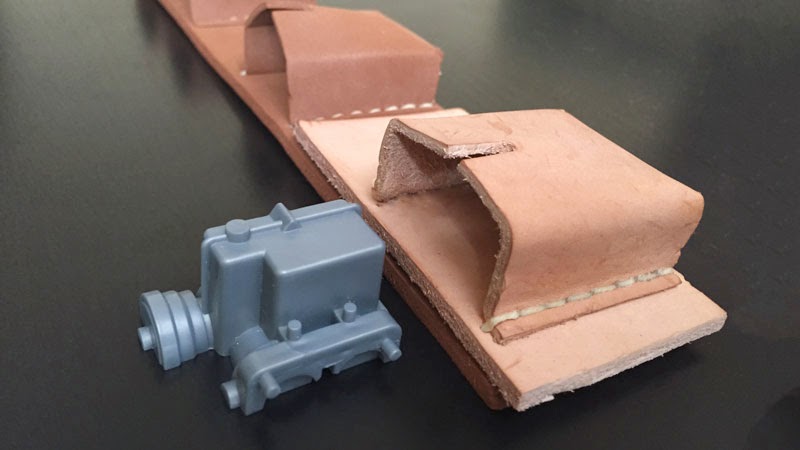
"Just print it and make a mockup already!" my girlfriend annoyingly shouted over her Fractal run in Guild Wars 2.
She was right. If I am going to see if this pattern translates to the real world, I was going to have to finally make something 3D and tangible to compare. So, using the technique I will be using for the final holster, I printed the pouches onto sticky paper, attached them to foam, and then punched the holes.
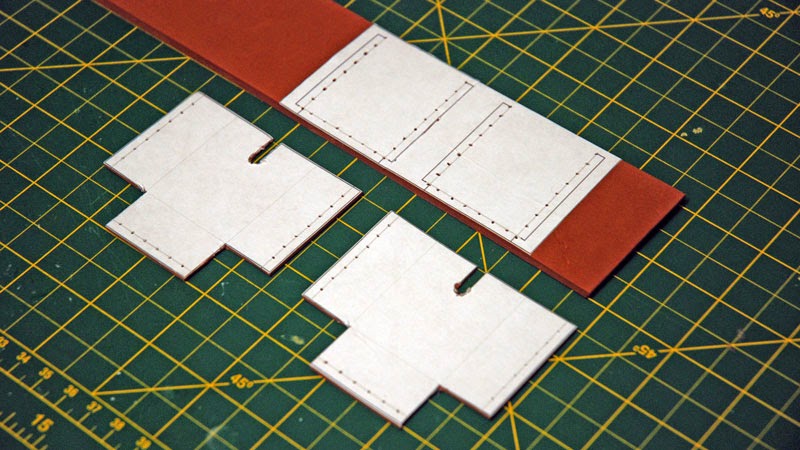
It isn't a difficult way to do a pattern, but I'll go into more detail in the final pattern book.
Using this I was able to correctly bend, and sew the pieces together to get an idea of how it will look. Foam is quite different than leather (obviously) but it does sort of behave similar.
Comparisons
So, was my reworked pattern correct after all this craziness? The answer is of course...I don't think so.
*facepalm*
Take a look.
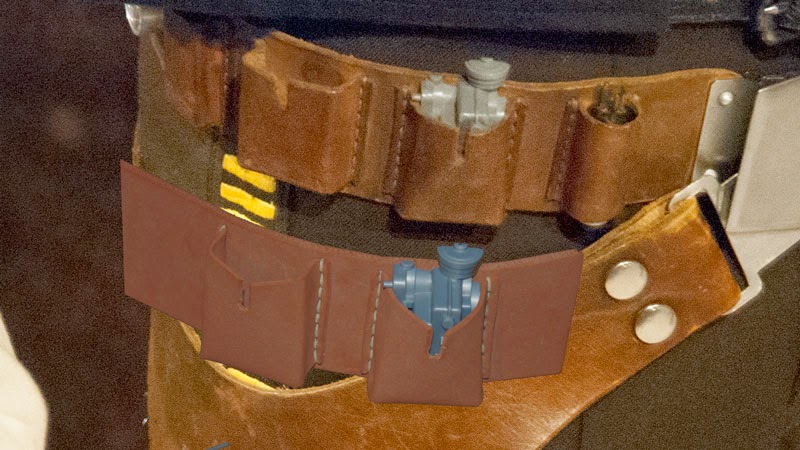
To my eye, the depth of the pouches is now too shallow, and they may be a tad shy of the right width.
When you look at the original, the curve of the leather seems a little more relaxed than the foam version. When I put the Greeblie in, it is actually fairly tight. The foam is slightly thinner than the leather needed, and so I think it will further add to the problem. It is close, but I think I need to add a bit more to the depth, not a lot, but just enough to let it "breath" a bit.
Secondly, I added 1/8" on each side, but it still feels a bit snug. This may be due to the depth causing the sides to curve in further than they should, but even right where the leather connects to the belt, it seems like I am off by a small bit. This also seems to be confirmed when I look at the empty pouch. When I hold it up to multiple reference photos, it does appear to be a bit shallow.
My girlfriend just stormed out of here mumbling something about millimetres, and who the hell can tell the difference, and something, something....But, I think some small tweaks will bring it to the right place.
I of course leave this in your hands to see what you think.
P.S. I am aware that my spacing is off between the pouches. That is another example of how far I am off on some of the measurements from before.
Next Step
Tomorrow I plan on reprinting, and resewing the pouches to double check that my alternations were correct.
If it all works out, then I will know that my measurement system is now working, and I can work my way out to correct any measurement issues with the pattern.
Unfortunately my reference photos uncovered some new information I wasn't aware of. My hooks for the Episode 5 version are incorrect, the disk that was based off of the one currently being sold is also incorrect based on the new photos, and I have to tweak the corners of the "Y" connectors.
From there, it is the holster.
But...lets move on to the next post....the DISK!
v 1.0
Measurements & Pouches
Okay.....so I think this should turn out to be a pretty significant post.
...
Over the last few weeks one of the major parts I've been able to finish is, this.
The Greeblie
Since this is the best thing I have for determining the measurements of everything else, I decided to make sure it was done as accurately as possible. Using digital callipers, I measured every surface to ensure that no wrong measurements would throw things off.
Horseshoes & Hand Grenades
So, how close was I when I put the finalized Greeblie onto my pouch patterns?
Close...so close, but also about as accurate as using a french baguette to make Darth Maul's lightsaber.
The original pouch measurements were way too wide, and deep. This is why my pouches kept bothering me as none of the reference photos show it to be exactly square. Using the Greeblie, and the following images, I was able to rework the pouch size to be more accurate.
(I have like 12 images, but I didn't show them all here).
What I noticed that when looking from multiple angles, the Greeblie sort of sits in the pouch with about 1/8" (3.175 mm) on each side. What is a bit tricky is that the pouch is not as deep as the Greeblie is, and so it kinda bows out a bit. This also is becomes a bit complicated since the thickness of the leather is not all that consistent in thickness.
The exact measurement needs to account for the gap, leather, and the depth. Since the short depth is what forces the front out, it doesn't come off the sides straight, which is why the leather is snug under that little protrusion on the left side.
All n' all it is a bit of a pain.
By a Thread
In an attempt to double check the measurement, I integrated the thread count into the pattern. Now, I don't know exactly how long each stitch is, but I do know that there are 8 on the sides, and 7 on the bottom.
In my original pattern, I didn't have reference shots for the bottom stitching, so I guessed. Now that I have adjusted for the thread count, and cross referenced that with the Greeblie measurements, I was able to rework the pattern to be much closer to the actual holster.
Following The Pattern
"Just print it and make a mockup already!" my girlfriend annoyingly shouted over her Fractal run in Guild Wars 2.
She was right. If I am going to see if this pattern translates to the real world, I was going to have to finally make something 3D and tangible to compare. So, using the technique I will be using for the final holster, I printed the pouches onto sticky paper, attached them to foam, and then punched the holes.
It isn't a difficult way to do a pattern, but I'll go into more detail in the final pattern book.
Using this I was able to correctly bend, and sew the pieces together to get an idea of how it will look. Foam is quite different than leather (obviously) but it does sort of behave similar.
Comparisons
So, was my reworked pattern correct after all this craziness? The answer is of course...I don't think so.
*facepalm*
Take a look.
To my eye, the depth of the pouches is now too shallow, and they may be a tad shy of the right width.
When you look at the original, the curve of the leather seems a little more relaxed than the foam version. When I put the Greeblie in, it is actually fairly tight. The foam is slightly thinner than the leather needed, and so I think it will further add to the problem. It is close, but I think I need to add a bit more to the depth, not a lot, but just enough to let it "breath" a bit.
Secondly, I added 1/8" on each side, but it still feels a bit snug. This may be due to the depth causing the sides to curve in further than they should, but even right where the leather connects to the belt, it seems like I am off by a small bit. This also seems to be confirmed when I look at the empty pouch. When I hold it up to multiple reference photos, it does appear to be a bit shallow.
My girlfriend just stormed out of here mumbling something about millimetres, and who the hell can tell the difference, and something, something....But, I think some small tweaks will bring it to the right place.
I of course leave this in your hands to see what you think.
P.S. I am aware that my spacing is off between the pouches. That is another example of how far I am off on some of the measurements from before.
Next Step
Tomorrow I plan on reprinting, and resewing the pouches to double check that my alternations were correct.
If it all works out, then I will know that my measurement system is now working, and I can work my way out to correct any measurement issues with the pattern.
Unfortunately my reference photos uncovered some new information I wasn't aware of. My hooks for the Episode 5 version are incorrect, the disk that was based off of the one currently being sold is also incorrect based on the new photos, and I have to tweak the corners of the "Y" connectors.
From there, it is the holster.
But...lets move on to the next post....the DISK!
ImperialWalker
Well-Known Member
Smugglers Holster
v 1.0
The Disk
Admittedly I was quite happy that the costume in Seattle was turned in a way that allowed me to get some usable images of the disk. The reference photos I had access to were simply not cutting it, and so I based my original disk off of the one that many of you know and love, from Elvis Trooper.

Now, these are great disks, so please don't think I am singling Elvis Trooper out. I have been in contact with him and he has made it quite clear he will update his version if he is convinced that there is a way to do it more accurately.
So, lets see if that is the case.
Unidentified Disk Shaped Object
Here are the images that I was able to get from the ESB costume in Seattle.
(sorry for the size, but I want you guys to have access to the detail)
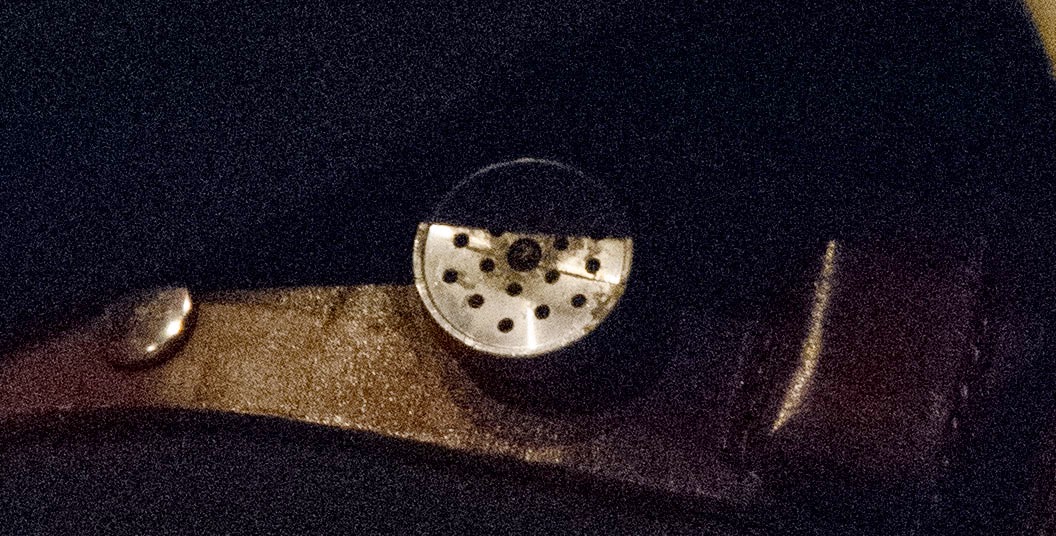
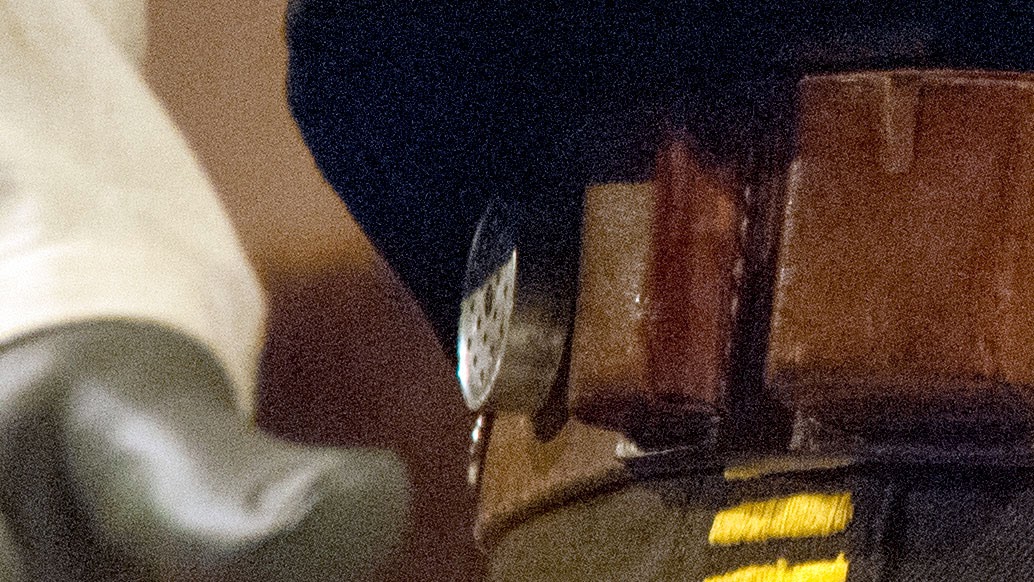

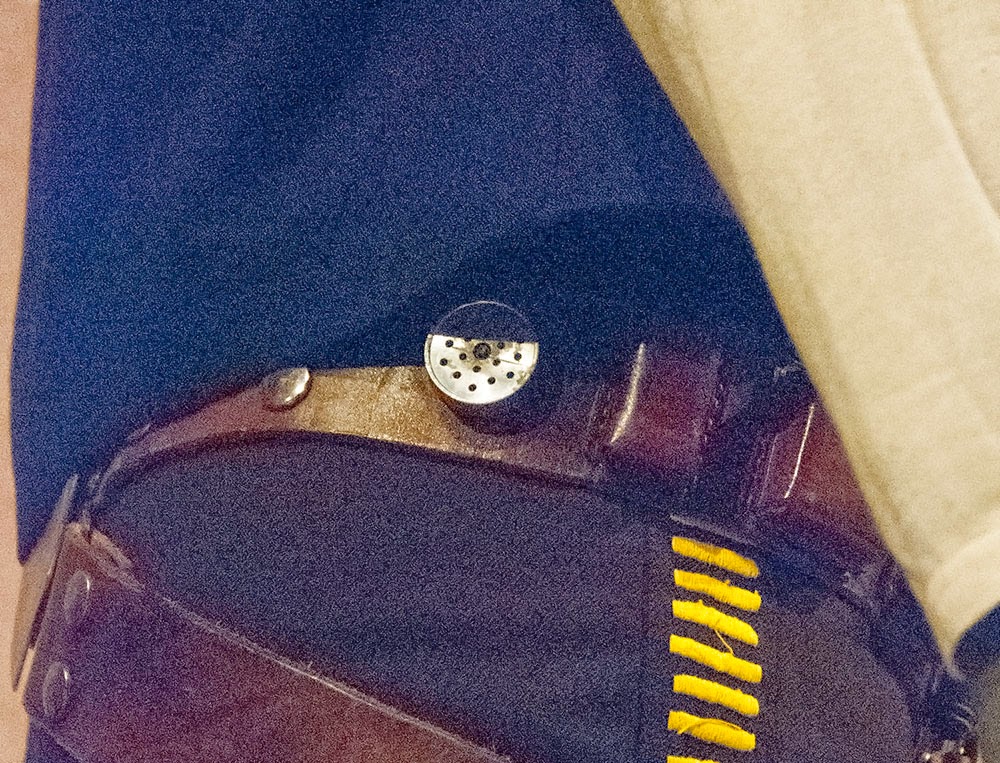
So, as you can perhaps see, the ones being offered by Elvis Trooper are very close, but the little holes appear to be slightly deeper, and not as close to the edge. Lets look at my pattern versions to get a different perspective.
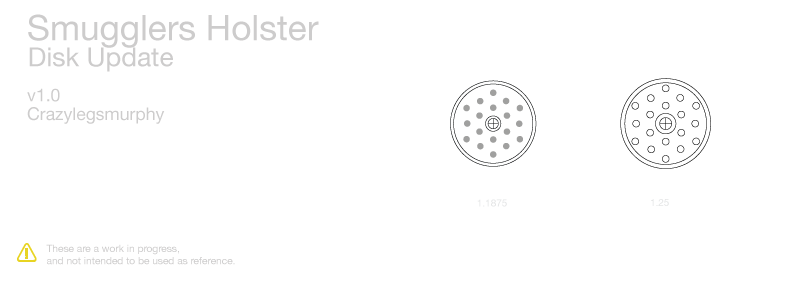
The disk on the right is the original, based off of the design done by Elvis Trooper. It is slightly larger, and the hole spacing is closer to the edge. The centre hole is also larger than the revised version.
The one on the left is the current version based off of the photos above. I still want to double check the radius since I now have higher resolution photos to use, and the other Greeblies, so this may change slightly.
The reason I made this post however, is that I wanted to get your feedback. Do you feel that the disk is closer to the costume used version? Do you see any issues with the updated design?
I also need to figure out the depth of the disk as well, but I haven't gotten to that point yet.
For now, I'll leave this for you guys to ponder.
v 1.0
The Disk
Admittedly I was quite happy that the costume in Seattle was turned in a way that allowed me to get some usable images of the disk. The reference photos I had access to were simply not cutting it, and so I based my original disk off of the one that many of you know and love, from Elvis Trooper.
Now, these are great disks, so please don't think I am singling Elvis Trooper out. I have been in contact with him and he has made it quite clear he will update his version if he is convinced that there is a way to do it more accurately.
So, lets see if that is the case.
Unidentified Disk Shaped Object
Here are the images that I was able to get from the ESB costume in Seattle.
(sorry for the size, but I want you guys to have access to the detail)
So, as you can perhaps see, the ones being offered by Elvis Trooper are very close, but the little holes appear to be slightly deeper, and not as close to the edge. Lets look at my pattern versions to get a different perspective.
The disk on the right is the original, based off of the design done by Elvis Trooper. It is slightly larger, and the hole spacing is closer to the edge. The centre hole is also larger than the revised version.
The one on the left is the current version based off of the photos above. I still want to double check the radius since I now have higher resolution photos to use, and the other Greeblies, so this may change slightly.
The reason I made this post however, is that I wanted to get your feedback. Do you feel that the disk is closer to the costume used version? Do you see any issues with the updated design?
I also need to figure out the depth of the disk as well, but I haven't gotten to that point yet.
For now, I'll leave this for you guys to ponder.
ImperialWalker
Well-Known Member
Smugglers Holster
v 1.0
Update
My goal yesterday was to make sure the pouch pattern was perfect. After a full days work, the result is...

Argh!!
So frustrating. I realize that I am being overly critical here, but screen accuracy to this degree can be a bit of a pain.
But....it is what it is. So what have I figured out?
Not wide enough, not deep enough... story of my life.
When I adjusted the foam version from my first revision, I overcompensated and made the pouches too wide, and too deep. This resulted in the Greeblie basically just falling out.
After readjusting, I did another foam version which looked pretty much exact. I sized my reference photos on my monitor so they were as close to 1:1 as possible. I then used this, with a combination of other references to size what looked to be a perfect pouch.
So, I took it to leather to see what would happen.
Well, the thing with this project is that I often make two mistakes. One, I tend to focus on certain things so much, that I completely ignore others until much later. For example, I knew that the pouches were about 1/8" from the top and bottom. What I failed to notice was that it is actually the last hole for the sewing that is at that position. So, after sewing it all together, I noticed that my hole was very close to the top, and the leather was at 1/8". This isn't accurate. The hole is at 1/8" and the pouch sits below that. It is a small difference, but visually (if you know what you're looking for) it is totally inaccurate.
Secondly, and this was a major bone head move on my part. When I was making the pattern for the pouches, I forgot to think in 3D. It meant that my sewing holes were right under the bend line on the top of the pouch. This makes sense if you're working in paper, and even the foam didn't have any issues because it is much more forgiving when it bends/squishes.
The leather however...it is like trying to get a cat to wear a top hat and bow tie. When I sewed my leather version, it was bowing out on the sides. I realized that I needed to widen the sewing holes so the sides would be parallel. Not a huge issue...except.
Now that the holes are wider, it means that the Greeblie no longer sits right. Meaning there is too much space on either side. So, just adjust the width of the pouch, right....nope. If I do that, the pouch width, which is as close to perfect as I can make it, will be wrong. So, the only solution is that my pouch must be too deep.
(Quick explanation for those who actually care)
The Greeblie sits in the pouch and there is space on each side, but because it is deeper than the pouch, it forces the sides inwards. This makes the space on the sides of the Greeblie appear less. If the pouch is too deep, it doesn't stretch the leather, and the Greeblie falls out. If it is the right depth, it will not only sit in the pouch correctly, but will visually look correct.
It is a bit of a guessing game because the distortions of the leather make it almost impossible to get a fixed reference on how thick, and wide it should be. See below image.
Notice how the pouch on the left, and right are actually the same, but the distortion caused by the Greeblie creates an illusion that they are different. This distortion is really hard to compensate for I am finding. Finding the right depth to width ratio (screen accurate) is proving to be a bit of a challenge.
Here are the results of yesterdays tests.
Seeing Patterns
Today's goal is to adjust, and try again.
I hesitate to use leather for these throw away tests, but I just don't think the foam is going to cut it when I get down to this level of detail. I need the leather to work like it does, so I can determine if things are correct. The foam, even though it is the same thickness as the pouch leather, is way too forgiving in its ability to squish and bend into shape. Yesterday it lead me to believe my pattern was right.
I think I am super close though. If the pouch comes out perfect today, I will know that my measurements are correct, and I can go back and double check everything for sizing.
So...see you in a few hours.
v 1.0
Update
My goal yesterday was to make sure the pouch pattern was perfect. After a full days work, the result is...
Argh!!
So frustrating. I realize that I am being overly critical here, but screen accuracy to this degree can be a bit of a pain.
But....it is what it is. So what have I figured out?
Not wide enough, not deep enough... story of my life.
When I adjusted the foam version from my first revision, I overcompensated and made the pouches too wide, and too deep. This resulted in the Greeblie basically just falling out.
After readjusting, I did another foam version which looked pretty much exact. I sized my reference photos on my monitor so they were as close to 1:1 as possible. I then used this, with a combination of other references to size what looked to be a perfect pouch.
So, I took it to leather to see what would happen.
Well, the thing with this project is that I often make two mistakes. One, I tend to focus on certain things so much, that I completely ignore others until much later. For example, I knew that the pouches were about 1/8" from the top and bottom. What I failed to notice was that it is actually the last hole for the sewing that is at that position. So, after sewing it all together, I noticed that my hole was very close to the top, and the leather was at 1/8". This isn't accurate. The hole is at 1/8" and the pouch sits below that. It is a small difference, but visually (if you know what you're looking for) it is totally inaccurate.
Secondly, and this was a major bone head move on my part. When I was making the pattern for the pouches, I forgot to think in 3D. It meant that my sewing holes were right under the bend line on the top of the pouch. This makes sense if you're working in paper, and even the foam didn't have any issues because it is much more forgiving when it bends/squishes.
The leather however...it is like trying to get a cat to wear a top hat and bow tie. When I sewed my leather version, it was bowing out on the sides. I realized that I needed to widen the sewing holes so the sides would be parallel. Not a huge issue...except.
Now that the holes are wider, it means that the Greeblie no longer sits right. Meaning there is too much space on either side. So, just adjust the width of the pouch, right....nope. If I do that, the pouch width, which is as close to perfect as I can make it, will be wrong. So, the only solution is that my pouch must be too deep.
(Quick explanation for those who actually care)
The Greeblie sits in the pouch and there is space on each side, but because it is deeper than the pouch, it forces the sides inwards. This makes the space on the sides of the Greeblie appear less. If the pouch is too deep, it doesn't stretch the leather, and the Greeblie falls out. If it is the right depth, it will not only sit in the pouch correctly, but will visually look correct.
It is a bit of a guessing game because the distortions of the leather make it almost impossible to get a fixed reference on how thick, and wide it should be. See below image.
Notice how the pouch on the left, and right are actually the same, but the distortion caused by the Greeblie creates an illusion that they are different. This distortion is really hard to compensate for I am finding. Finding the right depth to width ratio (screen accurate) is proving to be a bit of a challenge.
Here are the results of yesterdays tests.
Seeing Patterns
Today's goal is to adjust, and try again.
I hesitate to use leather for these throw away tests, but I just don't think the foam is going to cut it when I get down to this level of detail. I need the leather to work like it does, so I can determine if things are correct. The foam, even though it is the same thickness as the pouch leather, is way too forgiving in its ability to squish and bend into shape. Yesterday it lead me to believe my pattern was right.
I think I am super close though. If the pouch comes out perfect today, I will know that my measurements are correct, and I can go back and double check everything for sizing.
So...see you in a few hours.
Last edited:
Oh man, I say this with a huge sense of admiration and appreciation, you are Crazy!! This is so good and through your descriptions I feel your pain. When you are done this will all be worth it, all I can say is keep going and enjoy yourself knowing you are probably analyzing this in more detail than anyone ever. Try picking up some cheapo leather from the tandys cutoff bin for you tests.
ImperialWalker
Well-Known Member
Oh man, I say this with a huge sense of admiration and appreciation, you are Crazy!! This is so good and through your descriptions I feel your pain. When you are done this will all be worth it, all I can say is keep going and enjoy yourself knowing you are probably analyzing this in more detail than anyone ever. Try picking up some cheapo leather from the tandys cutoff bin for you tests.
I know I am hitting the correct amount of obsessive ridiculousness when all I get are side eyes and head shakes from my girlfriend. I am enjoying myself. It has been too long since I had the opportunity to do this stuff, and it feels amazing to build stuff to the level of detail I want, with no time or budget constraints.
I should have picked some scraps up when I was in Mesa. The only Tandy leather store here, is on the mainland which is a $200 ferry ride and about 4 hours drive. I just have to accept that if I use an entire shoulder on pouches, I'll have to get more leather....Not sure what I'll do with all the pouches though.
ImperialWalker
Well-Known Member
Does anyone have a genuine Sparklets Bulb (ANH) that they could measure the diameter of?
Mine haven't arrived in time and I need to double check my pouch.
Thanks.
Mine haven't arrived in time and I need to double check my pouch.
Thanks.

ImperialWalker
Well-Known Member
The diameter on my vintage CO2 Soda cartridge is 1.85 mm and fits snug in the holster
http://i833.photobucket.com/albums/zz258/Sym-Cha/CO2-SodaCharger03.jpg
Is it possible the plastic ESB greeble has been slightly sanded from the back for a better fit?
Chaim
Thanks!
Did you mean centimetres? Because if it is millimetres, I have really, really miscalculated.
ImperialWalker
Well-Known Member
Smugglers Holster
v 1.0
Hooks
As I prepare the photos for the pouches, I wanted to take small detour back to the hooks.
You know, this project would probably be done already if I didn't have to go back and change a bunch of stuff, every time I come across some new photo. Oh well, that is what screen accuracy means I suppose.
After sifting through the photos I took in Seattle, I noticed on only two of them, something that made me realize my previous assumption was wrong.
In my initial design for the Episode V hooks, I knew from the reference photos that the one side was a rectangle shape. However, the reference photos showed that the other side had a top and bottom that curved down. I assumed this was because they were attempting to reduce the height of the hook, so it could more easily work with the "Y" connector.
See here:
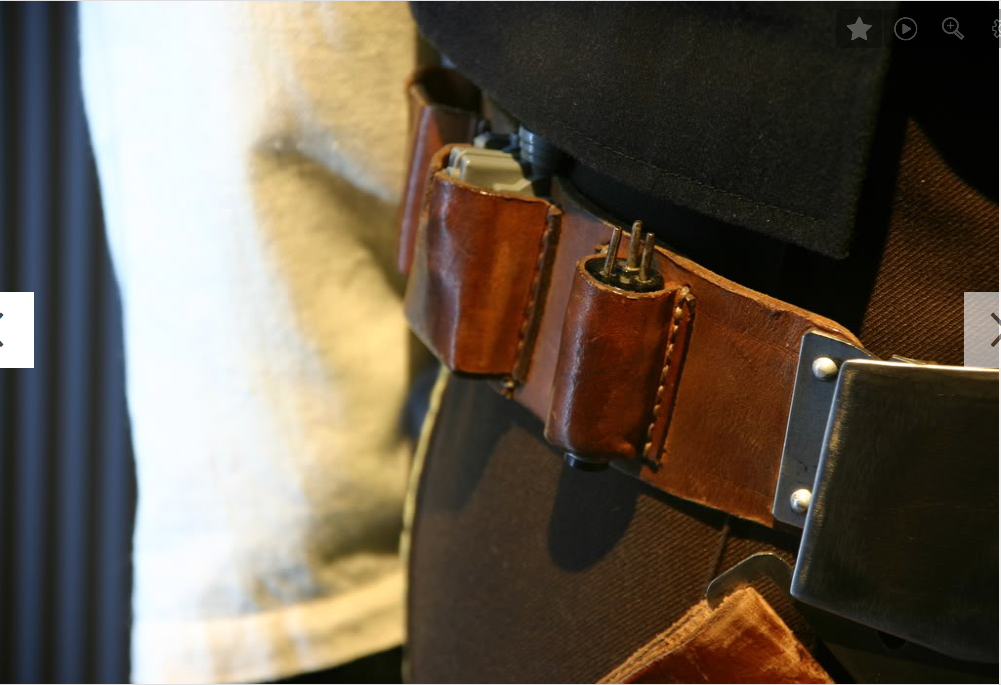
See how the top of the hook curves down?
I looked at this, and that little bit of metal to the right, and assumed this was the hook curving back around behind. My original design had the hook curve down, straighten out, then curve back around.
Well...turns out I was quite wrong...

On the right, we can see the hook from a different angle.
That was no reduction in height, nor was the metal curving back. It was actually a notch in the hook. Weird, huh?
This new information prompted me to go back and redesign the hook, which as with most things on this holster has a knock on effect, in that it meant that my loops were wrong, and the "Y" connector had to be tweaked, etc.
The reason I am posting this, is because I would like you guys to look at it with fresh eyes.
Fresh Hook
On the image above, the photo on the left is from Episode VI.
What is strange is that it seems to have the same curve, but in this version, the notch has an outward curve. Compare this to the Episode V version, which appears to have a concave curve. Here are the new shapes:

So, I am hoping you guys can take a look at this and let me know your thoughts on whether I have properly interpreted this new shape.
v 1.0
Hooks
As I prepare the photos for the pouches, I wanted to take small detour back to the hooks.
You know, this project would probably be done already if I didn't have to go back and change a bunch of stuff, every time I come across some new photo. Oh well, that is what screen accuracy means I suppose.
After sifting through the photos I took in Seattle, I noticed on only two of them, something that made me realize my previous assumption was wrong.
In my initial design for the Episode V hooks, I knew from the reference photos that the one side was a rectangle shape. However, the reference photos showed that the other side had a top and bottom that curved down. I assumed this was because they were attempting to reduce the height of the hook, so it could more easily work with the "Y" connector.
See here:
See how the top of the hook curves down?
I looked at this, and that little bit of metal to the right, and assumed this was the hook curving back around behind. My original design had the hook curve down, straighten out, then curve back around.
Well...turns out I was quite wrong...
On the right, we can see the hook from a different angle.
That was no reduction in height, nor was the metal curving back. It was actually a notch in the hook. Weird, huh?
This new information prompted me to go back and redesign the hook, which as with most things on this holster has a knock on effect, in that it meant that my loops were wrong, and the "Y" connector had to be tweaked, etc.
The reason I am posting this, is because I would like you guys to look at it with fresh eyes.
Fresh Hook
On the image above, the photo on the left is from Episode VI.
What is strange is that it seems to have the same curve, but in this version, the notch has an outward curve. Compare this to the Episode V version, which appears to have a concave curve. Here are the new shapes:
So, I am hoping you guys can take a look at this and let me know your thoughts on whether I have properly interpreted this new shape.
Last edited:
Sym-Cha
Master Member
Oops ... yeah 1.85 cm ... sorry about that :wacko
Chaim
Chaim
Thanks!Did you mean centimetres? Because if it is millimetres, I have really, really miscalculated.
ImperialWalker
Well-Known Member
Smugglers Holster
v 1.0
The "Action Belt"?
Last night I was working on the pattern for the belt and I happened across something. In many/most of the scenes in Ep. 6, it appears that the back of the belt, where they attach to the buckle, is missing some buttons.
Take a look.
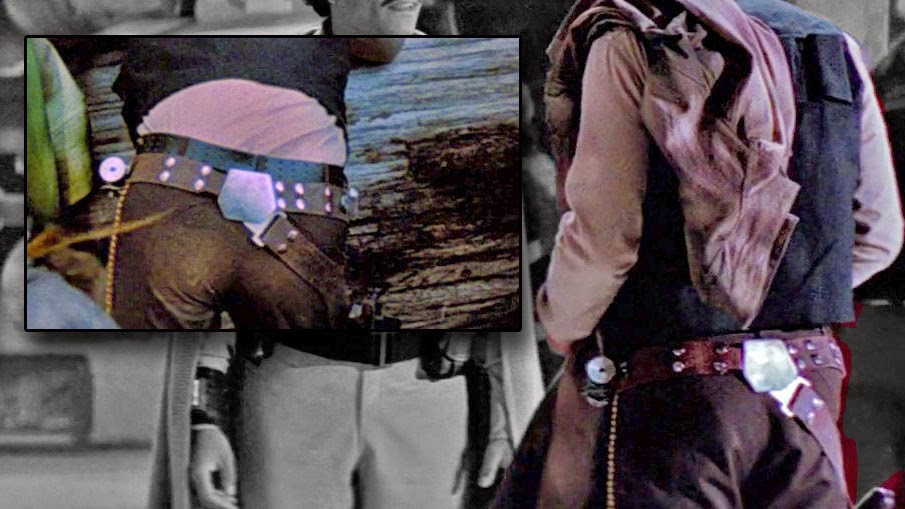
There are a few other screens with this, but you can clearly see that the belt tapers on one side, and is missing a set of buttons.
The thing is, I can't figure out why.
If you look at the apparent screen used version, the buttons are clearly there, and there is no taper to the belt.
These are obviously two different belts. What I can't figure out though, is why the one in the movie is missing the buttons, and where this holster even exists in the movie.
I thought that perhaps the screen used one above may have originally been a Ep. 5 belt, rehashed for display purposes, but it clearly has Ep. 6 characteristics (hook shape, etc.).
I can't seem to find where it is used in the movie.
So, my question is....
Should I put both in as options, or should this be explored a bit more?
v 1.0
The "Action Belt"?
Last night I was working on the pattern for the belt and I happened across something. In many/most of the scenes in Ep. 6, it appears that the back of the belt, where they attach to the buckle, is missing some buttons.
Take a look.
There are a few other screens with this, but you can clearly see that the belt tapers on one side, and is missing a set of buttons.
The thing is, I can't figure out why.
If you look at the apparent screen used version, the buttons are clearly there, and there is no taper to the belt.
These are obviously two different belts. What I can't figure out though, is why the one in the movie is missing the buttons, and where this holster even exists in the movie.
I thought that perhaps the screen used one above may have originally been a Ep. 5 belt, rehashed for display purposes, but it clearly has Ep. 6 characteristics (hook shape, etc.).
I can't seem to find where it is used in the movie.
So, my question is....
Should I put both in as options, or should this be explored a bit more?
Last edited:
Strontiumdoguk
Member
Looks like this will be very accurate with your attention to detail
Sent from my iPhone using Tapatalk
Sent from my iPhone using Tapatalk
ImperialWalker
Well-Known Member
Smugglers Holster
v 1.0
Episode 7
I present to you, the most screen accurate Episode 7 holster pattern to date.
v 1.0
Episode 7
I present to you, the most screen accurate Episode 7 holster pattern to date.
Last edited:
Was the one in the movie altered because Ford was heavier? Perhaps they cut an existing holster there and added the smaller strip to extend the belt.
ImperialWalker
Well-Known Member
Was the one in the movie altered because Ford was heavier? Perhaps they cut an existing holster there and added the smaller strip to extend the belt.
From what I can see, it does look very Ep. 5. based on the left hook and the buckle.
I would bet dollars to donuts that it is a completely new belt. They would have most likely produced a few for the movie, since I don't suspect there are many, if any other than the exhibit versions still around.
My guess is that we will see a very similar holster to Ep. 5, with potentially slight modifications to the disc, droid caller, and possibly pouches (for new Greeblies).
It might....might have an extra pouch or something on the droid caller side to space things out for Fords thicker body, but he is still in great shape, so they may have kept everything the same, and there will just be a bit more space between the front and back of the disc/caller.
ImperialWalker
Well-Known Member
Smugglers Holser
v 1.0
Who wants a free ticket to Maddame Tussauds Star Wars exhibit, in London?
I just watched the following video:
http://www.youtube.com/watch?v=UtILxNk9x-8
In it, the sculptor states that they had access to the original archives to be able to recreate very accurate costumes. If you notice, our pal Han has been recreated in very accurate detail it would seem.
I emailed them and asked them if they would please answer some questions for me, namely what are the white Greeblies, how does the buckle work, and what are the measurements of the pouches.
What is odd, is that the holster does seem to be a Ep. 4 / 5 hybrid. The buckle and holster and Ep. 4, but the pouches are Ep. 5.
Regardless, they allow you to get right up and close (actually sit with Han).

This has me thinking.
If that holster is fairly accurate, it might actually be a huge benefit to see it in person (and get photos). So, if anyone is living in London (or close) and would like to go on a recon mission, I would be willing to pay for your ticket to get in.
If you're interested, send me a PM and we can work out the details. This might be a super great opportunity to get some additional information, if in fact it was created from the archives.
v 1.0
Who wants a free ticket to Maddame Tussauds Star Wars exhibit, in London?
I just watched the following video:
http://www.youtube.com/watch?v=UtILxNk9x-8
In it, the sculptor states that they had access to the original archives to be able to recreate very accurate costumes. If you notice, our pal Han has been recreated in very accurate detail it would seem.
I emailed them and asked them if they would please answer some questions for me, namely what are the white Greeblies, how does the buckle work, and what are the measurements of the pouches.
What is odd, is that the holster does seem to be a Ep. 4 / 5 hybrid. The buckle and holster and Ep. 4, but the pouches are Ep. 5.
Regardless, they allow you to get right up and close (actually sit with Han).
This has me thinking.
If that holster is fairly accurate, it might actually be a huge benefit to see it in person (and get photos). So, if anyone is living in London (or close) and would like to go on a recon mission, I would be willing to pay for your ticket to get in.
If you're interested, send me a PM and we can work out the details. This might be a super great opportunity to get some additional information, if in fact it was created from the archives.
While they did have access to the Lucas archives, I am not sure that this would really benefit us with ANH Han's belt and holster. Do any of these items even exist anymore - even in the archives, let alone a private collection?
I only say this because looking at the photos, the "look" of everything is right, but those pants don't look like brushed denim to me and there is that dimple in the mandarin collar that I have never seen before.
So should we really trust that their belt is accurate? Or is it just as accurate as they can get?
Also, is that a Todd's belt on his pants??
Edit - the buckles look really accurate though. check out the bevel on the edges and how they match this photo
Last edited:
Similar threads
- Replies
- 3
- Views
- 221
- Replies
- 3
- Views
- 849
- Replies
- 232
- Views
- 25,556
- Replies
- 0
- Views
- 230