Weaselhammer
Sr Member
It's really great of you to do these projects to support charities like Child's Play.You set a great example ! Thank you !

Thanks guys!
The charity thing is really addictive, and I know that's a weird thing to say, but being at the auction with the electric vibe of the whole thing makes all the weeks of work totally worth it. I love that the guys at PA have managed to give gamers a positive voice as well, as we're too often portrayed as a lazy or malevolent culture in a lot of media.
Not much work going on today (Thanksgiving and all!) but I spent some time in photoshop putting together the graphics for the little gauge on the left handle drum.
1.5" diameter gauge - super tiny! Need to figure out the best way to mock up a needle... maybe I can salvage some plastic toothpicks from dinner tonight!
(colors look a bit off above, because this is a CMYK file saved as a JPEG then displayed on a monitor. Its much more subdued in the final print)
")
I think what he was trying to point out was that it appears that your pivot hole for the pointer appears to be off center.
Here's the actaul gauge from the texture files, if it helps.
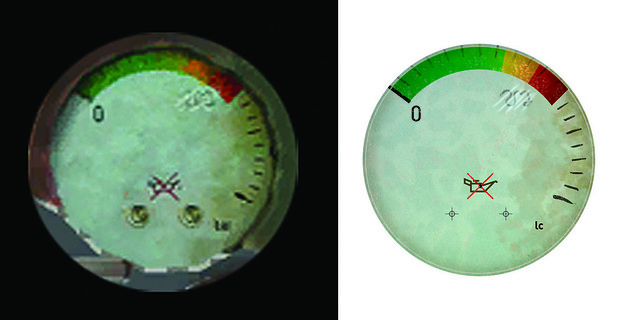
Still no idea what the "82" or "U2" thing is in the upper right, but its mostly scratched out anyhow. Besides, this thing is 1.5" in diameter; I doubt you'll be able to read the printout anyways!
Coming along really well. Are you going to use rub n buff for the finish?
This thing is amazing, excellent work! So I know you said you couldn't share the hi-res files, but what about your Arduino code?