You are using an out of date browser. It may not display this or other websites correctly.
You should upgrade or use an alternative browser.
You should upgrade or use an alternative browser.
GONK!
- Thread starter Torron
- Start date


Are you going to add something to the feet for weight?
Torron
Active Member
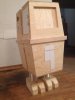
Today I made the nib cutouts. Everything is glued together except the top sections.


I also started on the legs. No pics yet")
I'm still thinking with what can I fill the feet (maybe stones/sand?) or if I leave them hollow. I will probably test it hollow vs filled and see what works better.
I also started on the legs. No pics yet
I'm still thinking with what can I fill the feet (maybe stones/sand?) or if I leave them hollow. I will probably test it hollow vs filled and see what works better.
Today I made the nib cutouts. Everything is glued together except the top sections.
View attachment 648385
View attachment 648386
I also started on the legs. No pics yet
I'm still thinking with what can I fill the feet (maybe stones/sand?) or if I leave them hollow. I will probably test it hollow vs filled and see what works better.
Ideally, I think some heavy ball bearings would work, but that could get very expensive.
Torron
Active Member
After a line of some minor updates, here comes a super big update!
A lot of photos aswell
Cut out some decorational panels from styrene and glued them on, including the E:


I was inspired mainly by the new Battlefront (front down panel) and by TCW Gonk (three back pieces).
Side details of the feet:


Completed legs:

Not screwed together yet:


And I just wanted to see, how does it look:

Tomorrow trimming and bondoing when the weather is good.
What do you all think? Any criticism welcomed
A lot of photos aswell
Cut out some decorational panels from styrene and glued them on, including the E:
I was inspired mainly by the new Battlefront (front down panel) and by TCW Gonk (three back pieces).
Side details of the feet:
Completed legs:
Not screwed together yet:
And I just wanted to see, how does it look:
Tomorrow trimming and bondoing when the weather is good.
What do you all think? Any criticism welcomed
Attachments
EdrrakNolat
New Member
Looks good! I am still not sure what to cut for my details but seeing how well the styrene turned out for you I may use that.
Torron
Active Member
Looks good! I am still not sure what to cut for my details but seeing how well the styrene turned out for you I may use that.
Thanks! I use styrene for most of the details on my builds, because it's easy to work with it. The hardest part on this were the holes on the feet deatils. I usually cut pieces with exacto knife, but for them was dremel better
Torron
Active Member
I had no time today for bondoing, but on the other hand I trimmed and sanded the Gonk thorough.


Drilled holes on the back of the feet for hoses:

Glued and drilled the feet together. They're filled with stones, so they are pretty heavy

And once again putted together. From these pictures the feet seem to be too big, but maybe it is just me. What do you think?


Bondo is next on the list!
Drilled holes on the back of the feet for hoses:
Glued and drilled the feet together. They're filled with stones, so they are pretty heavy
And once again putted together. From these pictures the feet seem to be too big, but maybe it is just me. What do you think?
Bondo is next on the list!


Torron
Active Member
Thank you.this is coming out amazing!! i love how you have him at a angle. perfect!!
Tomorrow sanding and then I can paint him + greeble up the faceplate
Torron
Active Member
Feet is looking right scale to me.
How did you do the trim piece where the bottom and top halves meet?
-Eric
I cut long pieces of wood, which fitted around the body (about 4 cm high) and screwed them to the bottom part, but with half of it overlapping the top (so 2 cm are screwed to the bottom and 2 cm jut out). In the pictures you can see styrene plates on it. They're simply glued on. Then I trimmed the corners, so they are nosing. I bondoed it and now I am going to sand it.


Similar threads
- Replies
- 31
- Views
- 1,121
- Replies
- 3
- Views
- 648
- Replies
- 17
- Views
- 2,973