You are using an out of date browser. It may not display this or other websites correctly.
You should upgrade or use an alternative browser.
You should upgrade or use an alternative browser.
Ghostbusters Ecto-1 Project: The Largest Ever
- Thread starter Ultimate Badass
- Start date
-
- Tags
- car ecto ghostbusters
Ultimate Badass
Well-Known Member
Just a quick update...no car pictures sadly, but important photos nonetheless. I have some photos of the new garage - the garage I had been renting is just too inaccessible for a car of Ecto's size, so I wasn't willing to risk it. This new garage is bigger, nicer, more hidden, and much easier to get the car in and out of.
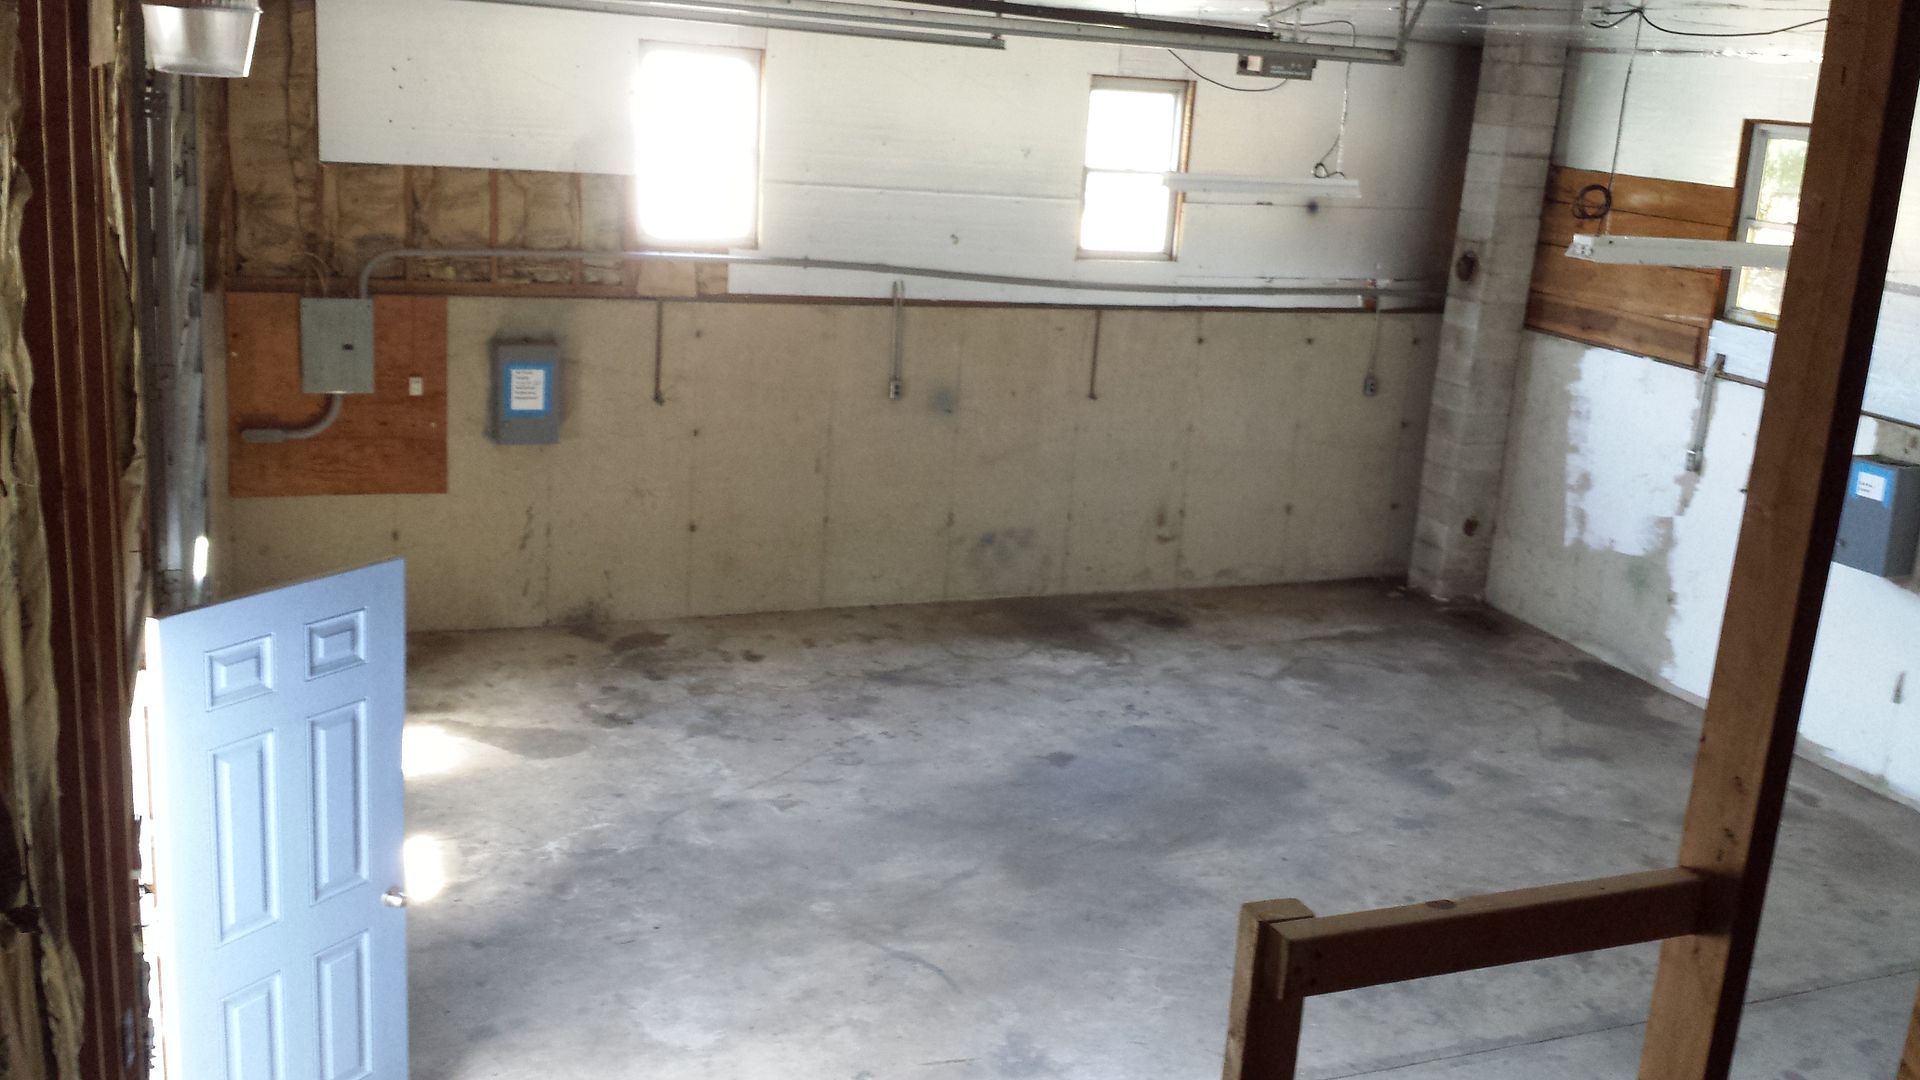
Here's a nice panoramic shot taken by my buddy Matt:

I'm pretty stoked!
Here's a nice panoramic shot taken by my buddy Matt:

I'm pretty stoked!
Ultimate Badass
Well-Known Member
Hey guys,
It's been too long and for that I apologize. I've been in the middle of a lot of stuff (I'm actually going to be tackling another huge prop build soon and can't wait to share that on here). Today I got some fresh photos that I had to share. Yes, it's the rear of the car, and it's been primered!
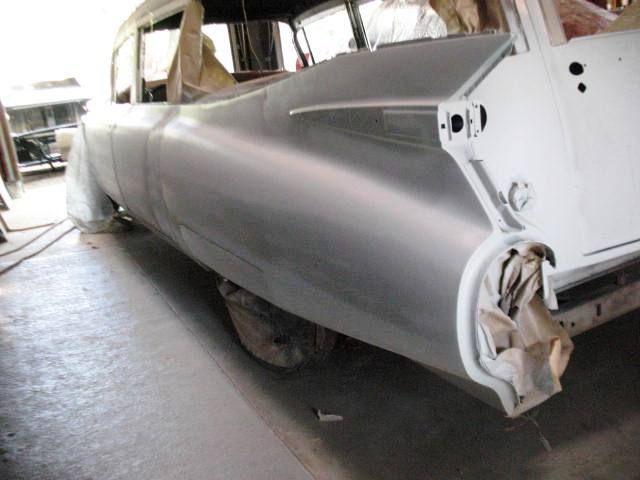
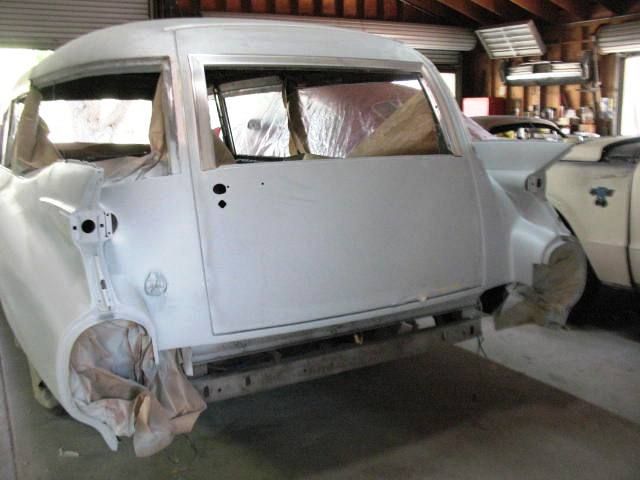
So. Damn. PRECISE. I love it! Ironically, I have recently had a massive argument and showdown with a few knuckleheads within the hearse community over my car project. Some of them feel that I've ruined a car...well, not only is it none of their f'n business what I do with a car that *I BOUGHT*, but I'd say this turned out flawless. This car has been transformed from a 1960 to a 1959 and that has brought a dead car back to life. The excitement continues to build!
I'm about to do the same thing to a 61.... Not looking forward to the fight  beautiful work on this!! Such an iconic and classic body style in any form!! Right up there with so many greats!!
beautiful work on this!! Such an iconic and classic body style in any form!! Right up there with so many greats!!Ultimate Badass
Well-Known Member
Hotshot, what are you doing to a 61? Full restoration or conversion to a 59? The 61 actually looks closer to the 59 than even a 60 does in a lot of ways.
Yea she's a heavenly beast. Needs some work, and resoration and hearse to ambulance underway. Finished her brakes today. Don't wanna hijack, but yea I'm converting to a 59. Gonna do a 1A. Between you an Loren, so I figured 1A wouldn't be repetitive !!
!!Ultimate Badass
Well-Known Member
Good luck...haha. I am looking forward to seeing pictures if you've got any? PM me a link if you do!
Boatloads. Will get my own thread going soon!!
I just got a new set of vinyl samples for my own build( and I'm happy to say I've got my accurate vinyl), and I think we accidentally id'd the Ecto 1's interior white vinyl pattern! I'll be sure to pass it on!!
Ultimate Badass
Well-Known Member
Hey everyone, I have returned from an incredible trip to California. What an amazing time. As Egon says: "This is big, Peter...this is very big..."
First and foremost, my buddy Matt and I got to California and spent our first day eating massive burritos (so good) and followed that up with an evening at the Griffith Observatory (an awesome location). If anyone saw the Rocketeer (all of you better have seen it), it's the location of the ending. The great thing about this place is that you literally have to drive through the tunnel that was used as the tunnel to Toon Town in 'Who Framed Roger Rabbit' and as the tunnel in which Biff tries to run Marty McFly down after he reclaims the sports almanac in 'Back to the Future, Part II'.

This picture is actually from a few nights into the trip, but I'm mainly showing it because it's me with our buddy Nik. Well, why do you care about Nik you ask? Well, because he's got this:

A beautiful 1963 Cadillac S&S ambulance. This thing is SO MUCH FUN to ride in. People were so caught up over it...I guess the Ecto should generate sickening amounts of envy.
Now, on that note...PHOTOS:

So freaking BIG AND BADASS!


How many times can you look at the same thing over and over? I know, it's boring...but I just love this damn thing so freaking much I have to post any good photo I can find...

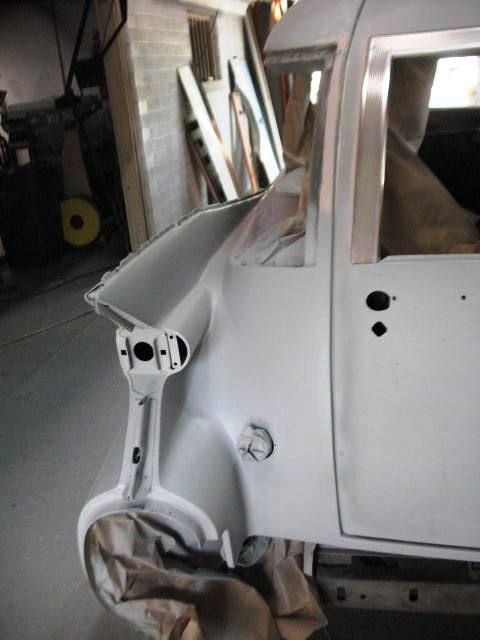
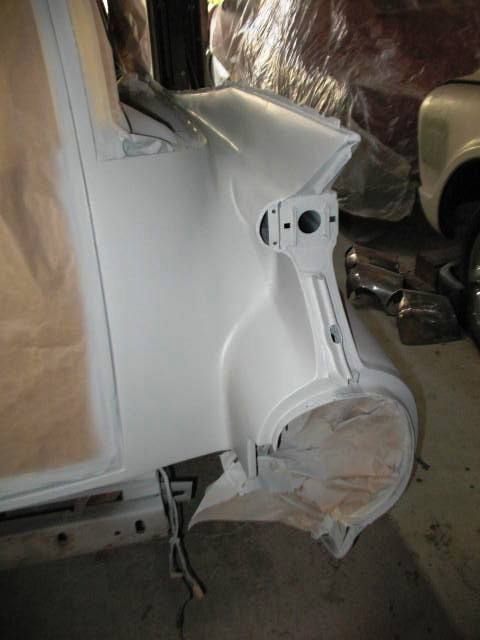
Here I am with the car and the incredibly talented guy restoring it:

Here's the dash waiting to be re-inserted:

That was taken out mainly to allowed for installation of certain things. I found out that the 1959 Cadillac steering wheel and horn ring that I have did not fit to the steering column in the car...mainly because it was a 1960 steering column. My buddy Nik (again, the guy pictured above) found out that I needed a 1959 steering column, he made a phone call, and the next day I had one locked up at an insanely low price. Again, Nik is the freaking man.
Alright, I'll be right back with some more photos and some other awesomeness once I have them uploaded!
First and foremost, my buddy Matt and I got to California and spent our first day eating massive burritos (so good) and followed that up with an evening at the Griffith Observatory (an awesome location). If anyone saw the Rocketeer (all of you better have seen it), it's the location of the ending. The great thing about this place is that you literally have to drive through the tunnel that was used as the tunnel to Toon Town in 'Who Framed Roger Rabbit' and as the tunnel in which Biff tries to run Marty McFly down after he reclaims the sports almanac in 'Back to the Future, Part II'.

This picture is actually from a few nights into the trip, but I'm mainly showing it because it's me with our buddy Nik. Well, why do you care about Nik you ask? Well, because he's got this:

A beautiful 1963 Cadillac S&S ambulance. This thing is SO MUCH FUN to ride in. People were so caught up over it...I guess the Ecto should generate sickening amounts of envy.
Now, on that note...PHOTOS:

So freaking BIG AND BADASS!


How many times can you look at the same thing over and over? I know, it's boring...but I just love this damn thing so freaking much I have to post any good photo I can find...

Here I am with the car and the incredibly talented guy restoring it:

Here's the dash waiting to be re-inserted:

That was taken out mainly to allowed for installation of certain things. I found out that the 1959 Cadillac steering wheel and horn ring that I have did not fit to the steering column in the car...mainly because it was a 1960 steering column. My buddy Nik (again, the guy pictured above) found out that I needed a 1959 steering column, he made a phone call, and the next day I had one locked up at an insanely low price. Again, Nik is the freaking man.
Alright, I'll be right back with some more photos and some other awesomeness once I have them uploaded!
Ultimate Badass
Well-Known Member
Let me start this off with another beautiful shot...

I'm a small human being...even more noticeable now...see for yourself:

Now, prepare to clean your shorts...*****'s about to get REAL...
Here is a video tour of my Ecto at present:
And now, TURN ON YOUR VOLUME IF YOU HAVEN'T YET, and listen to my Ecto GROWL - MY FIRST TIME STARTING HER UP!
Yeah, I got a little excited and hit the starter trigger again after it fired up...but I was so freaking excited and wanted to hear the fire-up again and again...and again.
I LOVE THIS CAR!
I'm a small human being...even more noticeable now...see for yourself:
Now, prepare to clean your shorts...*****'s about to get REAL...
Here is a video tour of my Ecto at present:
And now, TURN ON YOUR VOLUME IF YOU HAVEN'T YET, and listen to my Ecto GROWL - MY FIRST TIME STARTING HER UP!
Yeah, I got a little excited and hit the starter trigger again after it fired up...but I was so freaking excited and wanted to hear the fire-up again and again...and again.
I LOVE THIS CAR!
Last edited by a moderator:
Ultimate Badass
Well-Known Member
So now I have returned to PA and I have left the Ecto back in California, but she's in great hands and still coming along. As you can see in some of the photos, the spotlight has been installed in the front driver-side fender. I'll make a post about this in the future but I'm tired and need to overcome the remaining effects of jet-lag. My buddy and I did do some cool stuff I didn't post much about on here, including a private Sony tour that led to us literally becoming the only two GB fans anywhere to personally inspect some of the hero/semi-hero screen used proton packs, as well as the slime blower (I'm 99.99% sure we are the only two fans to ever see the blower). We visited some other movie-related locations but I figured I'd spare you all from seeing non-related photos. If anyone wants I can post more non-Ecto photos at a later time too. Anyway, enjoy! I hope you watched and loved the videos!
- Adam
- Adam
sonicscrudvr
Active Member
looking awesomer and awesomer!
Ultimate Badass
Well-Known Member
Hey guys,
I've got some more pictures to share as I wait for even more.
First, I know I had posted a picture of my Ferno Washington cot (proton pack rack) before, but I have finally (after years of looking) found the 100% correct one. The ones I already had are 95% accurate but lacked one sliding bar under the foot end of the cot. Well, here she is:
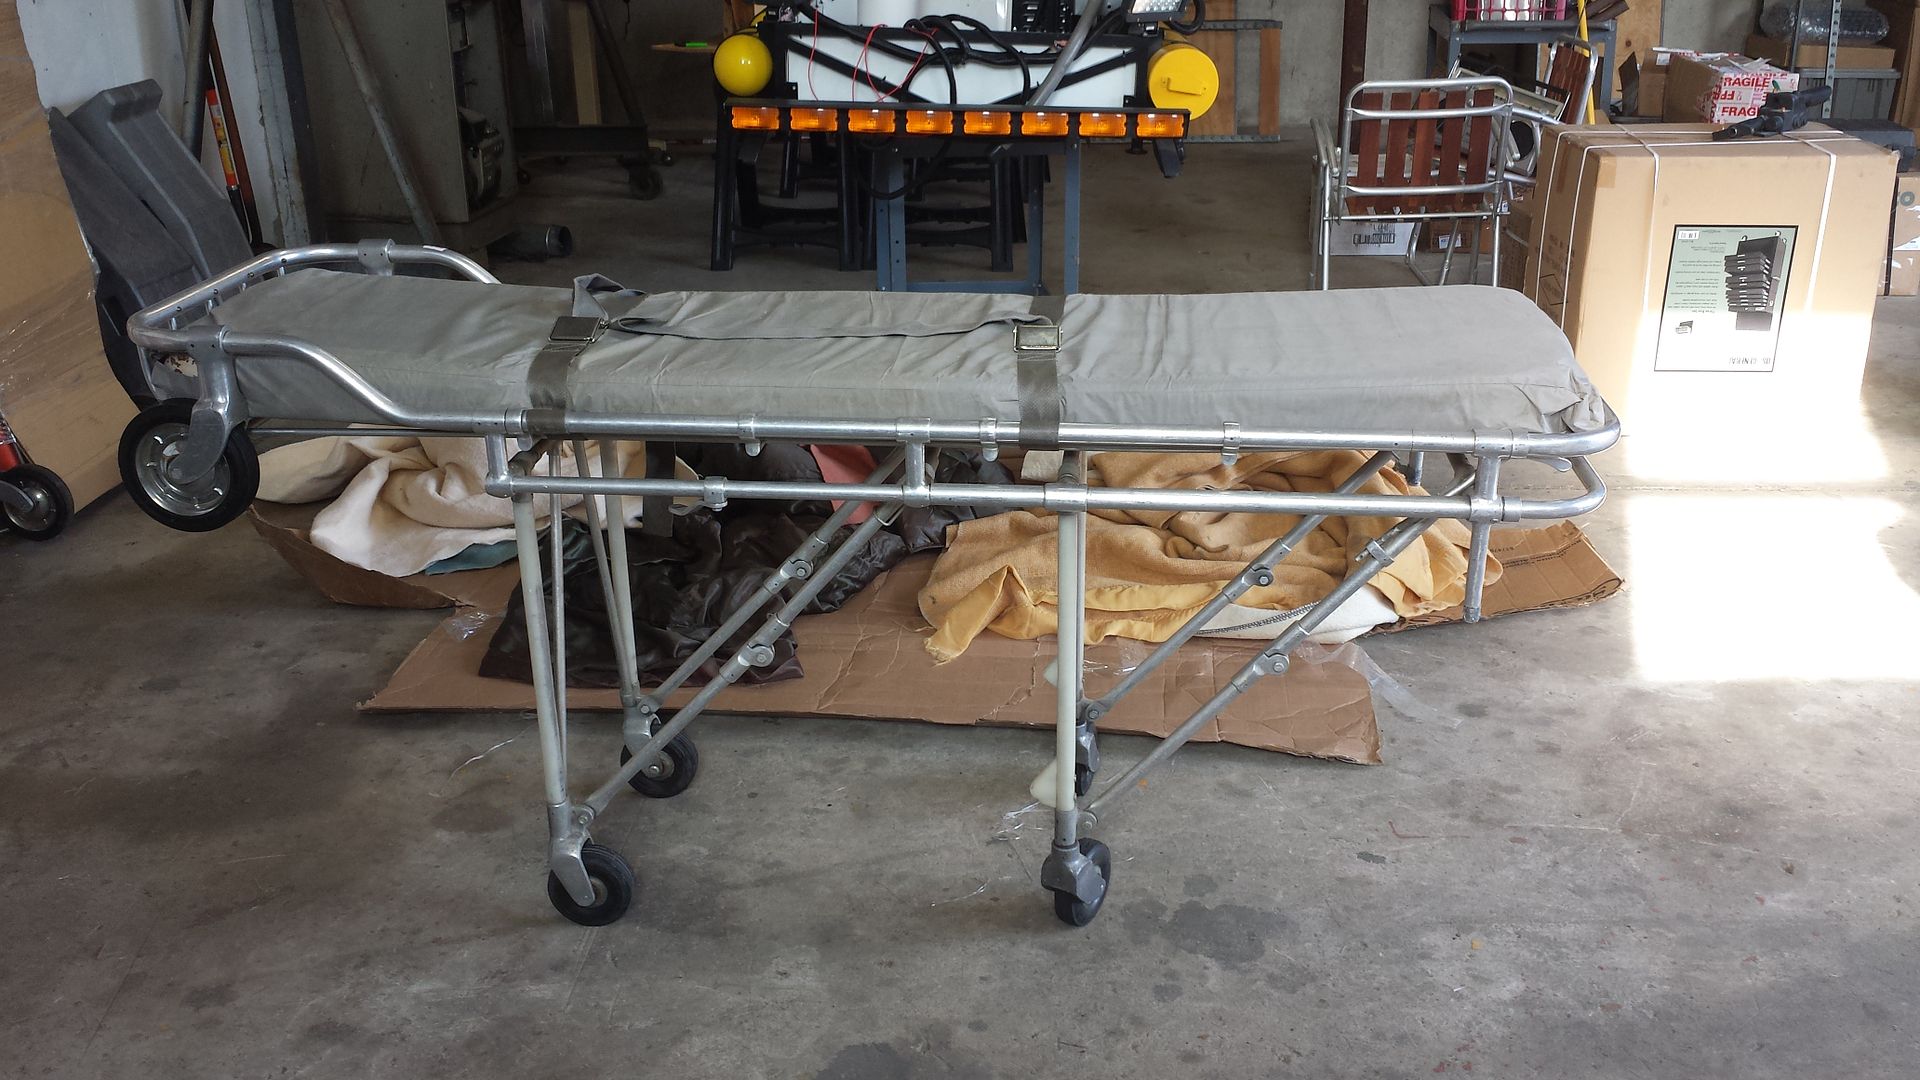

So I have two spare cots...that are super close to movie-accurate. One of the spares will be going to my friend Matt, who purchased a 1963 Cadillac Superior Crown Royale (it's really cool). The other will be used...in another car eventually...
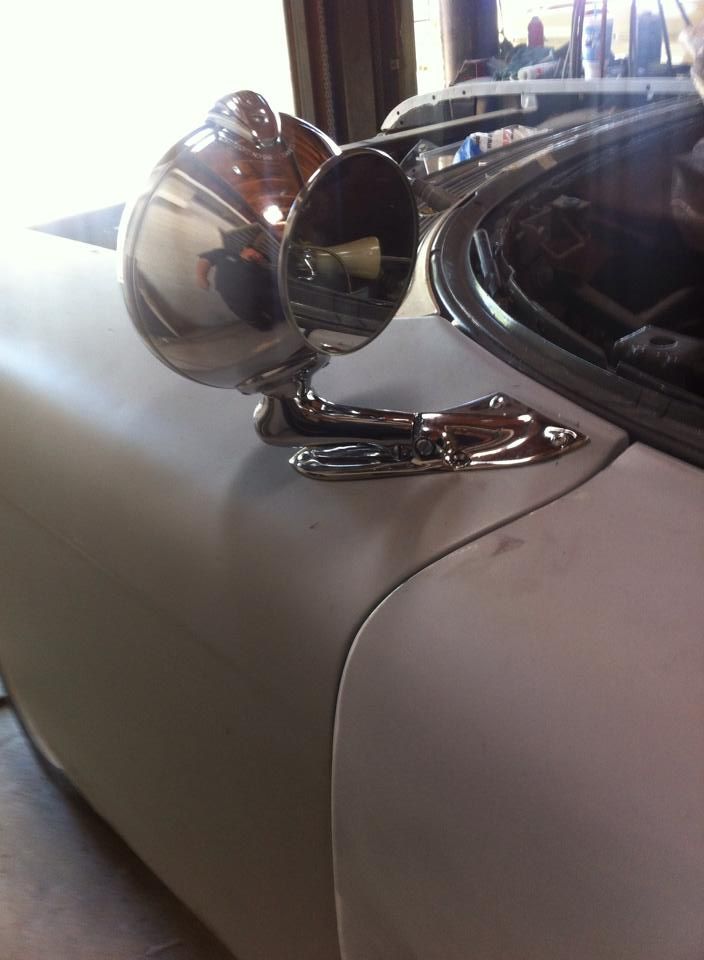
Anyway, here's a close-up shot of the screen-accurate Unity S6 spotlight. I do have the correct blue lens (two of them actually) to place over the actual spotlight, which you can't actually see in this specific photo, but yes, this is taken care of...
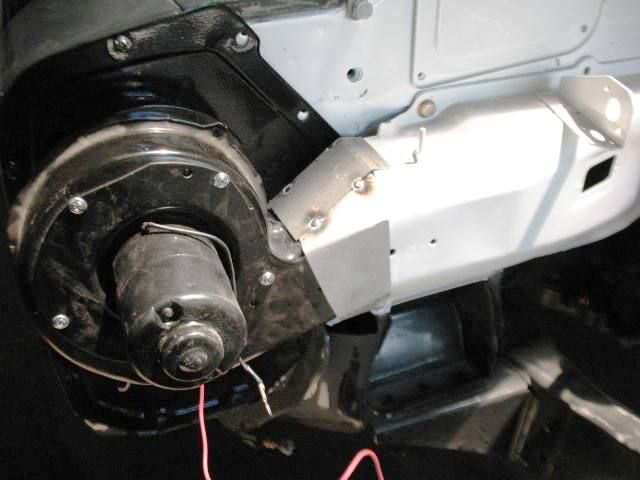
The heater motor and squirrel cage fan have been addressed as well:
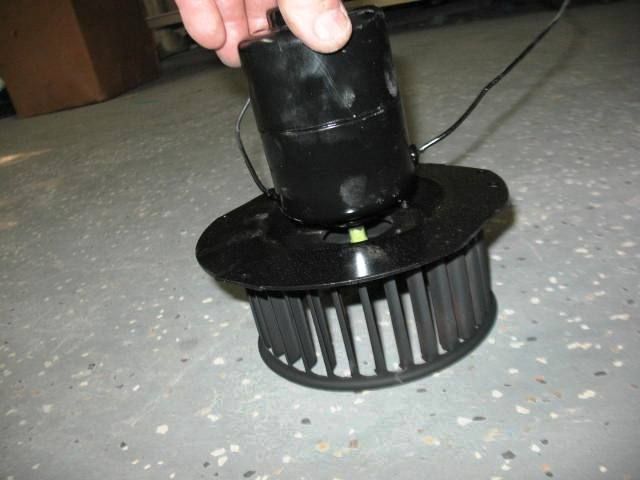
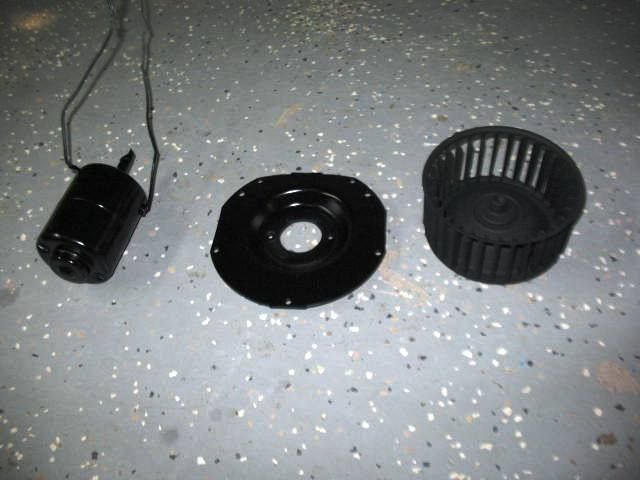
Heater motor installed:
Finally, I've gotten a new radiator:

On top of this, the brake lines are going in, the carrier bearing and u-joints are going to be replaced with new ones, and air conditioning will be installed eventually. She's coming along guys...I can't wait until she looks like more of what we all want to see her as!
- - - Updated - - -
Just for a reminder:

Sorry...I had to!
I've got some more pictures to share as I wait for even more.
First, I know I had posted a picture of my Ferno Washington cot (proton pack rack) before, but I have finally (after years of looking) found the 100% correct one. The ones I already had are 95% accurate but lacked one sliding bar under the foot end of the cot. Well, here she is:


So I have two spare cots...that are super close to movie-accurate. One of the spares will be going to my friend Matt, who purchased a 1963 Cadillac Superior Crown Royale (it's really cool). The other will be used...in another car eventually...
Anyway, here's a close-up shot of the screen-accurate Unity S6 spotlight. I do have the correct blue lens (two of them actually) to place over the actual spotlight, which you can't actually see in this specific photo, but yes, this is taken care of...

The heater motor and squirrel cage fan have been addressed as well:


Heater motor installed:

Finally, I've gotten a new radiator:

On top of this, the brake lines are going in, the carrier bearing and u-joints are going to be replaced with new ones, and air conditioning will be installed eventually. She's coming along guys...I can't wait until she looks like more of what we all want to see her as!
- - - Updated - - -
Just for a reminder:

Sorry...I had to!
sonicscrudvr
Active Member
great stuff, Its going to be beyond awesome...
Ultimate Badass
Well-Known Member
Hey everyone,
As always, a bunch of things are happening.
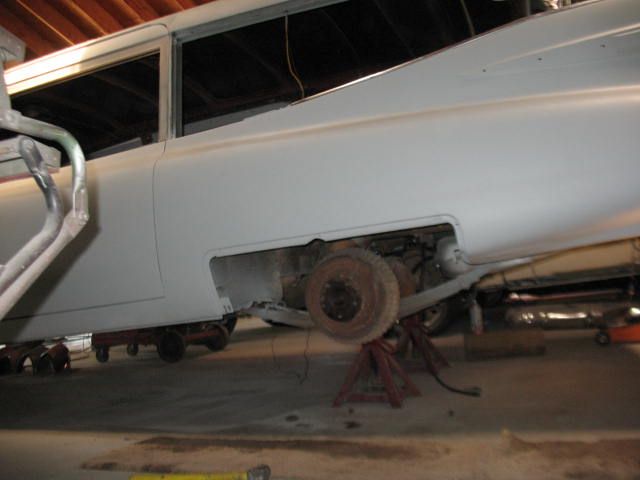
First, the rear drum brakes need to be rebuilt, and thankfully there is a car mechanic prodigy working with Roger (the guy restoring my car) to make everything work. I say this because Roger is more of a body-modification artist than he is a mechanic capable of pulling apart old drum brakes and rebuilding them.
Here are some photos of the rear brake restoration underway:


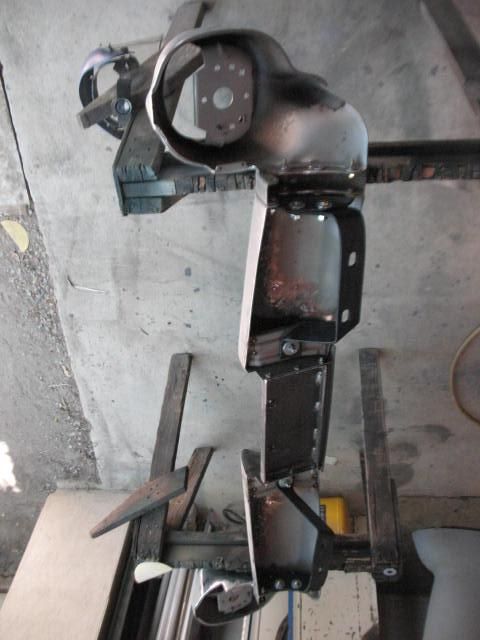
Also, when I was out in California I found out that my steering column was not compatible with a 1959 steering wheel. Who would think a 1960 and 1959 are really that much different...the truth is they are. We got together for dinner with my buddy Nik that very night, he made a phone call, and within 2 hours a steering column was sourced.

Here it is cleaned up and painted:
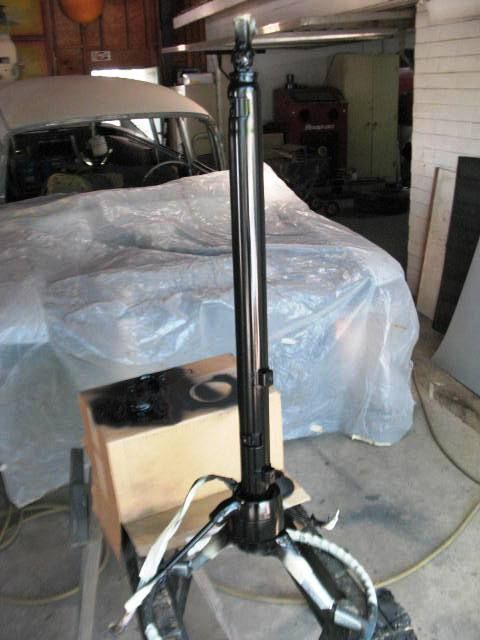
The levers all work and this is in much better shape than the ones you can find on Ebay and other places like that. Amazingly, I got this for a fraction of what it would cost me anywhere else. Man, it's nice to have friends that have connections!
Finally, the rear bumper is still being perfected. The overall construction had been completed before, but there's A LOT that goes into making sure it all lines up perfectly. After initial construction, everything was taken apart, cleaned up, and then reconstructed. Now it's a matter of fitting it on, and it's looking good...
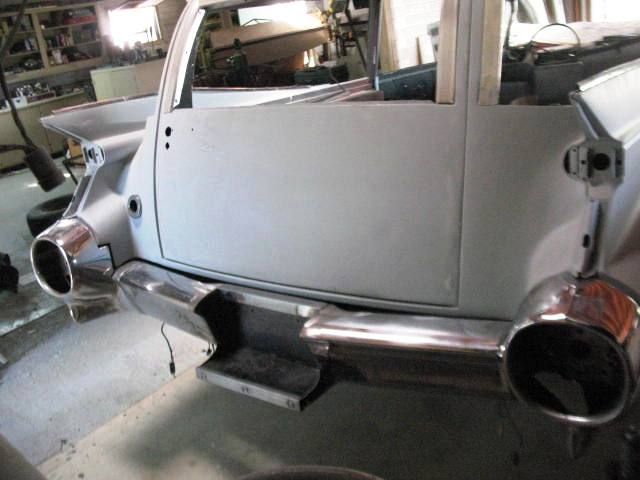
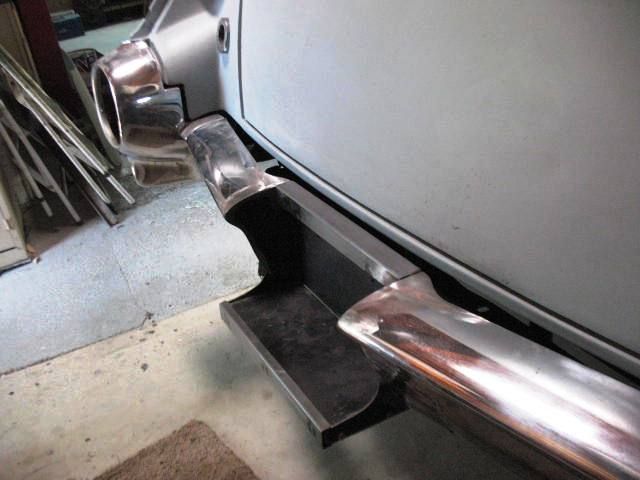
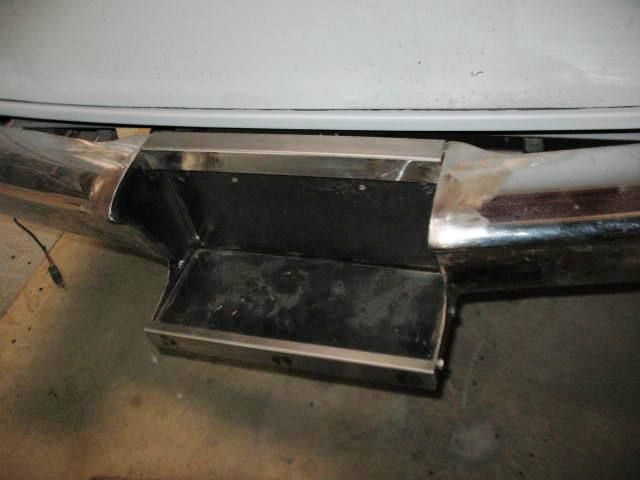
There is a piece that fits under the bumper to securely attach it. We can worry about that when the bumper is rechromed...
Enjoy!
As always, a bunch of things are happening.
First, the rear drum brakes need to be rebuilt, and thankfully there is a car mechanic prodigy working with Roger (the guy restoring my car) to make everything work. I say this because Roger is more of a body-modification artist than he is a mechanic capable of pulling apart old drum brakes and rebuilding them.
Here are some photos of the rear brake restoration underway:


Also, when I was out in California I found out that my steering column was not compatible with a 1959 steering wheel. Who would think a 1960 and 1959 are really that much different...the truth is they are. We got together for dinner with my buddy Nik that very night, he made a phone call, and within 2 hours a steering column was sourced.

Here it is cleaned up and painted:

The levers all work and this is in much better shape than the ones you can find on Ebay and other places like that. Amazingly, I got this for a fraction of what it would cost me anywhere else. Man, it's nice to have friends that have connections!
Finally, the rear bumper is still being perfected. The overall construction had been completed before, but there's A LOT that goes into making sure it all lines up perfectly. After initial construction, everything was taken apart, cleaned up, and then reconstructed. Now it's a matter of fitting it on, and it's looking good...


There is a piece that fits under the bumper to securely attach it. We can worry about that when the bumper is rechromed...
Enjoy!
Ultimate Badass
Well-Known Member
A quick update guys...
Well, remember this?

Well, I wanted it to be a two-tone black and gray. The steering wheel was in great shape to begin with (probably why it cost me a fortune), so the job wasn't too hard compared to the other work that's been done.
Check it out...


And now...the FINISHED product:

Such a beautiful steering wheel...should look pretty with the restored dash.
Well, remember this?
Well, I wanted it to be a two-tone black and gray. The steering wheel was in great shape to begin with (probably why it cost me a fortune), so the job wasn't too hard compared to the other work that's been done.
Check it out...
And now...the FINISHED product:
Such a beautiful steering wheel...should look pretty with the restored dash.
Similar threads
- Replies
- 5
- Views
- 1,592
- Replies
- 0
- Views
- 241