McFlyte
Active Member
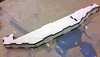
Markus, this is looking really incredible.
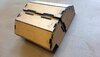
Yes, you understand correctly. I've been trying to find a way to draw the tabs and slots automatically from a solid model, but the tools I've found don't work very well for models with any complexity. I've been working on a Quake II blaster for laser cutting and have done the same as you, it's a lot of work!

Thank you for the nice words!
I am not completely sure how to understand your question. The plywood is cut with a laser cutter and the tabs and slots are included in the .dxf files for the laser cutter. I am drawing the dxf files in librecad, based on my hand-drawn sketches. This includes the drawing of the tabs and slots. If this is what you mean "by hand", then "yes".
Yes, you understand correctly. I've been trying to find a way to draw the tabs and slots automatically from a solid model, but the tools I've found don't work very well for models with any complexity. I've been working on a Quake II blaster for laser cutting and have done the same as you, it's a lot of work!


")