Done / Completed FS: Disney Entry Plaque 4th run **CLOSED**

Re: FS: Disney Entry Plaque 3rd run **NOW OPEN**

got mine! Love it! Should we sad any of the lettering before primer? Mine has a few little spots that look fuzzy on the lettering and might split off. I have never sanded this wood before though, so I wasn't sure if I should just leave it alone!?

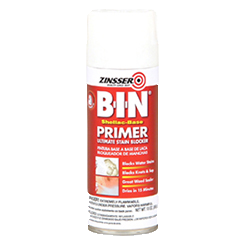
I sanded the carving shavings off before I shipped. You can go straight to primer. I recommend using Zinnser Shellac based primer.

Also, this is is a super refined version of MDF that is meant to hold up small lettering like this plaque. The standard MDF would do exactly what you fear. Part of the reason I use this as opposed to Standard MDF.
 
Re: FS: Disney Entry Plaque 3rd run **NOW OPEN**

Where do you find the shellac based primer? Any hardware chain?
 
Re: FS: Disney Entry Plaque 3rd run **NOW OPEN**

Lowe's, Home Depot, etc. It's a spray shellac, works like a charm. I use it on all my helmet stands I get from Eric :thumbsup

63e76771-fb67-4bb4-ba63-32f5e97c8c66_300.jpg
 
Re: FS: Disney Entry Plaque 3rd run **NOW OPEN**

First post updated with shipment information.

ObscureReferenc - Please confirm your address for me.

There are still 3 slots open in the 3rd run.

Thanks,

-Eric
 
Re: FS: Disney Entry Plaque 3rd run **NOW OPEN**

I would love to grab one of the spots in run three, if they are still open. They look great, can't wait to see all the painted versions start rolling in!
 
Re: FS: Disney Entry Plaque 3rd run **NOW OPEN**

Just received mine. Looks fantastic. I need to do a bit of sanding around the letters and some of the trim but looks great. Any recommendations the best way to go about it with this? I was just going to start with some high grade sandpaper and go from there.
 
Re: FS: Disney Entry Plaque 3rd run **NOW OPEN**

I think we might need one of these for Parker's playroom.
 
Re: FS: Disney Entry Plaque 3rd run **NOW OPEN**

I'm almost finished with mine. hard because I have no work space in my new apartment, and i'm hiding it from the partner so she its a treat for her when I finish it. I also have a ton of pretty up close pictures of the disneyland plaques that I can upload here for you guys if you want color references. I painted mine espresso and I think i should have done even darker, almost a black brown. I used rub n buff (and i've only used it a little in the past) and had some issues getting an even finish with it.. it still looks great, but up close, my perfectionist self is bothered.. lol.

So here are my tips for finishing this up.
It's incredibly clean and well done, BUT, if you are at all a stickler, take the time and sand it, and make sure it looks good to you. THEN hit it with some primer. If you see more imperfections that you couldn't spot before, sand them again. You can always reprimer or just cover it with the paint later. The shellac based primer is a good primer, but the white color (all i found at least) can be an issue if you have only a thin layer of the dark brown over it. I had to do some touchups with paint, and even used a black sharpie for a small white spec i spotted last night. haha...

Sand your edges and trim very well, and make them nice and flat adn smooth. Spray will adhere just fine to the rougher texture of the edges, but rub and buff wont polish up nicely on that. The front facing trim is pretty smooth already, but just go over it with some fine sandpaper to get it perfectly consistant. Same with the letters. I used tiny bits of sandpaper, and little tiny file picks to really get the details on the lettering to pop. Then I used some compressed air to blow all the debris away, and was ready to primer.

The texture of the background behind the lettering is rough. It should be that way, and it is on the real plaque as well. This can be a problem spot for painting, because if you do use the white primer, then brown on top, if you rub that texture and any flakes off, or while you are detailing with the gold, it's easy to scratch that up if you aren't careful, and then you have white you'll need to touch back up!

With the letters, just go very slow. I suggest starting top left and working your way down left to right. It keeps your hands out of the fresh stuff, and you can even rest your arm for a more precise grip/aim that way. Once you are happy with the letters, then you can do the trim and not worry about your arm being in it!

That's all i can really suggest on my end. Take your time, and don't rush! And since there are 5 different gold rub n buff colors, test them out on some spare wood! Do some brown on it, dry, then try some rub n buff to see how you like the finish. My gold was the regular antique gold, and it looks very nice, but some might prefer the champagne type ones, or the european.. so just beware of what you are buying and using before putting it on the finished product!


That's a a great write up!

One thing to stress is the use of the shellac primer. To me it is essential to the success of good prep. After the initial sanding, Shellac is the first thing I use. Afterward, I have used both shellac and fill and sand automotive primer, but having shellac down as a base makes a big difference in your final product.

-Eric
 
Re: FS: Disney Entry Plaque 3rd run **NOW OPEN**

Agreed! I really liked the shellac primer! It went on nicely and dried pretty fast!
 
Re: FS: Disney Entry Plaque 3rd run **NOW OPEN**

Agreed! I really liked the shellac primer! It went on nicely and dried pretty fast!

I first discovered it redoing a house. Get it in a gallon can and put on a wall that had/ has wallpaper. Worked like a champ, but ventilate that room!!!
 
Re: FS: Disney Entry Plaque 3rd run **NOW OPEN**

The last of the "paid for" plaques just came off the CNC and will be shipped on Monday. There are still two slots left on the list for the 3rd run.

Thanks,

-Eric
 
Re: FS: Disney Entry Plaque 3rd run **NOW OPEN**

I got mine yesterday. That thing is a beast and is beautiful. I won't be able to work on it until mid-November due to some already in work stuff. But if you're debating getting this, I'd recommend just pulling the trigger.
 
Re: FS: Disney Entry Plaque 3rd run **NOW OPEN**

All orders have now shipped. There is one open slot left if anyone is interested.

-Eric
 
Back
Top