Free Guy “Guy” Costume

I just received my tie and also the cnc produced name tag.

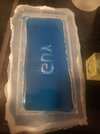
I measured the length of my own index finger, from knuckle to first joint, which was about 5 cm, and the height of the name tag was about 80% of that.

Based on that, I guesstimated it to be about 4 cm, but since this is a US made movie, 1,5"sounds like an option. (3,8 cm).

The length was judged after doing a 3d model and rotating to match, and about 7 cm seemed to work pretty good. Might be 3 inches or slightly under for you with imperial units.

The name tag shown below is 40 mm by 70 mm.

The font was chosen after putting a layer above a screen cap and finding the closest font. This is fairly close I think.

Any comments?
View attachment 1486566
Name badge looks pretty spot-on to me! Did you do the CNC yourself, or did you have it custom made?
 
Name badge looks pretty spot-on to me! Did you do the CNC yourself, or did you have it custom made?
Thanks! =)
I worked on finding the font and measurements as listed, but I sent out to have it made by a place that makes proper engraved nametags.

The font I used is called "Lato"
 
Last edited:
Found a very close match for the Henley:

EE1D8D54-5EB7-4722-B45B-124B5C36B9C8.jpeg

941D8DC9-7816-4F1C-9A6F-965516F257EF.jpeg
 
Not a costume piece, but a possible accessory: I thought about the coffee cups used in the movie, thinking I might try to replicate it. These plain white cups seem like they're the right size and pretty close to the lid type to be a base for the orange cups from the movie. I'm thinking you could print a stencil on a vinyl sticker, then spray paint the cup orange. Or maybe just get pre-made vinyl letter stickers, like the ones sold in craft stores for scrapbooking - although the letters appear to reduce in size as they go down the cup, so it might be hard to get it accurate looking. A full printed label could work too, surrounding the entire cup. I haven't decided if I'm going to buy these and try it, but I'll post if I do.

Coffee Cup Blank.png

gRQ4Zn.jpg

Disney-Movie-Free-Guy-Ryan-Reynolds-3-scaled-1.jpeg
 
Good stuff...only critique is the tie knot; should be more of a inverted triangle and tight around the neck;)
I second that, but I didn't want to pull the tie too tight on a test fit only ;)
I'll make sure to pull the knot tight when it is time to wear it in public!
 
What knot are you using? Should be a relatively small one, like the four-in-hand.
That is exactly the knot I made, but did not pull it tight on the test fit.

I just didn't want to wrinkle the tie at this point, just testing the overall look of my pants, shirt, tie, belt, tie-pin and badge =)
 
I'm trying to figure out what to do for the name badge. Askernas's badge looks great, but I haven't found a U.S. retailer that I'm confident will engrave the name at the correct size - based on their examples, most seem like the text would be a bit too small. The ones on Amazon also limit the font options, though they do have ones that are pretty close.
I did try to figure the dimensions, based off of measuring this pic:
vi.jpg

This pic was pretty straght on, but I adjusted a bit for rotation and perspective:
20210821_180732.jpg

It's still not exact, but pretty close. I figured the dimensions are most likley 3" x 1.5", as I've found that's a standard name badge size in the U.S., with the "GUY" text being about 1.5" wide and close to .5" high (maybe a few hundredths of an inch shorter).
I'm not sure if I should risk getting a tag from one of those vendors, or try to contact them to get exactly what I want. I may go the 3D printed route instead, so I can have more control.
 
I did an overlay of the image you cropped from the trailer to the render of my nametag:

Ratio wise it looks like I am spot on with the badge being twice as wide as it is high.
The font needs to be squished a bit and slightly fatter I think.

I will make a new physical version of this and se how it goes.

1629837615754.png
 
  • Like
Reactions: JPH
I did an overlay of the image you cropped from the trailer to the render of my nametag:

Ratio wise it looks like I am spot on with the badge being twice as wide as it is high.
The font needs to be squished a bit and slightly fatter I think.

I will make a new physical version of this and se how it goes.

View attachment 1487485
Looking at this pic, my adjusted badge pic might be a little too squished for the name. I just manually rotated and warped it in photoshop, so I probably warped it too much. I'd say yours is more accurate. The cross bar of the "G" may need to be a little wider, and the end of the top of it has a straight, vertical edge that lines up with the bottom of the letter, but otherwise it seems pretty close in size. I wouldn't squish the letters much, if at all.
Screenshot_20210821-140747_DuckDuckGo.jpg
 
Have a great day
 

Attachments

  • 20210826_203930.jpg
    20210826_203930.jpg
    382.5 KB · Views: 134
  • 20210826_203857.jpg
    20210826_203857.jpg
    1.5 MB · Views: 140
Belt and glasses arrived. The belt leather is actually a bit lighter than the pic on Amazon, so that's good. I tried to adjust this pic to get the colors more accurate to how they look IRL. The leather could still be lighter, but I'm pleased with how it looks as-is:
20210827_001724.jpg


The glasses were more orange than expected. They're also too round, more like frames designed for women, but I knew that they'd be that way when I ordered them:

20210827_001916.jpg


I decided to pop the lenses out and try to reshape and recolor them. So some time spent with an iron and a brown Sharpie got them looking like this.They still need more work to at least clean up some rough spots, but this shows where they are now:

20210826_235038.jpg

I think they look a lot closer now. Here's a pic from the movie for comparison. This is a screen grab from a clip from a bootleg (not my bootleg, I found the clip on YouTube) so the colors are a bit off, but you get the idea:

20210826_223823.png
 
Last edited:
  • Like
Reactions: JPH
Re-inventing the wheel.

Used Sorta clear 40 to chase bubbles out of the mold. Blue layer is slic pig and so strong blue in 3d XTC. Next, using Smooth Cast 65D for the white layer, put a safety pin in the SmoithCast layer.
 

Attachments

  • 20210828_160457.jpg
    20210828_160457.jpg
    1.1 MB · Views: 154
I thought the Gascan was the correct pair?
Anyways, regarding the glasses, they are very hard to find, there’s so many glasses that are so close but just not perfect. Here’s some more screenshots:
C311E31F-2B91-493A-B8AC-0A0CC718997E.jpeg

3ECD6275-CF7E-4943-8F36-DE39B1A295D6.jpeg
64C990C1-3566-4F74-9C49-42C8AA78BC31.jpeg

8B3C0ECB-2F3A-4519-8353-17C8375CE117.jpeg

There’s a little detail of the outer part of the frame where the hinge meets the corner that appears very rarely it seems.

Regarding the sneakers, I have a couple better shots of them and they do appear to be leather:
33F044B0-8720-49F6-AE0B-C294271159D5.jpeg
DB9465BC-4EFF-47F0-A621-07B4B480C923.jpeg
 
Last edited:
I thought the Gascan was the correct pair?


The Gascans are the correct pair, but the crankshafts are close and cost much less.

I got the camo, polarized Gascans. Yeah, not black, but I needed a new pair of polarized glasses and liked them. Hopefully, I wont have a five year old back out of a selfie because the frames weren't legit enough.

if you log out of amazon and any identifying website (like fb or gmail) they offered me the glasses as a discount, with *another* discount on top of it!
20210828_200051.jpg
Cheaper than cataract surgery!
20210828_200142.jpg
 
Back
Top