Hey gang,
I've been slowly getting back into making stuff, so I figured I'd do a collective thread about it . I've got a few things on the burner- a revisit of "Vera" from Firefly (has its own thread), I've been tinkering with the Prime Radiant from Foundation since the premiere of Season 2 and a whole mess of pistols and other things from The Expanse. I've also been (very slowly) sculpting new heads for the old Hot Toys Hicks, Apone and Vasqez 1/6 figures. (I might have to do a thread on those in the modeling secion instead of here... we'll see.)
First up some photos from the Expanse and Foundation.
Prime Radiant prototype. The final version will have traced engravings from the screen prop!

The above is my "almost final version". I made 3-4 different finished copies and probably printed another 4 sets of parts with different types of symbols and lettering. (The real prop has a series of geometric shapes. I've been spending some time trying to redraw them to see if they will print nicely as engravings.
Here's a W-I-P of me redrawing the correct symbols of the prop after perspective-correcting screengrabs.

I'll see if I can do some w-i-p shots of how I assemble it when I build the next version.
As for the Expanse, the first thing I did was Miller's hat. The original Guido Delgado is impossible to find, so I found a "close enough" trilby, re-bashed it, trimmed the brim and put a new band on it... pretty much redid it from the ground up and even metal printed a badge!

(I will be remodeling the grips on the airsoft Rhino...)
I've only just made a start on Amos' shotgun. The correct laser scope is impossible to find now, but there's sn updated model that I have and will be modding to get is close. There are a lot of models of FN airsoft out there but only one has the correct details and rivel positions... it's not cheap, however.

Next up, the Star Helix. This is pretty much done, except for the decals which I'll probably do for ALL the props at once. I looked for a small enough flashlight to fit in the scope, but the tube is so thin that in the end I opted to just prep it for adding a LED. I also made it so it can be tapped and screwed in place, without using any glue!
Printed, primed and test-fitted:


The first copy I did had threads on the light cap, but it ended up being a very tight fit.

Here's a test-painting of it (front barrels are not on yet). Much too saturated blue, so I'll be redoing it.

Mars pistol... this one was pretty fast and easy. (I also managed to snag one of THE last copies of the under-rail laser pointer.) I am talking to a machinist about doing the rear barrel in aluminum for me. Looks rather bland without all the markings!

I'll be doing Ashford's pistol too... I have the paintball marker, just haven't started on it yet.
(Note: I do have runs going for both the Prime Radiant and a couple Expanse props, but please keep any questions about the runs there or via PM and not here, as per the RPF rules!)
More pics and build info when I have it...
I've been slowly getting back into making stuff, so I figured I'd do a collective thread about it . I've got a few things on the burner- a revisit of "Vera" from Firefly (has its own thread), I've been tinkering with the Prime Radiant from Foundation since the premiere of Season 2 and a whole mess of pistols and other things from The Expanse. I've also been (very slowly) sculpting new heads for the old Hot Toys Hicks, Apone and Vasqez 1/6 figures. (I might have to do a thread on those in the modeling secion instead of here... we'll see.)
First up some photos from the Expanse and Foundation.
Prime Radiant prototype. The final version will have traced engravings from the screen prop!
The above is my "almost final version". I made 3-4 different finished copies and probably printed another 4 sets of parts with different types of symbols and lettering. (The real prop has a series of geometric shapes. I've been spending some time trying to redraw them to see if they will print nicely as engravings.
Here's a W-I-P of me redrawing the correct symbols of the prop after perspective-correcting screengrabs.
I'll see if I can do some w-i-p shots of how I assemble it when I build the next version.
As for the Expanse, the first thing I did was Miller's hat. The original Guido Delgado is impossible to find, so I found a "close enough" trilby, re-bashed it, trimmed the brim and put a new band on it... pretty much redid it from the ground up and even metal printed a badge!
(I will be remodeling the grips on the airsoft Rhino...)
I've only just made a start on Amos' shotgun. The correct laser scope is impossible to find now, but there's sn updated model that I have and will be modding to get is close. There are a lot of models of FN airsoft out there but only one has the correct details and rivel positions... it's not cheap, however.
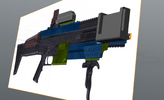
Next up, the Star Helix. This is pretty much done, except for the decals which I'll probably do for ALL the props at once. I looked for a small enough flashlight to fit in the scope, but the tube is so thin that in the end I opted to just prep it for adding a LED. I also made it so it can be tapped and screwed in place, without using any glue!
Printed, primed and test-fitted:
The first copy I did had threads on the light cap, but it ended up being a very tight fit.
Here's a test-painting of it (front barrels are not on yet). Much too saturated blue, so I'll be redoing it.
Mars pistol... this one was pretty fast and easy. (I also managed to snag one of THE last copies of the under-rail laser pointer.) I am talking to a machinist about doing the rear barrel in aluminum for me. Looks rather bland without all the markings!
I'll be doing Ashford's pistol too... I have the paintball marker, just haven't started on it yet.
(Note: I do have runs going for both the Prime Radiant and a couple Expanse props, but please keep any questions about the runs there or via PM and not here, as per the RPF rules!)
More pics and build info when I have it...
Attachments
Last edited: