For those indoor-builders: Acrylic Resin w/ Iron Man Pepakura Helmets

Dirtsen

Well-Known Member
RPF PREMIUM MEMBER
I wanted to show you guys how I handled my MK42 Pep build. Maybe that helps some of you out. Since I had no experience working with Epoxy Resin and wanted a non-toxic way of building a MK42 Pep Helmet INDOORS I went ahead and experienced a little. Here are my fails and maybe... wins. This is still a kind of WIP so I will update every time I learn something new. I used gimpee's file for the Helmet.

The first try:
- traditional Pep on 160gr paper.
- used 3mm foamies to help with the details.
- hotglue

So my first MK42 was done with paper in a medium thickness. I put the pep-file together using hot glue. My idea for the little greases on the forehead: using 3mm foamies to ensure the exact space in between them. A picture might help understanding:
2013-02-21 20.15.18.jpg2013-02-21 23.03.41.jpg
as you can see the greases are pretty accurate this way and you save yourself the trouble with the tiny folds on this thing. The only downside: sanding this area is tricky. You don't want to sand on the foam. On the other hand: since you can get this accurate on the first try, you don't need to sand a lot. I used this trick in other places too.
2013-02-21 23.03.12.jpg2013-02-21 23.03.23.jpg2013-02-21 23.03.31.jpg

After finishing the pep work i had to harden it. This would be the step where you use Epoxy Resin. I wanted to try something else. Acrylic Resin. It kinda looks like plaster but it isn't. Look it up, it's pretty cool stuff. Also works really great of bond work later. But first... my fail: Since i used medium thickness in my paper... it warped like hell:
2013-03-04 13.30.31.jpg
I tried to save it but in the end the warping destroyed the symmetry and it was just frustrating... so...
2013-04-24 13.04.01.jpg

First try - first fail. But I'm not one to give up. the problem was: the paper soaked the moisture from the Acrylic Resin and warped. So i had to make the paper waterproof at least from one side. I could either use non-water-based glue... or laminate the paper.


Second try
- Normal 80gr paper
- laminating sheets
- again 3mm foamies and 5mm foamies for the edges.

I went with the laminated paper option. That means I printed out the pep-pages and laminated it afterwards... but before cutting. The laminating foil bonds with the paper so don't worry about it peeling off. There are different thicknesses too. Choose one that is not too thick.
The result looked like this:
2013-05-23 23.55.10.jpg
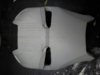
using laminating foil on the pep project had proven some pretty cool advantages: you have very good stability without having to use the thick paper that can be hard to work with. Also: due to the tension it holds its shape even when you deform it temporarily (my helmet fell down). All of that ensures for a clean pep-build. Note that the picture was taken after the first acrylic resin treatment, that is why there are white specks on the front. That being said. This way there was no warping! Awesome! Here are some pictures from the inside:
2013-05-23 23.55.31.jpg2013-05-23 23.55.54.jpg2013-06-02 17.21.28.jpg
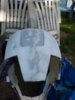
Now, that was something i could work with! Even though this time the scaling went wrong and the helmet was way too big for me. But that didn't matter. So I started working on it. Then there was the disadvantage i noticed: When you sand through the laminating foil you rip off more than you want. So sometimes you have to remove whole pieces from the original paper model... looking like this:
2013-06-02 17.20.43.jpg2013-06-02 17.20.50.jpg
That was a little setback but nothing that some bondowork couldn't fix. Since the paper was very thin that wasn't such a big problem. Note to self: next time laminate only one side of paper and use a medium thick paper again.
I had to deal with that problem in some places so I had to to some bondo-work. Speaking of which, since that stuff is not good for your health and I was looking for alternatives. I found some woodfiller. Like the name says: It is used to fill holes in wood. It has very small grains and has a very fine consistency. It's also pretty hard once it hardened (doesn't take long... 20 minutes for 3mm thickness). It is not toxic and can be sanded pretty easily. Awesome stuff. I stocked up on that instantly.
2013-06-06 17.26.20.jpg2013-06-06 17.26.31.jpg2013-06-06 17.26.44.jpg
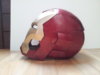
After sanding on the laminating foil proved to be a bigger pain in the A** than I thought: I called it a day and went ahead and painted it:
2013-07-09 18.07.02.jpg2013-07-10 17.54.06.jpg2013-07-10 17.55.26.jpg2013-07-05 16.32.49.jpg2013-07-10 17.54.38.jpg
It looks okay but not perfect. It still has some small bumps and imperfections but I am done with this helmet. I might consider doing a run for people who are interested and wanting to work on it a little themselves. It is for pretty big heads. I will post some more information on that later.

Also coming up: Third try with only on laminated side (inside) of the paper. This one turned out pretty good so far.
 

Attachments

  • 2013-06-06 17.26.34.jpg
    2013-06-06 17.26.34.jpg
    910.5 KB · Views: 398
  • 2013-07-10 17.53.37.jpg
    2013-07-10 17.53.37.jpg
    1 MB · Views: 493
Last edited:
Re: MK42 Pepakura with Acrylic Resin - NON TOXIC!

After some problems figuring out how to properly mold I finally pulled my first cast and I'm planning on doing some more next week. This is what i got so far. I probably should have sanded a little more but I got too excited ;)
2013-08-07 14.28.56.jpgironback.jpgironfront.jpgironfrontleft.jpgironfrontright.jpgironright.jpg

Next up is the smaller version.
 
Re: MK42 Pepakura with Acrylic Resin - NON TOXIC!

frenzyboi: Thank you very much. I was beginning to think that this doesn't interest anyone.

For all you inside working fellas without proper ventilation: This might be for you. I can't work with Polyurethan or Polyester Resin, so I have to stick with stuff that isn't toxic while/after working with it. I use Acrylic Resin to stiffen my pepakura builds. But since this stuff is kinda waterbased it would warp the paper itself. So in my last project i worked with laminated paper which made it water resistant. This meant I could work with the Acrylic Resin without having the warping issues. Also it insure stability during my build and made it turn out nice and symmetrical. But... sanding was a pain. I eventually got the hang of it and settled for the not so perfect but still decent results as you can see in my post above.

The next time I only coated the thicker paper (160gr/m2) from one side. Which meant i tore the laminating foil in half and put it through the machine with the paper. This way I had one water resistant side (inside of the helmet) and one side that would be easily worked with... sanding and applying 1K-Putty. So i assembled the pepakura and resined the inside with Acrylic Resin. Then i brushed a light coat of it on the outside. Since i tried to be as clean as possible during the pepakura stage... I don't have to sand as much. So I primed it to be able to see where there would be the most work. This is what I came up with:

2ironback.jpg2ironfront.jpg2ironleftfron2.jpg2ironleftfront.jpg
2ironprofil.jpg2ironprofil2.jpg2ironrightfront.jpg2irontop.jpg2ironunderside.jpg

As you can see, i applied some 1K-Putty lightly in some of the places very lightly. Sanding this stuff is a charm and you end up with a very smooth finish. Also: I used polystyrene-sheets in some key-spots (like the underside of the jaw) to ensure that there is no warping. That results in a very symmetrical build.
The ears are still missing. I am going to put these on in the very last stages.

So far so good. The progress on the helmet has been some weeks ago. In the meantime I found some epoxy that is safe to use inside. Also: I moved! Which means I now have a yard where i can use the more toxic stuff like polyurethane which I am now succesfully using to cast the first version of the helmet. It is pretty big and fits people with up to 28-inch-heads. Check it out if you got a big ol' noggin.

The new place also comes with a great view...roomwithaview.jpg

Building has just gotten even more fun ;)

Stay tuned for updates! If you have questions... go ahead and ask!
 
Last edited by a moderator:
I had some time to work on my second helmet. I needed to sand the thing down and work on the eye section.
2013-08-13 23.22.11.jpg2013-08-13 23.22.23.jpg

After that i put a light coat of primer on it to see where it needs more work. I marked some imperfections and areas that needed some attention.
2013-08-14 13.48.40.jpg2013-08-16 19.43.16.jpg

And after sanding again...
2013-08-16 23.39.06.jpg2013-08-16 23.39.19.jpg2013-08-16 23.39.30.jpg2013-08-16 23.39.39.jpg

The problem I had with breaking through the layers of paper while sanding no longer occurred here. So I guess only using the laminating foil on the inside of the paper-model its the way to go. Good news if you don't want to work with the usual resin. So much for the Iron Man helmet today.
Here is a little sneak peek of my upcoming projects:

Iron Man MK7 Helmet:
2013-08-16 19.51.44.jpg

And the Halo 4 Spartan IV Soldier Helmet (I'm going to open a separate thread for that one)
soldier.jpg
 
Small update: I started sculpting the eye-nose section. There was a gap there that needed filling. I gave it a quick sanding and cut the angle i painted black here. Maybe I get the time tomorrow to sand the Faceplate down.

2013-08-19 23.36.00.jpg
 
Some small update. I got some work done on the faceplate. I think the "eyebrows" look good now. Still there are a lot of imperfections and spots i need to work on.
2013-08-20 14.47.37.jpeg2013-08-20 14.47.49.jpeg

and a small test run for the LED-eyes:2013-08-20 22.01.08.jpeg

And I got around to install the ears. I had to install them before I filled them up with Acrylic Resin so they would be able to bend a little and adapt to the shape of the helmet. looky looky:
2013-08-20 23.43.43.jpeg2013-08-20 23.43.54.jpeg2013-08-20 23.44.08.jpeg

Now my concern is, that eyes are too deep. Should I work on that? Maybe I can get some feedback. Until now this has pretty much been a one-way street. Or is this forum fed up with Iron Man builds?
 
Ooooh, very nice technique. I am in an apartment with no yard and I just finished pepping a dragon priest mask (skyrim) and at this point I'm thinking "now what?" since I don't want to do the toxic/vapor-making resins and/or fiberglass. Good to see it can work out without those things! Since I've already pepped it at this point do you know of a way I could waterproof the inside or do you think I should start again with half-laminated cardstock? Good work here, I'll be interested to see how strong the finished helm is with this method!
 
Ooooh, very nice technique. I am in an apartment with no yard and I just finished pepping a dragon priest mask (skyrim) and at this point I'm thinking "now what?" since I don't want to do the toxic/vapor-making resins and/or fiberglass. Good to see it can work out without those things! Since I've already pepped it at this point do you know of a way I could waterproof the inside or do you think I should start again with half-laminated cardstock? Good work here, I'll be interested to see how strong the finished helm is with this method!

there are alternatives to the half-laminated route would be finding some fume-free epoxy resin. I got some right here in Germany so it has to exist in the US too since you guys are spoiled with awesome stuff to build with ;)
Another thing I found out works: using thin layers of solvent-based glue on the inside of your paper-project. Use thin layers, it shouldn't soak up all the way through the paper or you might face some warping.
When you use Acrylic Resin use some cheese cloth in between the layers or some other cloth that allows you to soak it in the resin. It has the same effect as fiberglass just not as strong! The Resin I use can take some pretty good beating. A layer of 5mm is really strong!
 
I had some time in between today for sanding:
2013-08-21 18.03.57.jpeg2013-08-21 18.04.27.jpeg2013-08-21 18.04.40.jpeg
We're getting there... Now i made a little mistake sanding right between the eyes. It's not as symmetrical as I want it to be... so some minor fixing is in order. But so far, this has the potential to look good I think. If only the days had a few more hours...
 
So the next step was getting the eyebrows and "nose" symmetrical. For that I pulled out my geometry knowledge from 6th grade... and I drew some lines to get this right...2013-08-22 12.43.22.jpeg
Some sanding...
2013-08-22 15.13.53.jpeg
Priming to see where this was going...
2013-08-22 15.17.07.jpeg
And again from the top...
2013-08-23 17.02.36.jpeg

And the result:
2013-08-23 20.28.27.jpeg
2013-08-23 20.28.54.jpeg
2013-08-23 20.29.05.jpeg
2013-08-23 20.29.44.jpeg

Now there is some fine tuning necessary. I am still contemplating if i should put the dent on the top of the helmet in or not. The dents on the forehead and on the temples will be added after molding, using a rotary tool.

Some feedback would be cool. Dent on the head yes or no? some other suggestions? How are the eyes looking?
 
Thank you for posting this thread. Lots of great ideas for those of us who don't have access to a garage or other well ventilated working areas. Right now I have to drive 45 minutes to get to a place where I can work on projects, leave them and trust that nothing is going to happen in between visits.

Seeing the trial and error of the different methods has been really helpful. Keep the great ideas coming.
 
Thank you Max! I hope this helps some of you guys out. The only thing I haven't figured out is how to sand indoors (without
my girlfriend killing me ;) ). There are machines that offer a connection for a vacuum cleaner... but they don't work too well. Maybe I figure something out.
I will be trying to cast a whole helmet with acrylic resin in the next weeks. Just to check how much beating it can take... and how heavy it is going to be. As always... I will be posting my results.

Thank you for posting this thread. Lots of great ideas for those of us who don't have access to a garage or other well ventilated working areas. Right now I have to drive 45 minutes to get to a place where I can work on projects, leave them and trust that nothing is going to happen in between visits.

Seeing the trial and error of the different methods has been really helpful. Keep the great ideas coming.
 
Re: MK42 Pepakura with Acrylic Resin - NON TOXIC!

The next time I only coated the thicker paper (160gr/m2) from one side. Which meant i tore the laminating foil in half and put it through the machine with the paper. This way I had one water resistant side (inside of the helmet) and one side that would be easily worked with...

This thread deserves far more attention than it seems to be getting. I really love your willingness to experiment with different, innovative materials and techniques! The acrylic resin and woodfiller combination could be a boon for a lot of builders: people in small houses/apartments, people who have small kids in the house, people who just don't like working with a respirator on, etc. Have you considered doing a tutorial video or something?

Instead of laminating the paper, I wonder if it'd work to use the acrylic resin as an easy way to harden a 3mm EVA foam build? Alternatively, maybe spray the paper with a couple of light coats of a spray sealer like Mod Podge or something?

Thank you! Now that you mention it, I've already used the Acrylic Resin to harden one of my foam helmets on the inside. it sticks pretty well to the foam if it's not sealed. It grabs on to the little pores on the outside of the foam. I also tried it on the outside of one foam helmet and try to sand it. The only problem is, that it cracks easily when applied in thin layers on foam. So it did not work well on the outside. On the inside though it workel like a charm. I was even able to separate the faceplate and the back of the helmet after the acrylic resin had cured. Maybe i can find some pictures since I sold the helmet. I'll take a look.
I haven't tried out Mod Podge to seal the paper. It would be an easy test though. Just take some sheets of paper and apply whatever you want to try out as a sealant. Anything waterbased is likely to warp the paper though. I'm sure there are tons of possibilities.
Maybe I'll make a video of how to work with the Acrylic Resin. There is even a way to thicken it. It has a creamy consistency then and you can apply it anyway you like. Since it is not toxic you can even apply it by hand and sculpt details.
 
Just letting you know guys, the thread is not dead. I am just working on the faceplate details and it's taking its toll on me :D
I'm redoing the eye section... I just wasn't happy with how it looked and decided to go at it again... ah the perfectionism...
 
Just a quick update. Not having too much time at the moment but i managed to remodel the eyes. Going to do the fine sanding and adding the angles to it.

Gesendet von meinem GT-I9100 mit Tapatalk 2
 

Attachments

  • uploadfromtaptalk1378025382989.jpg
    uploadfromtaptalk1378025382989.jpg
    34.1 KB · Views: 236
Back
Top