justy
Well-Known Member
I have been wanting to make a display stand for my Indiana Jones Fertility idol for quite some time now. I knew that I wanted it to feel like a set, or something that belongs in the film. I really liked the look of the alter thing that the idol sits on in that opening sequence, what a great place to put a mcguffin! I don't have room to put the whole thing in my house (and if I did, I'd be super tempted to make the whole room into an abandoned stone temple hah. Maybe some day.)

So then I thought, what about miniature? I did some sketches, and decided to do a shrunken version of the top section. At one point, I had the top part, the squiggly carvings section, and the lip below, but eventually opted for just the squiggly and top level to keep the height down.
I opted to 3D print the thing. My idol is 3D printed so I thought it fitting to do the same for the display. Although, carving it out of XPS or EVA foam would have been fun as well. I haven't done much 3D modeling before and I wanted to push myself a bit and learn something more. Many many years ago I had used Maya for a class project, but I no longer have a license for it. And Blender is free and grows more and more capable every year. Again, I haven't touched Blender in a decade or so, but I enjoy tinkering. It was a challenge but was very fulfilling.
At some point in my design process I stumbled upon the awesome stand by Dark Matter Props on Etsy. I felt a lot less original when I realized they beat me to the idea already haha. I liked that they put the diamond pattern from the floor on top of the altar, I think it is smooth in the film from what I could see, but I could be totally wrong. Either way, I thought it looked nice so I incorporated it into my design. Their stand is so cool I was really tempted to order one. In fact, at one point I was so frustrated with the technical issues that I really wanted to give up on the project. But, seeing their stand really helped me to push through learn a ton in the process. Thanks Dark Matter Props for being inspiring. I needed it.
The geometry is pretty simple, just a short cylinder with some rounded edges, and a shorter cylinder on top.

However, the fun part is wrapping a texture around it to displace the geo, that's where it comes alive. Here's a peak at my "map" used to deform the model. It's a combo of After Effects and Photoshop. It was fun to place the cracks and damage on top of the design. This type of modeling is pretty easy and fun once you get it set up right and get things dialed in.

Here's what comes out of it.

The model is huge, lots of vertices. I ended up slimming it down to make it printable, but at one point it looked really smooth and realistic.
For those interested, here's a bit of the process and some older versions.


I spent quite a while fiddling with it to get it just right. More time than I'd like to admit hah. Our baby was in the NICU for a few weeks so I just hung out there with a laptop and tinkered. (I also got to chip away on my grail diary, finally making some progress.)
Then it was on to slicing and printing.

It fit quite nicely on my print bed. This is a CR10-v2 for any wondering.


This one probably required the least amount of post processing of anything I've printed. The rugged look of this thing is pretty forgiving, so all I needed to do was get rid of some of the obvious layer lines. I sanded a little with some 220 grit then hit it with a couple thick coats of filler primer. Then went over it with a scotch bright pad to smooth things a bit. I base coated it really splotch-ily with some greys, greens, oranges, and blues; pretty subtle. Clear coated with a matte spray. Dry brushed on some sandy highlights to bring out the edges. Another light matte dusting with a clear coat. And finally, a dark wash of some various umber/brown combinations to tie it all together and darken it up a bit. Clear coat with a semi gloss to seal it all in. Sorry I didn't get any pictures of the process, I was just having such a blast.
And here it is after some paint.

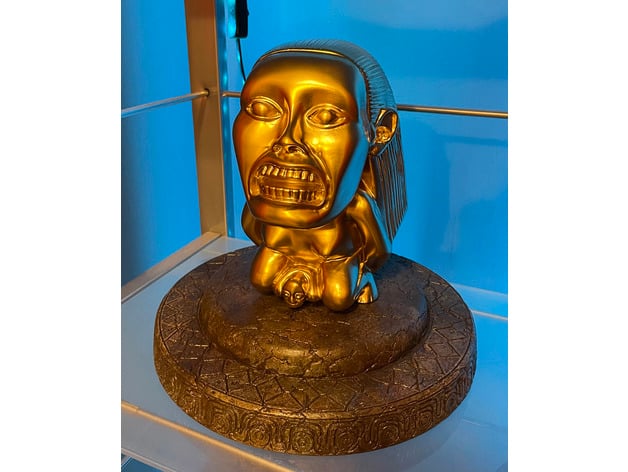
And with the finished idol.


When I have some more time I may revisit the paint job. Maybe add some moss or ivy, who knows.
So then I thought, what about miniature? I did some sketches, and decided to do a shrunken version of the top section. At one point, I had the top part, the squiggly carvings section, and the lip below, but eventually opted for just the squiggly and top level to keep the height down.
I opted to 3D print the thing. My idol is 3D printed so I thought it fitting to do the same for the display. Although, carving it out of XPS or EVA foam would have been fun as well. I haven't done much 3D modeling before and I wanted to push myself a bit and learn something more. Many many years ago I had used Maya for a class project, but I no longer have a license for it. And Blender is free and grows more and more capable every year. Again, I haven't touched Blender in a decade or so, but I enjoy tinkering. It was a challenge but was very fulfilling.
At some point in my design process I stumbled upon the awesome stand by Dark Matter Props on Etsy. I felt a lot less original when I realized they beat me to the idea already haha. I liked that they put the diamond pattern from the floor on top of the altar, I think it is smooth in the film from what I could see, but I could be totally wrong. Either way, I thought it looked nice so I incorporated it into my design. Their stand is so cool I was really tempted to order one. In fact, at one point I was so frustrated with the technical issues that I really wanted to give up on the project. But, seeing their stand really helped me to push through learn a ton in the process. Thanks Dark Matter Props for being inspiring. I needed it.
The geometry is pretty simple, just a short cylinder with some rounded edges, and a shorter cylinder on top.
However, the fun part is wrapping a texture around it to displace the geo, that's where it comes alive. Here's a peak at my "map" used to deform the model. It's a combo of After Effects and Photoshop. It was fun to place the cracks and damage on top of the design. This type of modeling is pretty easy and fun once you get it set up right and get things dialed in.
Here's what comes out of it.
The model is huge, lots of vertices. I ended up slimming it down to make it printable, but at one point it looked really smooth and realistic.
For those interested, here's a bit of the process and some older versions.
I spent quite a while fiddling with it to get it just right. More time than I'd like to admit hah. Our baby was in the NICU for a few weeks so I just hung out there with a laptop and tinkered. (I also got to chip away on my grail diary, finally making some progress.)
Then it was on to slicing and printing.
It fit quite nicely on my print bed. This is a CR10-v2 for any wondering.
This one probably required the least amount of post processing of anything I've printed. The rugged look of this thing is pretty forgiving, so all I needed to do was get rid of some of the obvious layer lines. I sanded a little with some 220 grit then hit it with a couple thick coats of filler primer. Then went over it with a scotch bright pad to smooth things a bit. I base coated it really splotch-ily with some greys, greens, oranges, and blues; pretty subtle. Clear coated with a matte spray. Dry brushed on some sandy highlights to bring out the edges. Another light matte dusting with a clear coat. And finally, a dark wash of some various umber/brown combinations to tie it all together and darken it up a bit. Clear coat with a semi gloss to seal it all in. Sorry I didn't get any pictures of the process, I was just having such a blast.
And here it is after some paint.
And with the finished idol.
When I have some more time I may revisit the paint job. Maybe add some moss or ivy, who knows.
Last edited:

")