Evil Dead Chainsaw(s) Build... Groovy Part 2! DONE!!

Re: Evil Dead Chainsaw(s) Build... Groovy Part 2!

Man, that wooden stand looks amazing. It just needs a Necronomicon sitting next to the saw.

Also, I’m loving the build discussions. It’s exsctly what I was hoping for. If you guys want, we could ask the mods to move those posts to another thread. That way, we don’t take the focus anyway from the original build.
 
Re: Evil Dead Chainsaw(s) Build... Groovy Part 2!

I don't mind the discussion being on this thread, I'm honored in fact! ;)

I think your layout for the handle is spot on! I know it took me building it FOUR TIMES, and I'm talking about complete building it complete with wooden grips until I got something I was happy with! If there was a bonus to that at all it was that I got really proficient at splitting 1" dowel rods on a band saw! LOL!

As mentioned above, here's a step by step on how I weathered the base...
I used a Rustoleum Paint Satin or Flat... First I mist the edges of the planks
FullSizeRender(3) copy 15.jpgFullSizeRender(3) copy 16.jpgFullSizeRender(3) copy 17.jpgFullSizeRender(3) copy 18.jpg

Then a mist the surface until I get a the amount of coverage I'm looking for. I also try and keep it kind of splotchy and random as possible
FullSizeRender(3) copy 19.jpgFullSizeRender(3) copy 20.jpg

These are the sanding blocks I use... You'll need at least a couple
FullSizeRender(3) copy 21.jpg

Then just go at it! Here's a corner done just to give an idea...
FullSizeRender(3) copy 22.jpg

The finished piece with a closeup of the detail...
FullSizeRender(3) copy 23.jpgFullSizeRender(3) copy 24.jpg

Any questions, please don't hesitate to ask. ;)

-B89!
 

Attachments

  • FullSizeRender(3) copy 14.jpg
    FullSizeRender(3) copy 14.jpg
    167.8 KB · Views: 91
Re: Evil Dead Chainsaw(s) Build... Groovy Part 2!

I think your layout for the handle is spot on! I know it took me building it FOUR TIMES, and I'm talking about complete building it complete with wooden grips until I got something I was happy with! If there was a bonus to that at all it was that I got really proficient at splitting 1" dowel rods on a band saw! LOL!

Thanks, yeah I spent a lot of time looking at Rob's photos until I went cross eyed, drawing and holding the paper up to the screen until I was happy. Then I made a cardboard mockup and tweaked it until I was happy with the proportions and how it looked sitting on the saw. It was only then that I felt comfortable bending up some metal! Cheaper to start with cardboard too :D

Any questions, please don't hesitate to ask. ;)

-B89!

Thanks for that rundown - helpful stuff!
 
Re: Evil Dead Chainsaw(s) Build... Groovy Part 2!

The saws are officially DONE!! I have to apologize that I didn't take any pics of the process and that has nothing to do with my not wanting to share my process, I just kept saying 'I need to shoot a pic of this' but never stopped to cleanup my hands to actually do it. ;)

I'll be posting pics later today. In the mean time, here's a bit of a run down on the process I use....

I do a mix of siena brown and a darker brown acrylic with a touch of red to simulate a rust/dirt color mixed to the consistency of a melted milkshake and do a wash over all the metal parts and dab it off with a paper towel. I mix in a little black and start hitting the more recessed areas; where the handle bolts to the body and the wrist cuff... All the while dabbing the excess off with a paper towel. I then do a thicker mix of black and a little siena brown. With this I hit the recesses on the metal parts again and start filling the recessed areas on the body parts of the saw itself,,, I dab the excess of as well and let it all dry. I then go over the saw with 0000 steel wool. Depending on the pressure you apply, you can take off as much or as little of the paint wash as you want. Also, be mindful of the direction your going with your steel wool. Try to keep in mind how dirt and grim would normally accumulate on the saw and how it might get wiped or worn off. Same with the "blod/gore" spatter... try to keep in mind how it would actually travel. It all helps "sell" the legitimacy of the look.

One of the details I add at this point is a mix of sawdust with the black and brown wash. I also so a mix of sawdust with the a dark "blood" paint. With the black sawdust mix, I apply that to the typical places you would find "oily sawdust" on an actual chainsaw.... You can guess where to apply the blood sawdust mixture... ;)

The post I'll be posting will so both version of the saws, one bloody version and one "clean" work shed version.

Thanks again for all the posts! Let's keep the discussion on the saw specifics going... either here on in it's own thread.

-B89!
 
Can’t wait to see the final paint job. I’m sure it’ll be amazing.

And, in the next few days, I plan on posting some comparative photos of my truly accurate XL and my not-exactly-right XL. It really is surprising how different the size and shape is. We’re talking marginal differences but they’re glaring once you know what you’re looking for.

I’m also looking into the black plastic side-handle. The top section obviously has to be cut down but it also looks like it needs to be shaped-up a little bit. Anyone have some insight on it?
 
Re: Evil Dead Chainsaw(s) Build... Groovy Part 2!

These are just some quick observations. There will be others. Next up: Get a definitive length on the wooden pull handle, figure out the definitive angle bends on the top handle, and start looking for some suitable bars.

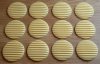
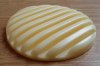
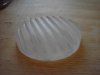
Pull handle: I made mine 90mm long and 25mm diameter. Why? Because that's what this dude did for his build :D It needs to be longer than the grill is wide - which is 68mm - and 90mm looks about right and feels about right in the hand. Somebody might be able to discern a more accurate measurement from the photos, but I'm not smart enough to manage that.

Guide bar: evildeadchainsaws.com and most other people user a 20" bar.

Bars can have slightly different shapes, even within the same length. Chain gauge, chain pitch - I assume - are responsible for this. My personal preference is that I'm not overly fussed about the exact shape as long as it's 20". But someone more dedicated to getting an exact shape would have to study the screenshots.

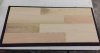
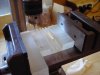
Because I have a chainsaw collecting problem, I currently have three homelite bodies and 3 20" bars to go with them.

In the first photo, they are laid over the top of each other and you can see slight differences in shape.

IMG_0057a.jpg

IMG_0058a.jpg

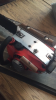
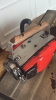
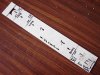
In the second photo - from the top: some generic bar with the brand name of Acremann. I stripped the paint and rusted it with vinegar to give it the appearance of something that has been sitting around in a shed forever, then I gave it a matte clear coat. The details given on the auction were 325 - 058 - 76 drive links.

The middle bar is obviously Homelite branded. It's specs are as follows:

IMG_0065_homelite.jpg

The third bar is an Oregon - the same brand as used by evildeadchainsaws.com. It started with the white paint/red logo colour scheme before I stripped it. It started to flash rust, so to stop it going too far by the time I got round to finishing it, I sprayed some rust converter on it which made the whole thing turn black. It's just a surface thing and I can work with that to give it the appearance of the AoD/AvED chainsaw.

The specs are:

20" Oregon Power Match Plus bar and chain
Genuine Oregon - Made in Canada
Bar has replaceable sprocket tip.
Bar code no: 200XXXD176 GF
Bar length: 20 inch
Chain gauge: 0.050 inch
Chain pitch: 3/8"
No. links: 70

IMG_0066_oregon.jpg
 
That is awesome info, keep it coming! As soon as I have A little extra time I want to chime in on this as well.


In the meantime here are the pics of the finished saw…
IMG_8037.PNGIMG_8036.PNGIMG_8038.PNGIMG_8039.PNGIMG_8041.PNGIMG_8040.PNG

-B89
 

Attachments

  • IMG_8043.PNG
    IMG_8043.PNG
    319 KB · Views: 134
  • IMG_8044.PNG
    IMG_8044.PNG
    324.9 KB · Views: 137
Awesome display, sir. The blood on the "floor" really sells the whole thing.

Okay, question time.

So, in this hobby of ours, we often have to ask just how far we want to go with screen-accuracy. Hell, it's what started a lot of the conversations we've been having in the thread recently. As such, it's time to address the side "grill" on the saw. Most of us have gone with a highly idealized version of the grill. But, should we be striving for a more screen-accurate version? Bare in mind, the screen-used grill is... Well, it doesn't look great...

Evil Dead 2 - 2011 US Lionsgate Blu-Ray Still 061.jpg

I've had to make decisions like this before on other builds. The proton packs from "Ghostbusters," for instance, had some pretty slapped-together components, especially the packs made for the second film. When I made mine, there were several points where I had to decide to go with true screen-accuracy or display aesthetics.

So, what does everyone think? Would anyone want the Play-Do Fun Factory version of the side grill?
 
Hells no :lol That thing is UH-gly!

After several attempts and finally ending up with a grille I like, I'm not going to trade it in for that elephant man grille! At the most, I'd maybe put some scrapes and scratches and dents in my grille, enough to make it look used. But I wouldn't go as far as what they used on screen.


IMG_0068.JPG
 
Hells no :lol That thing is UH-gly!

After several attempts and finally ending up with a grille I like, I'm not going to trade it in for that elephant man grille! At the most, I'd maybe put some scrapes and scratches and dents in my grille, enough to make it look used. But I wouldn't go as far as what they used on screen.


View attachment 806406

Looks pretty good to me. Did you hand-sculpt your mold or did you use a 3D printer?
 
What worked for me (after balsa, styrene, perspex) was MDF. The base is 6mm thick and the 'vanes' are 3mm thick. They're not all perfectly aligned but I guess that helps toward a certain rough look. Then I moulded it and made Onyx castings

I did a 3d print later on but it costs much more than MDF due to not having a printer of my own. I've never got around to smoothing out the print. I really just wanted to try it out.
 
Re: Evil Dead Chainsaw(s) Build... Groovy Part 2!

As far as the handle goes, this rotated screenshot (from AoD) gives a pretty good indication. I made a template for my own handle which I'm happy to post, but its at home so I'll do that later on.

View attachment 805491

I'm not claiming this to be identical to the prop - but this is what I came up with:

View attachment 805579View attachment 805580View attachment 805581

So the first image is the template with measurements on it. The second image is what my handle ended up like. The corners will never be sharp - nor should they. The small tucked under part is angled like that to sit flush against the lid for my cabin chainsaw. The third image is just the two overlayed together. Not perfect, but pretty happy that I managed to get it that close :D

3mm aluminium flat bar, 25mm wide.

So I looked at some screenshots from ED and AoD in photoshop and I think the correct angle is 102°. That ought to have some minor effect on the other dimensions which I may get round to figuring out at some point, but not any time soon as I already have a handle I like :)
 
Hells no :lol That thing is UH-gly!

After several attempts and finally ending up with a grille I like, I'm not going to trade it in for that elephant man grille! At the most, I'd maybe put some scrapes and scratches and dents in my grille, enough to make it look used. But I wouldn't go as far as what they used on screen.


View attachment 806406


I milled mine out of a solid piece of perspex. I used a 9/64" (3.57mm) milling bit to give give 9 channels & 10 ridges across the 68mm length, so each ridge and each channel was and equal 9/64" (3.57mm) wide. Then sanded it into a disc, and gave the flat top a slight curve.
 

Attachments

  • DSCF6818 (2).JPG
    DSCF6818 (2).JPG
    1.5 MB · Views: 88
  • DSCF6819 (2).JPG
    DSCF6819 (2).JPG
    998.4 KB · Views: 90
  • PICT8607.jpg
    PICT8607.jpg
    651.3 KB · Views: 91
  • PICT8609.jpg
    PICT8609.jpg
    370.6 KB · Views: 107
I agree, when I was researching this for my first build I noticed that wonky grill as well... It's funny, in similar props from other movies as well your mind kind of subconsciously "fill in the blanks" that you really never notice until you start studying it for a build... One of those was during the build scene in the work shed, I never noticed when Ash attaches the bar to the saw, similar to someone shoving a magazine into a gun, the chain doen't go around the back side of the bar so there's no way it could ever "function".... I LOVE seeing stuff like that!
Evil Dead 2 - 2011 US Lionsgate Blu-Ray Still 068.jpg

While I do appreciate those who are all about 100% "screen accurate", I tend to lean somewhat to a mix of screen accurate and idealized... and that's just a personal preference. I'll labor over making sure the handle matches the angles and length on the screen used version but I'll take a uniformly sculpted grill over the wonky one seen on screen any day. Not taking anything away from those who go after 100% screen accurate, just my preference. ;)

-B89!
 
Re: Evil Dead Chainsaw(s) Build... Groovy Part 2!

I'm not claiming this to be identical to the prop - but this is what I came up with:

View attachment 805579View attachment 805580View attachment 805581

So the first image is the template with measurements on it. The second image is what my handle ended up like. The corners will never be sharp - nor should they. The small tucked under part is angled like that to sit flush against the lid for my cabin chainsaw. The third image is just the two overlayed together. Not perfect, but pretty happy that I managed to get it that close :D

3mm aluminium flat bar, 25mm wide.


You can see a photo of the template I used to make all three handles here. The dimensions are all the same, the angles were just different depending on the type of saw. The metal used was 1" x 1/8" Aluminium Flat Bar. The measurements are 75mm at the back, 186mm across the middle, 51mm down to the front, and the little front section is 26mm for a cabin saw, and 33mm for an AOD saw. I had templates I could use to simply mark up, for everything I needed to make from scratch each time, all the brackets, lids, handles, etc...
 

Attachments

  • PICT2763.JPG
    PICT2763.JPG
    1 MB · Views: 133
Hey, folks.

Quick update.

So, I went to my local O’ Reiley’s Auto Parts for a ball-head switch for my shed build. If you look at the blu-ray captures, it’s incredibly easy to see the prop builders changed out the original on/off switch with a ball-head.

I’ve got my local Fastenal dealer looking for a shaft collar similar to the screen grabs on the cuff. He’s an old-hand so we’ll see what happens.

My younger brother will be staying with me this weekend. He’s a mechanical engineer. Between his professional modeling experience and my professional research experience, hopefully, we can come up with some definitive numbers on some of the saw sections.
 
Man. The chainsaw gets smashed, the series is cancelled and Bruce has retired the character. I has a very big sad :cry
 
This thread is more than 5 years old.

Your message may be considered spam for the following reasons:

  1. This thread hasn't been active in some time. A new post in this thread might not contribute constructively to this discussion after so long.
If you wish to reply despite these issues, check the box below before replying.
Be aware that malicious compliance may result in more severe penalties.
Back
Top