Evil Dead Chainsaw(s) Build... Groovy Part 2! DONE!!

Re: Evil Dead Chainsaw(s) Build... Groovy Part 2!

@extreme_too2

Have you looked at evildeadchainsaws.com? I consider his chainsaws to be the gold standard. He's done a lot of good research and documented the way he arrived at how his chainsaw looks the way it does.

That said, I don't believe anyone has researched particular part numbers of, say, the clamp or the chainsaw bar. That could be very difficult as clamps are quite generic products with many manufacturers.
 
Re: Evil Dead Chainsaw(s) Build... Groovy Part 2!

Thanks for bringing this subject up again, buddy! I do think this would be an awesome thing to try and pick apart. I think it might be tough to track down, (if they're still in tact), the original saws from ED2 or AoD to pour over like we've seen with some of the other iconic props out there. HOWEVER, given the popularity, (not to mention the new season), of Ash vs The Evildead, there's GOT TO BE SOMEONE out there who can get some sort of access to the actual prop! I'm actually really surprised that nothing has surfaced like detailed photos of that saw prop before now. I mean, do they keep it under lock and key when not on set??! LOL!! I would have thought it would make an appearance at some con before now.

-B89!
 
Re: Evil Dead Chainsaw(s) Build... Groovy Part 2!

I Rob from EvilDeadChainsaws.com. Thought I'd chip in and post think ZIP file link I uploaded it for someone else a while back. It contains hundreds of reference photos which I used myself back in 2013 to produce my replica chainsaws. You have 1080p screenshots from Evil Dead II & Army Of Darkness, detailed photos of the original HomeLite Super 2 chainsaw I used as a base to mould all my parts, a few hundred saved photos of various original homelite chainsaws (mostly either from Google or eBay sales), and two Medieval Chainsaw customer photos (in there as the person I uploaded it for was making a AOD chainsaw). Here is the link;

http://www.bookofthedead.ws/private_dump/EvilDeadChainsaws.zip (776mb)

Further to the post above, I did an awful lot of research on original parts. I was making saws between 2005 up to 2008, then again when I started from scratch between 2012 to 2015. The saw does change quite a bit, sometimes from shot to shot, so the models I used to sell were somewhat an amalgamation of saws shown from different angles in various shots. I think more than anything else, that's down to the screen-used saws being really trashed, repaired, and trashed again. The wristband I used to use was as close as I could make, but I was never even able to identify what the original item used was.

I do still get a couple of emails a month from people after chainsaws, mechanical hands, or DIY parts. I have a few parts left over, but not much. I've never felt the draw to come back making the saws after 2015. I have a full time job, and once I'd produced the first of each prototype saw, the new-ness and excitement of it was gone. After that it was just a bit of a slog to turn out each saw working from 6am - 8am before work, then a few hours after as well. Each one took about a week or so to make. The extra money was nice, but fairly meaningless if all my spare time was eaten up making the saws themselves. I also get emails from time to time asking 'can you tell me how to make a chainsaw?', to which I have to reply that unless you have the tools I had when I was making them, it's a little tricky for me to write up an instructions list for people of any ability with any random selection of tools available. I used various items many people will not have, like a bandsaw, table saw, mitre saw, pillar drill, disc sander, mill, lathe, metal shear, mig welder, not to mention a range of tools & bits. I'm happy to answer specific process or part questions, but beyond that it's hard to be too helpful.

It was nice to have supplied Evil Dead The Musical in Toronto, New York and South Korea, as well as sending saws to Ash Vs Evil Dead (even if my saws were not the final screen-used versions). I also still have the huge photo backdrops I used for both the Workshed & Cabin chainsaws sitting in my flat. I'm keeping busy enough with other projects; Filmaking, including attempting to make 'Book Of The Dead: An Evil Dead Fanfilm', running the Evil Dead fansite BookOfTheDead.ws, working with Scotty Spiegel & Bill Ward creating Super8Shorts.com, creating a number of other fanmade DVD projects and a whole list more stuff I've probably forgotten. I'm currently working on a 1:25 scale model of The Evil Dead cabin, that has taken me a few weeks so far, and will likely take me a good few more.
 

Attachments

  • collectables_personal_19a.jpg
    collectables_personal_19a.jpg
    1.2 MB · Views: 248
  • collectables_personal_19b.jpg
    collectables_personal_19b.jpg
    2.1 MB · Views: 330
  • lg_gallery_display_18.jpg
    lg_gallery_display_18.jpg
    4.6 MB · Views: 250
Re: Evil Dead Chainsaw(s) Build... Groovy Part 2!

Rob, THANK YOU for chiming in! I know when I built my first one I poured over your site for reference, you're work is outstanding!! Also, a HUGE THANK YOU for your willingness to share all the reference pics! I know I've poured through the movie myself a few hundred time, ;) , but it's invaluable to actually have the screen grabs!

It's funny, that was one of the things that I noticed once I started digging into building the saw, how often it changed from scene to scene!... One of the many aspects of the series that makes it an absolute classic for me!

Also, I LOVE the work shed backdrop for the saw!! GORGEOUS!!

Thanks again for posting!!
-B89!
 
Re: Evil Dead Chainsaw(s) Build... Groovy Part 2!

Hey Rob, thanks for the screenshot zips. I was poised to upload the zillion screenshots I took myself but you've done the work for me :D Thanks also for your website - it's a great resource.

as well as sending saws to Ash Vs Evil Dead (even if my saws were not the final screen-used versions).

I noticed those in among your dropbox photos! How come they never used them on screen?
 
Re: Evil Dead Chainsaw(s) Build... Groovy Part 2!

I noticed those in among your dropbox photos! How come they never used them on screen?

I supplied four non working and two working medieval style chainsaws, all assembled but without any painting or ageing, plus a rough stunt saw as well, which took two months to make. There were a few reasons they weren't used. Firstly, the outer look of the chainsaws needed to be changed after I'd already made them (rights issues), the saws weren't big enough for the stuntman to get his hand in, and the motor wasn't powerful enough for what they wanted to do.

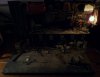
Now the first one would have just been cosmetic and not insurmountable by modification. The second and third would have been far more difficult to achieve by modifying my chainsaws. As anyone who's made a saw themselves knows, they are a snug fit no matter how you orient the internals, and the internal space you have in there is completely governed by the size of an original Homelite XL chainsaw body. As you can see from the three lower right hand photos, my chainsaws weren't exactly packed with stuff, it was mostly empty space in there, so making even more space would mean extending bits out to create a custom fit for the actor's hands. Once you have to do that with six original saws, you might as well modify one set of my original parts, remould them, and turn the six you need out, plus spares from scratch.

The motor issue was a tricky one. Back when I used to make working chainsaws, plus the ones I made for AvsED, it was intended that the motor should have enough torque to turn the chain (which is a fair bit on it's own) and maybe cut though a loaf of bread, but not enough to cut through a pair of jeans (if you tried, the motor would stall), that way the person wearing it was fairly unlikely to seriously hurt themselves. AvsED found they wanted something much beefier, capable of cutting through fake and prosthetic this-&-that. That would have presented safety issues which would have required a close eye, and I'm glad that wasn't my call. You can see from the below photos how I used to make working saws on the left photo; with a sprocket & chain to an offset motor at the front of the body, alongside how I made the AvsED working saws, with the motor located in the centre of the holding-handle. While that was a more elegant solution than the offset motor, it did make modification beyond those tight confines just about impossible, without really hacking away at it. Again once you're in that territory, you might as well modify & remould parts. I'm not 100% sure how they oriented the internals on their screen-used saws, but I'd guess they'd have to have gone to a bigger offset motor with a chain drive to the sprocket.

PICT1049.JPG PICT1337.JPG PICT1341.JPG PICT1343.JPG

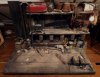
I don't think it's ever been shown, but the far right photo above, you can see the brass tube with the motor on/off momentary button is held to the centre handle with duct tape. This is so the tape could be simply removed, and the button assembly would come free and out of the saw body a few inches, allowing the button to be pressed without someone's hand inside the saw. Just about all the electrics had to be pretty highly rated as just the turning of the chain required a few amps. Can't remember how many, but I know I needed to use a 6A rated resistor on the circuit!

Anyway, all this meant they basically had to completely dis-assemble my chainsaws changing & re-orientating the interior to give more space, adding a bigger motor and changing the outer look. I know they used modified parts from my original chainsaws to make their first prototype chainsaw, but once they got this all sorted, they basically re-moulded everything and made their own chainsaws from then on.

I stopped making saws directly after that order as I'd made eleven chainsaws that up to that August alone (not including individual parts orders) compared to six in the whole of the previous year (plus I have a full time job). I wanted to take a break, so I put EvilDeadChainsaws on hiatus. At the time it was only temporarily, but I've been really busy with other projects ever since. As they re-moulded everything, they could maintain their own saws and make spare parts themselves, so it sort of worked out in the end.
 
Re: Evil Dead Chainsaw(s) Build... Groovy Part 2!

Thanks for the detailed response, that's really interesting stuff. So when you say they modified the outer look, that was purely for rights issues or did they also enlarge the outer dimensions of the body? The only aesthetic difference I could spot was the electrical tape on the top handle.
 
Re: Evil Dead Chainsaw(s) Build... Groovy Part 2!

So when you say they modified the outer look, that was purely for rights issues or did they also enlarge the outer dimensions of the body? The only aesthetic difference I could spot was the electrical tape on the top handle.
I think it was both reasons, but I'm guessing, I don't know that for a fact.
 
Re: Evil Dead Chainsaw(s) Build... Groovy Part 2!

WOW!! Having a working saw that you can still fit your hand into... That sir, is a REAL accomplishment! Seeing the pic of the offset motor is just genius! Love the activation switch on the grip! Again, I really appreciate your sharing! Any other pics you want to share, PLEASE do! :)

Here's the latest on my build... I thought I would show a pic of the interior. Like Rob mentioned in his post, it is extremely tight in those saw bodys! It's like they had no idea people would be putting their hands in there. ;) As I mentioned before, for my builds I mount the muffler setup on a sheet of styrene and here's why... I have pretty large hands so squeezing mine in the saw takes a little wiggle work. With the muffler assembly having a little flex to it, it allows it to bend out of the way as I slide my hand in and out... Otherwise I would NEVER be able to get my hand in or out!
FullSizeRender(3) copy 6.jpgFullSizeRender(3) copy 8.jpgFullSizeRender(3) copy 9.jpgFullSizeRender(3) copy 11.jpgFullSizeRender(3) copy 12.jpgFullSizeRender(3) copy 13.jpg

Couldn't resist adding the bar! Getting REALLY CLOSE!! ;)
FullSizeRender(3) copy 10.jpg

-B89!
 
Re: Evil Dead Chainsaw(s) Build... Groovy Part 2!

All fabrication work is DONE!! Behold, the finished ED2 Work Shed saw pre deadite encounter! Things are about to get VERY messy around here!! ;)

I'd forgotten how hefty these bad boys are once fully assembled! I love having a prop that actually "feels" weighty rather than like a toy!

FullSizeRender.jpgFullSizeRender.jpgFullSizeRender.jpg

-B89!
 
Last edited:
Re: Evil Dead Chainsaw(s) Build... Groovy Part 2!

Any suggestions of a soft material to stuff inside the wrist ring after your hand is in it for comfort and take up the slack?

Side note,
I actually keep an untouched working homelite chainsaw for... chainsawing.
It's a bad little guy for practical use, I love hacking through things with it knowing it's the "Evil Dead" chainsaw.
 
Re: Evil Dead Chainsaw(s) Build... Groovy Part 2!

Here's my "speculation" regarding that... If you notice Ashs' "stump" when it's been put in the saw, even in the new AvED series, it's quite bulky, more so then a typical human wrist. My guess is that there's padding added around his wrist under the shirt to fill out the cuff and add a buffer against the cuff itself.

So I would suggest upholstery foam or EVA foam under the shirt sleeve

-B89!
 
Re: Evil Dead Chainsaw(s) Build... Groovy Part 2!

Almost finished with the display base... ;)

FullSizeRender(3) copy 14.jpg

I'll be adding nails and beating it up a bit so it looks aged... Then it's time add some grime and gore to the saw! The end is officially in sight!! GROOVY!!!

-B89!
 
Re: Evil Dead Chainsaw(s) Build... Groovy Part 2!

The base is done! Here's some pics showing the denting and scuffing...
FullSizeRender.jpgFullSizeRender.jpg

And with the final weathering...
FullSizeRender.jpgFullSizeRender.jpg

The saw is next!...

-B89!
 
Re: Evil Dead Chainsaw(s) Build... Groovy Part 2!

Awesome! Now, this is exactly what I was talking about. Rob, thank you so much for your generosity. Looking through your files has already helped confirm a few details on the shed saw for me.

Speaking of...

It looks like the nut on the cuff isn't a nut at all, but some sort of shaft collar. The set screws are an especially nice touch.

Evil Dead 2 - 2011 US Lionsgate Blu-Ray Still 054.jpg

Next up...

The cuff is for sure made up of corrugated metal tubing. Now, to figure out what the diameter is... Bonus points for highlighting the set screw on the collar again.

Evil Dead 2 - 2011 US Lionsgate Blu-Ray Still 067.jpg

Then, there's the bar attachment area. On my Homelite, there a strip of metal riveted to the saw body just under the section where the bar bolts on. I assume it's some sort of guide for the bar. Anyway, it looks like the strip has been removed and the resulting holes have been filled with a couple of flat head bolts. But, what size?

Evil Dead 2 - 2011 US Lionsgate Blu-Ray Still 068.jpg


These are just some quick observations. There will be others. Next up: Get a definitive length on the wooden pull handle, figure out the definitive angle bends on the top handle, and start looking for some suitable bars.
 
Re: Evil Dead Chainsaw(s) Build... Groovy Part 2!

As far as the handle goes, this rotated screenshot (from AoD) gives a pretty good indication. I made a template for my own handle which I'm happy to post, but its at home so I'll do that later on.

Army Of Darkness - 2009 US Universal Studios Blu-Ray Still 015.jpg
 
Re: Evil Dead Chainsaw(s) Build... Groovy Part 2!

Cool info on those parts! I know mine is sort of a conglomeration of the saws from different scenes. I tried to stick primarily to the Work Shed saw but as mentioned before, it changes from scene to scene and some of the "details" are for the benefit of the scene/movie and not necessarily how it was on the prop itself. A couple of examples being the "motor" inside the saw during the build scene, the hinged top when they close up the top of the saw with the handle. I'm wondering if that's the case with the wrist cuff/clamp they toss onto the work table and the hinged version we see her close.

Regarding weathering the base, I'm happy to share! I'll post pics when I weather the second one... I'm planning to post a tutorial when I do the saw as well. Basically for the base, I do a light spray of flat back spray paint and hit it pretty hard with a sanding block until it has the look I'm after.

-B89!
 
Re: Evil Dead Chainsaw(s) Build... Groovy Part 2!

I'm not claiming this to be identical to the prop - but this is what I came up with:

handle template.jpghandle actual.jpghandle overlay.jpg

So the first image is the template with measurements on it. The second image is what my handle ended up like. The corners will never be sharp - nor should they. The small tucked under part is angled like that to sit flush against the lid for my cabin chainsaw. The third image is just the two overlayed together. Not perfect, but pretty happy that I managed to get it that close :D

3mm aluminium flat bar, 25mm wide.
 
This thread is more than 5 years old.

Your message may be considered spam for the following reasons:

  1. This thread hasn't been active in some time. A new post in this thread might not contribute constructively to this discussion after so long.
If you wish to reply despite these issues, check the box below before replying.
Be aware that malicious compliance may result in more severe penalties.
Back
Top