tl;dr, I made my first real prop from a movie, the Rotor Sword from Edge of Tomorrow, and I would love any feedback from this very experienced audience. I'm humbled to be here and thank you all for your welcome.


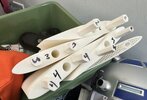
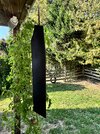
I truly enjoyed Edge of Tomorrow (2014), which led me to read "All You Need Is Kill' by Hiroshi Sakurazaka. Given that I also fly/flew helicopters in earlier days, the Rotor Sword triggered something primal, sending me down a multi-week exploration and build. I am not an experienced prop maker by any means, but I do have a good, self taught, background in 3D Printing and Parametric Design using Fusion 360. As I always seem to get more out of a project if I tie something real to the learning of a new skill... this was perfect. I spent many nights searching for 3D Models and came across tmax's limited run and I knew I found something fun. A few weeks of watching some beneficial Adam Savage videos about sanding and weathering of different types, I knew I was in for fun once I got a hold of the "$5 Sword" video.
I'm very new to this forum, and I'm trying to post my experience for others. I've posted my models and make on Printables as well for those interested in downloading the STL files to make one of their own.
Based on what I see here, the most usual method of posting progress is to make multiple posts in a thread, which I will try to follow here.
But, I would LOVE to hear from others on what you think I did well and what you think I could have done better. I've learned a lot by building this first build, but I'm sure I'm the newbie here and will be happy to soak up any guidance, advice, hints, or criticism on this adventure.
Thanks for reading,
-c