Looking at the cables, I see its the same at my phones charging cable, which is getting a short, so I probably need to get a new one and save the old one for something like this.Great work! Nice braided cables! I think I have some tamiya scale cables to use. 2 more weeks and I’ll be back on mine!
You are using an out of date browser. It may not display this or other websites correctly.
You should upgrade or use an alternative browser.
You should upgrade or use an alternative browser.
ED-209 by Moderoid
- Thread starter Fett_Ish
- Start date
bingoh
Active Member
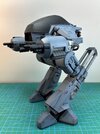
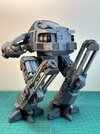
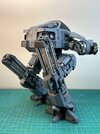
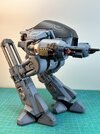
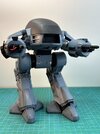
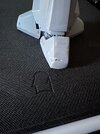
Heeeere’s EDdie!
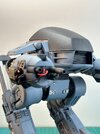
One final group of quasi-properly lit glamour shots of ED. I may get a burr during the dead of winter to do some minor weathering/dry brushing, but I’m calling him done for now.
Special thanks to all of the bad influences on here whose posts got me to fix his feet and paint him. There’s a good chance he would have drifted into my bottomless paint backlog otherwise.
Now we get to wait with baited breath for Fett_Ish ’s version of ED!
Attachments
-
 IMG_1776.jpeg1.2 MB · Views: 140
 -
 IMG_1787.jpeg1.8 MB · Views: 129
 -
 IMG_1786.jpeg1.1 MB · Views: 115
 -
 IMG_1785.jpeg1.6 MB · Views: 107
 -
 IMG_1784.jpeg1.1 MB · Views: 104
 -
 IMG_1783.jpeg1.2 MB · Views: 110
 -
 IMG_1782.jpeg838.1 KB · Views: 105
 -
 IMG_1781.jpeg1,018.2 KB · Views: 106
 -
 IMG_1780.jpeg1.1 MB · Views: 107
 -
 IMG_1779.jpeg1.1 MB · Views: 109
 -
 IMG_1778.jpeg1.1 MB · Views: 107
 -
 IMG_1777.jpeg1.1 MB · Views: 140
Fett_Ish
Sr Member
Sweet googly moogly that’s looking nice!Heeeere’s EDdie!
One final group of quasi-properly lit glamour shots of ED. I may get a burr during the dead of winter to do some minor weathering/dry brushing, but I’m calling him done for now.
Special thanks to all of the bad influences on here whose posts got me to fix his feet and paint him. There’s a good chance he would have drifted into my bottomless paint backlog otherwise.
Now we get to wait with bated breath for Fett_Ish ’s version of ED!
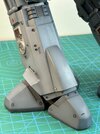
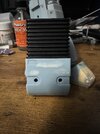
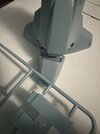
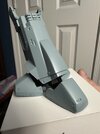
I am back at it myself. I was trying to figure out how to at that indented box back on the toe. I decide to carve it out, insert some 2 part epoxy putty and pres the end of a file in. Looks rougher on camera, as it all does but worked well. After a hit of primer I have a bit of sanding to do, but it’s getting there. I included two of the colors I will be mixing, probably with some white and blue to get to the color I want.
Attachments

bingoh
Active Member
I like how your toe cutout is bigger, not to mention the nice crisp angles...you really nailed that toe profile! I was fretting when I took an xacto blade to cut that notch out, worried that I would take too much and have to start the whole toe over.Sweet googly moogly that’s looking nice!
I am back at it myself. I was trying to figure out how to at that indented box back on the toe. I decide to carve it out, insert some 2 part epoxy putty and pres the end of a file in. Looks rougher on camera, as it all does but worked well. After a hit of primer I have a bit of sanding to do, but it’s getting there. I included two of the colors I will be mixing, probably with some white and blue to get to the color I want.
Fett_Ish
Sr Member
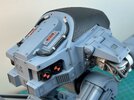
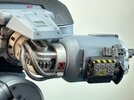
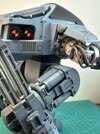
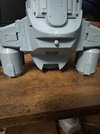
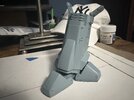
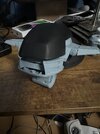
More filling of seams and some sink marks. I also sanded down a few ‘bulges’ I had not noticed on the lower legs. Finally and it’s nearly impossible to see, but I made a hexagonal shape in my added fasteners on the toe and shin. I did this by dropping a bit of MEK on the plastic and then pressing a tiny Allen wrench into the softened plastic. Hopefully will show when painted and weather. Should get the whole thing in primer by the weekend.
Attachments
bingoh
Active Member
Good progress! Particularly like how you're matching the added fasteners to the ones already on there. That seam line on top of his "head" was the toughest on the kit for me, but it looks like you got it filled nicely.More filling of seams and some sink marks. I also sanded down a few ‘bulges’ I had not noticed on the lower legs. Finally and it’s nearly impossible to see, but I made a hexagonal shape in my added fasteners on the toe and shin. I did this by dropping a bit of MEK on the plastic and then pressing a tiny Allen wrench into the softened plastic. Hopefully will show when painted and weather. Should get the whole thing in primer by the weekend.
What are your plans for the wires/antennas on top of his back?
That turned out really good, perfect really. Fixing that weird long toe made such a huge improvement.
It went from a cheaper looking plastic model to a filming model ready for the camera.
It went from a cheaper looking plastic model to a filming model ready for the camera.
Fett_Ish
Sr Member
Thanks for the responses fellas! I am getting closer, I think one more sanding session and he’s ready for prime and paint. As for the top ‘antenna’ I am going to use wire and shrink wrap fro replacing all but the end bits where I will just use the kit bits.
Attachments

Fett_Ish
Sr Member
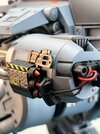
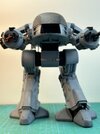
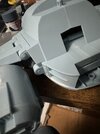
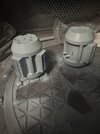
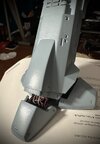
Finally getting some paint down. I was sanding and filling and sanding and got sick of it so it is what it is at this point. I mixed some medium blue with some medium gray and then added white until I got to a shade I liked. Sometimes looks quite gray, sometimes quite blue, so I am happy. Main color is down and I started the black and priming with black the metal parts. I need to add all the wiring still as I am replacing the kit ones with thinner ones and adding a bunch to the feet. I saw on the Chronically collectibles version there are a bunch of wires coming out of the back of the legs I may add as well. What do you guys think of the color?
Attachments
stevielewis
Sr Member
Color looks spot on. ")
bingoh
Active Member
I'm feeling the blue! Looks a lot like the color in the boardroom where the lighting is better.Finally getting some paint down. I was sanding and filling and sanding and got sick of it so it is what it is at this point. I mixed some medium blue with some medium gray and then added white until I got to a shade I liked. Sometimes looks quite gray, sometimes quite blue, so I am happy. Main color is down and I started the black and priming with black the metal parts. I need to add all the wiring still as I am replacing the kit ones with thinner ones and adding a bunch to the feet. I saw on the Chronically collectibles version there are a bunch of wires coming out of the back of the legs I may add as well. What do you guys think of the color?
And that build is CLEAN! Nary a seamline to be found (and there were some inconveniently-placed ones). Excellent!
If you are looking for miniature braided lines, the model car aftermarket has lots of products available.
Detail Master and Tamiya are a couple of them.
Detail Master and Tamiya are a couple of them.
Fett_Ish
Sr Member
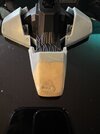
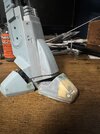
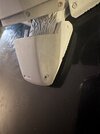
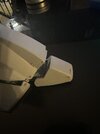
Thanks a lot guys, it is nice to get feedback, since I right now am sick of this model and just got the Modoking Batman Tumbler, but Imgotta finish this before starting another project. Here is a shot of the wiring in the front toe and started on the outer. Not much to see in a flat footed stance, but one foot will be posed toes down in mid step so will be a bit more visible. Also I must rant. I know some folks swear by valejomair paints, but every time I use them,usually metallic, they gum up my brush and today was no exception. I would have gotten more done but I had to spend an hour cleaning my airbrush.
Attachments
Looking good....and I sure know that feeling on the downward stretch and just wanting to finally get finished, and when another project/idea comes up real fast, then really want to get finished.
Similar threads
- Replies
- 17
- Views
- 822
- Replies
- 10
- Views
- 621