ED-209 by Moderoid

Whittling down the field of candidates!

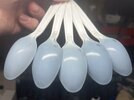
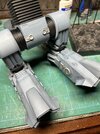
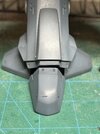
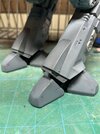
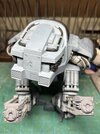
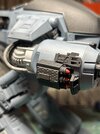
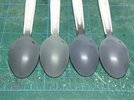
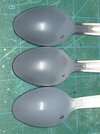
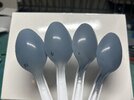
I really took the ole buffing stick to these four (which gave me a nice effect very similar to the movie model…thanks for the suggestion Too Much Garlic). Thinking 3 is a little too gray and 4 has a green tint (used JN gray which def has a green undertone).

I’m leaning toward 7’s slightly lighter shade, but it’s so tough to replicate movie colors. Still not sure if I’ve hit the mark with any of them. I like the blue tone of 5, but thinking it's too dark...maybe I'll mix up some of that tomorrow but add a touch of white to see if I can lighten it up.
 

Attachments

  • image.jpg
    image.jpg
    2 MB · Views: 82
Last edited:
#9 is 5 with an equal part white added. I think that’s getting much closer! Maybe still a touch too gray?
 

Attachments

  • image.jpg
    image.jpg
    1.2 MB · Views: 72
a#9 is 5 with an equal part white added. I think that’s getting much closer! Maybe still a touch too gray?
I would look at it with a white/nuetral background and agree on 9 that was five maybe a little lighter with a hint more blue. Maybe
 
Added more blue to #10 (on the left). I think I may have a winner, but I’m gonna leave it sit for a couple days and come back to it with fresh eyes.
 

Attachments

  • image.jpg
    image.jpg
    1.3 MB · Views: 75
  • videoframe_85697.png
    videoframe_85697.png
    1.2 MB · Views: 71
Last spoon post (I know, thank God, right? :p).

I came to the realization while I was painting my Aliens pulse rifle that, much like the classic brown bess debate, there's probably little chance that I'll ever recreate ED's true color (and, if I did, it might very well look nothing like I imagined because of the miracle of movie lighting). So, just as I'm doing with the pulse rifle, I'm going to stick with what looks best to me for ED instead of going full rivet-counter and endlessly tweaking the color to try to be "perfect." I'm going with #12 for ED and olive drab on the pulse rifle if anyone's curious ;).

Here's the list of the paint mixes I've tested below so anyone else painted ED can have something to work from. Everything is Tamiya acrylics mixed 50/50 with Mr. Color Leveling Thinner over a cheap rattlecan gray primer. If someone wants any of the other colors I've posted, PM me and I'll let you know the mix ratios.

9 - 1 part XF-18, 1 part XF-19, 1 part XF-2
10- 3 part XF-18, 2 part XF-19, 2 part XF-2
11- 2 part XF-18, 1 part XF-19, 2 part XF-2
12- 3 part XF-18, 1 part XF-19, 2 part XF-2
13- 3 part XF-18, 1 part XF-19, 3 part XF-2
 

Attachments

  • image.jpg
    image.jpg
    1.9 MB · Views: 70
Last edited:
The captures you are showing are from an evening scene. Better to use the demonstration scene as that is daylight.

For the used captures I would say #2 or #6

But your #12 seems right in my mind too.
 
The captures you are showing are from an evening scene. Better to use the demonstration scene as that is daylight.

For the used captures I would say #2 or #6

But your #12 seems right in my mind too.
I decided to stick to middle-of-the-road in tone since the color varies pretty significantly depending on lighting and angle. I think #12 hits the blue-gray industrial baked ceramic color I’m looking for.

Gotta say, I’m looking forward to what Fett_Ish does with his, tho.
 
“You have 20 seconds to move your vehicle.”

I’m digging this blue so far. Maybe not 100% screen-accurate, but it “feels” right. And the preshading I did really pops with it.
 

Attachments

  • image.jpg
    image.jpg
    1.5 MB · Views: 102
  • image.jpg
    image.jpg
    1.6 MB · Views: 99
  • image.jpg
    image.jpg
    2.1 MB · Views: 107
Thought I was getting near the end with everything painted then, during assembly, I saw the seam on the top of the head had opened up. Thought I had it glued sufficiently but apparently not. Not happy about seam-filling on a painted model but it was just too bag a gap to ignore. Damnit.
 

Attachments

  • image.jpg
    image.jpg
    1.4 MB · Views: 74
Well, waiting for the paint to dry on my seam repair gave me time to do a little extra detailing. I had planned on just using the included wires, but Fett_Ish mentioned re-creating the braided metal tubing on the arms so…

And how, pray tell, do you re-create braided metal tubing on a model? 2mm paracord with a wire down the middle, of course! It can even be painted silver!
 

Attachments

  • image.jpg
    image.jpg
    1.5 MB · Views: 89
  • videoframe_110738.png
    videoframe_110738.png
    1.6 MB · Views: 115
“He’s got the 209 series online and now he wants to show off.”

ED is painted and assembled! Gonna try to get him decaled over my days off and (temperature permitting) give him an overall satin clearcoat. Then I can weather him at my leasure.
 

Attachments

  • image.jpg
    image.jpg
    1.6 MB · Views: 106
  • image.jpg
    image.jpg
    1.8 MB · Views: 98
  • image.jpg
    image.jpg
    1.6 MB · Views: 97
  • image.jpg
    image.jpg
    1.7 MB · Views: 102
  • image.jpg
    image.jpg
    1.5 MB · Views: 106
  • image.jpg
    image.jpg
    1.7 MB · Views: 106
  • image.jpg
    image.jpg
    2 MB · Views: 113
Great work! Nice braided cables! I think I have some tamiya scale cables to use. 2 more weeks and I’ll be back on mine!
 
Great work! Nice braided cables! I think I have some tamiya scale cables to use. 2 more weeks and I’ll be back on mine!
Thanks! I was looking at the Tamiya cables before I went cheap and tried out the paracord. I’ve never used the Tamiya ones and I’m interested in how those look, so make sure you post it!

Looking forward to seeing how your version turns out!
 
Pretty decent decals overall. Some minor trimming to fit tight spots but nothing major. A couple missing markings that I fudged with spares out of my extra decal bin.

Probably the most interesting part is the number of alternative decals provided. To try to stay accurate, I re-watched the ED-209 clips from the original Robocop and found that there are actually multiple discrepencies, mostly between the stop motion and full size. Think I’m relatively close to the stop motion with my choices.
 

Attachments

  • image.jpg
    image.jpg
    1.4 MB · Views: 82
  • image.jpg
    image.jpg
    1 MB · Views: 77
  • image.jpg
    image.jpg
    1.4 MB · Views: 78
  • image.jpg
    image.jpg
    1.2 MB · Views: 79
Thanks to a warm snap this week, I got everything topcoated (yeah!). Now I’m going over the vents, bolts, and panels with some black Tamiya panel liner. I’m trying to go super subtle, just to make it look like there’s normal machinery grime in there (you can see the difference between the unlined shoulder flap and the side of ED), except for the sootier exhaust vents.
 

Attachments

  • image.jpg
    image.jpg
    2.5 MB · Views: 72
  • image.jpg
    image.jpg
    1.5 MB · Views: 70
Back
Top