wetcelery
Active Member
This has long been a dream of mine and it's another ambitious project for my second costume! I am aiming to try and create Mulan/Ping's training outfit and military armour all before the end of September! This will most likely be my last big project as summer comes to an end and art school starts up again. This time round, I'm hoping to make everything from scratch. I'll try and make it as cartoon accurate as possible, hence why I'm opting for a more simple look for the armour, than what several cosplayers have done to try and recreate the look of historical Chinese military wear of the dynasty. Maybe I'll get there at some point but for now, I'd like to try my hand at EVA foam armour! So here's a thread of my progress. As always, suggestions are more than welcome!
Undershirt and trouser:

Training uniform:


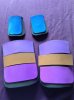
Military armour:


Detailed Costume References:


INDEX
Probably best to view it in this order if you're following this as a guide. Posting order is more how I worked and it's a little bit all over the place.
1. References
i. Personal Notes
2. Training Uniform
i. Coat
ii. Collar
iii. Cuffs: part one, part two
iv. Finishing the Coat
v. Trousers: part one, part two
vi. Hair tie
3. Armour Base
i. Chest piece: part one, part two
ii. Skirt pieces
iii. Pauldrons
iv. Gauntlets
v. Shinguards: part one, part two
vi. Hand guards
4. Detailing the Armour
i. Cutting Thin EVA foam
ii. Sealing with PVA/Water
iii. Spray painting: part one, part two
iv. Detailing with Acrylic Paint
5. Summary
6. Complete Costume


Undershirt and trouser:
Training uniform:
Military armour:
Detailed Costume References:
INDEX
Probably best to view it in this order if you're following this as a guide. Posting order is more how I worked and it's a little bit all over the place.
1. References
i. Personal Notes
2. Training Uniform
i. Coat
ii. Collar
iii. Cuffs: part one, part two
iv. Finishing the Coat
v. Trousers: part one, part two
vi. Hair tie
3. Armour Base
i. Chest piece: part one, part two
ii. Skirt pieces
iii. Pauldrons
iv. Gauntlets
v. Shinguards: part one, part two
vi. Hand guards
4. Detailing the Armour
i. Cutting Thin EVA foam
ii. Sealing with PVA/Water
iii. Spray painting: part one, part two
iv. Detailing with Acrylic Paint
5. Summary
6. Complete Costume
Last edited by a moderator:


") )
)