Deckard's Sedan from Blade Runner build thread - Fujimi 1/24 model kit

Neon Nautilus

Well-Known Member
RPF PREMIUM MEMBER
fujimikitbox.jpg


Thanks for visiting my thread!
I'll be documenting my build process of this kit and the additional detailing and lighting that I'm adding.
If you are also building this kit, have built it already, or made a start and need a bit of motivation to get it back on it feel free to join me and post your progress or discuss.

There are a few points I'll be trying to tackle in my build:
1) Which interior? One of the two big questions to ask when modelling this subject; Do I go with the actual vehicles interior or match the spinner cockpit that was used for the interior shots.
2) Body colour. For me at least this is the second big question and I'm still a bit unsure what colour I'm going for. All I know for sure is I'm more interested in it looking like it does on screen than in person.
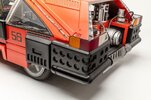
3) Some of the parts, especially on the rear engine deck are simplified and lacking detail. I'll be adding finer details or rebuilding parts to better sell the scale of the model.
4) Lighting for the interior vid screens and controls.
5) External Lighting for the headlamps, red tail lights and orange side lights.
 
Whilst I mull over the questions of interior and body colour I've been working on adding detail.

I started with the radiator that sits on the roof. There are some molded pipes on the ends that I'd like to replace with thin wire.

DS Radiator before.jpg

Those little semicircular nubs on the ends should be little pipes coming in and out of the radiator.

First I carefully cut off the nubs so everything was flush.
Then I used a 0.35mm dia pcb drill bit to make holes at each point where the pipes enter and exit. When I say 'A' drill bit I mean about 6 as I'm very good at snapping them off once they're firmly embedded in the hole!
There was also a larger down pipe on one side which I replaced with a 0.5mm wire. I also drilled a hole for this in the roof of the car.
Finally I bent small lengths of 0.35mm wire around a pin and inserted the ends into the holes. The loops of wire were pushed down until they sat at the right height and then secured with CA glue.

This was the finished result which just adds so much extra fidelity to the model. I always try to find little bits like this to upgrade as it's a good way to disguise the small size of the model making it look more real.

DS Radiator after.jpg
 
On the rear engine deck there are two large gaps either side that look into the empty internal void of the model.
This image shows the area I'm referring to and the gap on the right. You can see through to the wheel wells although it is difficult to see in the image.

PXL_20220319_123302363.jpg


There will be other parts on the outside that hide this a bit but I figured I could add some wiring in there for a bit of visual interest.

First I added a styrene plate to cover the empty voids of the exhaust moldings.
PXL_20220319_124522467.jpg


Next I just let my imagination go and added some internal structural braces and panels. Then some wiring and a bit of spring as ducting.
I used some ref pics of the outside of the rear deck for inspiration. Bundles of copper wire strands gave a similar feel. I also tried to think about where cables may be routed to link up with the lights or components of the rear deck of the car.

PXL_20220319_182530040.jpg


This was then sprayed in a metallic steel colour with hand painted details to pick out various wires and a bit of grime.
I did not spend too much time on this as it is not clearly visible, I just want to add a bit of texture.

PXL_20220516_155910608.jpg


Here's the view through the gaps, you can see a little more in person, it's tricky to get an angle with the camera.
I'm hoping this will just add to the overall feel of the finished model so it reads more like 1:1 scale than 1:24.

PXL_20220516_160205677.jpg

PXL_20220516_160223335.jpg
 
Thanks for for the encouraging comments guys!

So next up I've sorted the wheels. I wasn't completely happy with the silver coating on these so I stripped it using some Mr Muscle oven cleaner.
Both the wheels and all chrome parts were coated in the cleaner, left for about 20 mins then washed off.

With the wheels back to bare plastic I used side cutters to clip off the lip at the back of the wheel rim.
PXL_20220517_131308750.jpg


This meant the wheel was deeper than the tyres so I sanded the rim until it was flush with the edge of the tyre.
Here's the wheels before paint.
PXL_20220410_134529646.jpg


The wheels were then primed with Alclad Black Base and painted with Alclad Dull Aluminium.
PXL_20220517_125608140.jpg


Here you can see the reverse side with the rim lip removed.
PXL_20220517_125628087.jpg
 
Here's another little part that I detailed up (sorry there's no before pic).

On the rear deck is this..... something or other
Deckard3_1024x1024.jpg


It's missing a lot of detail on the kit part and the pipes on the sides are just solid shapes to allow for mold limitations.
I removed the pipe-ish shapes and replaced with 0.5mm wire and various dia of styrene rod. Rod was bent by gently heating over a candle.
Then cut some shapes from 0.25mm sheet styrene for the lozenge between the pipes and triangle on the top.
Finished off with a bit of 0.35mm rod cut into tiny slices for the bolt heads around the base.
PXL_20220517_124354815.jpg


PXL_20220517_124551864.jpg


Will look great with some paint and wiring installed!
 
Will be following this thread intently! On colour, another thread mentioned Rover Orange Blaze - it seems quite close to me, and a quick Google search shows it being a colour for MG/Allegros, which would have been pretty popular in the early 80s (in the UK anyway) so would seem to make sense.

I'll be getting my kit out of the loft along with the paragrafix pe set and just ordered an led kit. I might order the orange from zero paints. I'm still a bit of a novice when it comes to building so this thread will give me plenty of inspiration!
Hi silverstar189, great to have you along for the ride!
I'm sure I've seen the same thread you've mentioned regarding the body colour. I'd agree it looks pretty close to the shots of the real car. The issue for me is that seeing pics of the real car in bright light is quite jarring to how the car looks in the film. The question I've been asking myself is, If I paint my model in the orange color will it still feel like the car from the movie when I view it in my collection. Anyway, that's my own personal choice to figure out, but leaning more to a darker colour scheme.

I'd be really happy to help if you come up against any issues or just want to sound out some ideas. Oh, and hopefully will keep offering up inspiration. I've got the paragrafix kit as well, been working with it a little already so will be sharing progress on that soon.
 
A teeny update on a couple of parts I've been working on. I've circled the parts on the image below from the real car.
Deckard3_1024x1024 2.jpg
Deckard8_1024x1024 crop.jpg


So first up is the part on the right, the cylindrical cage with a column in the centre. The kit part has this molded as one piece so first up I separated the two bits so I could mount them to the car body in the same way as the picture.

This meant that I needed to add a ring to the bottom of the 'cage' part. I cut this from a styrene tube and sanded to the right thickness. This was glued to the kit part. See that marked in blue in the image below.

Then I cut the square holes in the top part marked in green below. Also beveled the edges of the uprights a bit marked in red below.
Lastly I drilled a few 0.25mm holes as per what I could see in the reference. These don't really show yet but should once painted.

Rear cylinder 2.jpg
Rear cylinder 1.jpg

I've made a cylinder to go in the middle from a piece of the kit's sprue. I just cut to length and then rounded the top.
There is an intricate pattern on it which I'm not sure on the best way to replicate, I may just mark it on with a fine pencil.
More on these parts once they're painted.
 

Attachments

  • Deckard8_1024x1024.jpg
    Deckard8_1024x1024.jpg
    92.8 KB · Views: 115
Here's the second part mentioned above, the part circled on the left of the ref image on the previous post.
PXL_20220524_111830327.jpg


This part is pretty detailed already, the only part I added was a couple of thin pieces of styrene rod, the silver part on the far right of the pic.

It was painted in Alclad Black Base, then Alclad Polished Alu. I then masked the left side and painted the right in Alclad Copper.
The rest of the colour was brush painted with Vallejo Model Air colours. A little gold was diluted and washed onto the copper for an aged look. Then a bit of diluted blacks and browns to add some grime.

Thin wires will be added as per the ref when I start assembly.
 
You definitely capture the look for that scratched built cylinder thing and the paint work on that second part looks very convincing. I would have thought they were life size metal pieces rather than painted plastic
 
Hi silverstar189, great to have you along for the ride!
I'm sure I've seen the same thread you've mentioned regarding the body colour. I'd agree it looks pretty close to the shots of the real car. The issue for me is that seeing pics of the real car in bright light is quite jarring to how the car looks in the film. The question I've been asking myself is, If I paint my model in the orange color will it still feel like the car from the movie when I view it in my collection. Anyway, that's my own personal choice to figure out, but leaning more to a darker colour scheme.

I'd be really happy to help if you come up against any issues or just want to sound out some ideas. Oh, and hopefully will keep offering up inspiration. I've got the paragrafix kit as well, been working with it a little already so will be sharing progress on that soon.
Thank you! I ordered the blaze red from zero and I can understand what you mean, wherever we see the car in the final cut it's giving the appearance of being maroon. Then there is the occasional time when a searchlight hits it from above (like when Deckard exits the car to go inside the Bradbury building) where it gives off that orange tone. I think a lot of it will depend on how and where you intend to display it in terms of the lighting conditions. When we see the car in darkness it almost reminds me of this colour: C. Leclerc Ferrari SF1000 #16 1000th GP Ferrari Toskana GP F1 2020 - LSF1031, EAN 9580006141781
 

Your message may be considered spam for the following reasons:

If you wish to reply despite these issues, check the box below before replying.
Be aware that malicious compliance may result in more severe penalties.
Back
Top