You are using an out of date browser. It may not display this or other websites correctly.
You should upgrade or use an alternative browser.
You should upgrade or use an alternative browser.
DEC ANH Hero Blaster Kit Builds
- Thread starter Vanitas
- Start date
sdhlaw1701
Well-Known Member
So painting is probably better for a complete novice with this particular kit?
Darth Lars
Master Member
The one thing to keep in mind with aluminium and pewter is that unlike steel they oxidise from exposure to air, so you should sand the surface right before applying Aluminum Black or aluminium primer.
Jasonvince1
New Member
So painting is probably better for a complete novice with this particular kit?
FWIW- I'm doing my first build. If you read the threads, and watch Scottjua's video a few times on using the chemicals, take your mistakes in stride, you can do it too. The techniques are simple, the patience of repetition is the hard part. A little filing and some sanding can fix a lot of mistakes ( just look at my scope mounting rings above). The scope drill mount a few pages back seemed to make the scope go better. It definitely let me thinking WTF the most through the 7-8 repetitions.
quarryman
Well-Known Member
We still don't have access to the original piece. It's still conjecture what the actual finish is at every stage of filming. Not to be argumentative; we just don't know. It simply can't be proved yet.I'd go for authentic and more of my time than the easy way out that doesn't look right.
sdhlaw1701
Well-Known Member
Yeah... it's not that HARD as it is time consuming. Paint SOUNDS easy, but looks crap, and usually is harder to get a nice surface.
I'd go for authentic and more of my time than the easy way out that doesn't look right.
That is a really good point.
We still don't have access to the original piece. It's still conjecture what the actual finish is at every stage of filming. Not to be argumentative; we just don't know. It simply can't be proved yet.
The only part TO ME that's somewhat debatable (I'm 95% convinced one way though) is the lower receiver of the Mauser... the rest is very plain to tell from all the decent reference we have.
Other than the Cross bar and knobs, the rest is metal finish either blued or natural patina.
goldenry007
New Member
Does anyone have any leads on a display case? I'm thinking something similar to an acrylic box that you'd display a sign football in or something of that sort. I actually was going to use one of those and modify it but it was too small.
My kit is on the way- I'm going to base it on an Umarex M712 (so I can shoot it...) The frame has a lot of inaccuracies but I do not know if the metal is thick enough to try and have the pockets and slots on the frame machined. Has anyone based a build on this? The gun comes with a long CO2 magazine but I have a short 8 round GBB mag on the way from E-Hobby Asia that I think I can modify to use the 4mm BB. If not it will be good for display and I will have to use the long mag for plinking.
The plan is to strip it down and blue the gun to get it as close as possible to the live fire version Scottjua built.
Thank You
Mark


The plan is to strip it down and blue the gun to get it as close as possible to the live fire version Scottjua built.
Thank You
Mark
Got the parts today and did a quick test fit to see how it goes. A lot of work to do, but it's pretty damn cool... The grill does not fit well, but the M712 is flatter in front than the C96. I will either build up the front of the magwell or figure something else out.
Thanks
Mark


Thanks
Mark
I received my parts and been putting my DL together tonight. Everything is pretty strait forward and fits pretty well. The only problem I'm having is that there is a tiny bit of play between the machined flash hider and bull barrel when assembled. I would like to avoid gluing them. Any suggestions?
Han Goes Solo
New Member
I had the same idea but I used the HFC M712/C96 model as a base for my build. The HFC and Umarex are almost identical apart from the insides, also the Umarex has a small gap on the base of the barrel which could be a potential weak spot depending how much material you will have to take away to fit the bull-barrel. If the Umarex is anything like the HFC i wouldn't worry too much, the alloy is really hard and should be able to take a beating. A few tips that might be helpful...
First of you will want to disassemble the gun (to be able to assess the thickness of the frame and to see if you can thread / fit a locking nut on the inside). Check youtube for a dissassembly tutorial, and watch out for flying springs") I you want to use the gun you will probably have to weld the threaded rods in place. The scope weighs a ton and epoxy won't work. For my build I ordered four new screws with tighter threads, drilled the holes in the frame, then soldered two of the screws to the frame using a threaded rod (through base and screw) as a place holder (the two other screws obviously goes on the outside of the crossbar). This way you wont have to weld / solder the rods to the base of the gun, also you won't mess with the mechanics inside. Like you noticed the mag-well is too wide so you wont be able to fit the grill without modifications... still working on that one, maybe the original plastic grill can be cut to fit? 3D printing a custom one? As for bluing I think it looks authentic and old which is what I like, BC Super Blue and Renaissance Wax gave my gun a great finish. Happy I took Scottjuas advice bluing the darn thing
I you want to use the gun you will probably have to weld the threaded rods in place. The scope weighs a ton and epoxy won't work. For my build I ordered four new screws with tighter threads, drilled the holes in the frame, then soldered two of the screws to the frame using a threaded rod (through base and screw) as a place holder (the two other screws obviously goes on the outside of the crossbar). This way you wont have to weld / solder the rods to the base of the gun, also you won't mess with the mechanics inside. Like you noticed the mag-well is too wide so you wont be able to fit the grill without modifications... still working on that one, maybe the original plastic grill can be cut to fit? 3D printing a custom one? As for bluing I think it looks authentic and old which is what I like, BC Super Blue and Renaissance Wax gave my gun a great finish. Happy I took Scottjuas advice bluing the darn thing
Some other tips, someone mentioned rubb n buff for the brass detailing on the scope knob. I went with the gold leaf color... looks great! Also have the long mag but 3D printed a plate to fill the hole when used as a display piece. That's about all the advice I can give you without hijacking the thread :lol


First of you will want to disassemble the gun (to be able to assess the thickness of the frame and to see if you can thread / fit a locking nut on the inside). Check youtube for a dissassembly tutorial, and watch out for flying springs
I you want to use the gun you will probably have to weld the threaded rods in place. The scope weighs a ton and epoxy won't work. For my build I ordered four new screws with tighter threads, drilled the holes in the frame, then soldered two of the screws to the frame using a threaded rod (through base and screw) as a place holder (the two other screws obviously goes on the outside of the crossbar). This way you wont have to weld / solder the rods to the base of the gun, also you won't mess with the mechanics inside. Like you noticed the mag-well is too wide so you wont be able to fit the grill without modifications... still working on that one, maybe the original plastic grill can be cut to fit? 3D printing a custom one? As for bluing I think it looks authentic and old which is what I like, BC Super Blue and Renaissance Wax gave my gun a great finish. Happy I took Scottjuas advice bluing the darn thing Some other tips, someone mentioned rubb n buff for the brass detailing on the scope knob. I went with the gold leaf color... looks great! Also have the long mag but 3D printed a plate to fill the hole when used as a display piece. That's about all the advice I can give you without hijacking the thread :lol
Attachments

Awesome! Thank you, I figured someone had to have done this before with an M712. I will pm you with questions once I start this thing (have to finish an E-11 first). Your build looks great-
I ordered a short GBB Marushin mag from E-hobby Asia. I think it will be easy to mod to use with the BB's, but that's getting off kit topic.
Cheers
Mark
- - - Updated - - -
E]
I ordered a short GBB Marushin mag from E-hobby Asia. I think it will be easy to mod to use with the BB's, but that's getting off kit topic.
Cheers
Mark
I had the same idea but I used the HFC M712/C96 model as a base for my build. The HFC and Umarex are almost identical apart from the insides, also the Umarex has a small gap on the base of the barrel which could be a potential weak spot depending how much material you will have to take awayhavew doine had to to fit the bull-barrel. If the Umarex is anything like the HFC i wouldn't worry too much, the alloy is really hard and should be able to take a beating. A few tips that might be helpful...
First of you will want to disassemble the gun (to be able to assess the thickness of the frame and to see if you can thread / fit a locking nut on the inside). Check youtube for a dissassembly tutorial, and watch out for flying springs
Some other tips, someone mentioned rubb n buff for the brass detailing on the scope knob. I went with the gold leaf color... looks great! Also have the long mag but 3D printed a plate to fill the hole when used as a display piece. That's about all the advice I can give you without hijacking the thread :lol
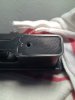
View attachment 464436View attachment 464437View attachment 464439View attachment 464440View attachment 464441View attachment 464442View attachment 464457View attachment 464458
- - - Updated - - -
E]
Darth Lars
Master Member

Blued at home! Recipe: Water, lots of table salt, a bit of hydrogen peroxide, a bit of white vinegar. Dip, drip, rinse, blow torch, rinse, torch, repeat a couple of times, wire wool, oil. It is far from a proper black, but I don't want it to be either.
I'm not going to bother with cold-bluing liquids again if it is this easy to get real blued finish.
awesome builds guys :cheers
- - - Updated - - -
Someone made a post about display cases, I'm not sure if it was in this thread or the other DL44 thread, I can't find it now
- - - Updated - - -
Does anyone have any leads on a display case? I'm thinking something similar to an acrylic box that you'd display a sign football in or something of that sort. I actually was going to use one of those and modify it but it was too small.
Someone made a post about display cases, I'm not sure if it was in this thread or the other DL44 thread, I can't find it now
Similar threads
- Replies
- 53
- Views
- 7,945
- Replies
- 19
- Views
- 3,492
- Replies
- 38
- Views
- 6,990
- Replies
- 4
- Views
- 1,219