You are using an out of date browser. It may not display this or other websites correctly.
You should upgrade or use an alternative browser.
You should upgrade or use an alternative browser.
Death Star Surface Tiles - Full scale 2x2 replicas
- Thread starter t2sides
- Start date
t2sides
Master Member
Hello All! A long overdue update here!! Dan and I have continued to make great progress on the last three tiles masters we've been working on. I've just wrapped up the master for the Module 3 "KitKat" tile, so we'll get started on that here. Dan will be jumping in on the amazing other 2 tiles, Module 4 "Fins" and Module 6 "Round Tower".
So here we go!
Here's a quick shot of the final "Kit Kat" then I'll give some construction background after that.

So it started with an amazing MDF board base, skillfully designed and cut by Dan and our friend Dirk! Next up, after Dan 3D modeled a single tile sub structure 'head' and 'body' after we carefully measured kit parts, then slightly reducing the overall size to accommodate .040 styrene skins. My friend Jim generously printed the inserts in between the tiles on his resin printer, making that part of the project so much easier for finish work.
The final heads and bodies were printed 4x on a CR10s , in PLA. Then a few original kit parts were mocked up to ensure all the measurements, and the structures fit to the base.


After that, it was time to draw up in CAD all the panel lines for the .040 styrene size shapes. This took an extensive amount of time cross checking the exact positioning of each and every line to reference photos of the original 2x2 Kit Kat tile. Then print the design on paper, and tape them to the tile to ensure everything lined up. After that, off to the laser cutter and for laser scribes cutting all the .040 styrene.
.jpg")


Once all these 'skins' were applied, the brutal effort of filler for all the seams, edges and all that had to happen, sand, filler, sand.... on and on, uggh.


Then the process of adding kit parts begins. There is one area that uses the Ywing back of the head casting, twice. So I built up a master of that using all original kit parts, then molding and casting it (it gets trimmed and I didn't want to destroy that master, so I trimmed the castings).


Next Post will be more progress.
So here we go!
Here's a quick shot of the final "Kit Kat" then I'll give some construction background after that.
So it started with an amazing MDF board base, skillfully designed and cut by Dan and our friend Dirk! Next up, after Dan 3D modeled a single tile sub structure 'head' and 'body' after we carefully measured kit parts, then slightly reducing the overall size to accommodate .040 styrene skins. My friend Jim generously printed the inserts in between the tiles on his resin printer, making that part of the project so much easier for finish work.
The final heads and bodies were printed 4x on a CR10s , in PLA. Then a few original kit parts were mocked up to ensure all the measurements, and the structures fit to the base.
After that, it was time to draw up in CAD all the panel lines for the .040 styrene size shapes. This took an extensive amount of time cross checking the exact positioning of each and every line to reference photos of the original 2x2 Kit Kat tile. Then print the design on paper, and tape them to the tile to ensure everything lined up. After that, off to the laser cutter and for laser scribes cutting all the .040 styrene.
Once all these 'skins' were applied, the brutal effort of filler for all the seams, edges and all that had to happen, sand, filler, sand.... on and on, uggh.
Then the process of adding kit parts begins. There is one area that uses the Ywing back of the head casting, twice. So I built up a master of that using all original kit parts, then molding and casting it (it gets trimmed and I didn't want to destroy that master, so I trimmed the castings).
Next Post will be more progress.
t2sides
Master Member
Here's the process of adding all the kit parts, mostly all accurate, original model kits placed exactly where they are on the ILM tile.
Big Shout out to Dan Loes, he was instrumental in kit ID'ng and helping provide many of the critical kits needed for this project, THANK YOU Dan !


Lastly, the priming process began, and it was awesome to see it all come together! There are still a couple of parts that I'm waiting on that will go down or be replaced, but, it's 99% done. Then we'll begin the process of molding all these tiles! That'll be fun! NOT!


And the Final Beauty Shots!


And for a sense of scale/size, here's the Kit Kat at bottom with an original round tower casting, and on the wall are the castings from the 1st 3 tiles we created (these were all still 'test casts'. (The Y wing is a 2x studio scale I made a while back, and is over 4' long for perspective).

And here's some of the big happy family with the 5' Falcon. Can't wait to see Dan Durda's tile updates next!!

Thanks!
-Sean
Big Shout out to Dan Loes, he was instrumental in kit ID'ng and helping provide many of the critical kits needed for this project, THANK YOU Dan !
Lastly, the priming process began, and it was awesome to see it all come together! There are still a couple of parts that I'm waiting on that will go down or be replaced, but, it's 99% done. Then we'll begin the process of molding all these tiles! That'll be fun! NOT!
And the Final Beauty Shots!
And for a sense of scale/size, here's the Kit Kat at bottom with an original round tower casting, and on the wall are the castings from the 1st 3 tiles we created (these were all still 'test casts'. (The Y wing is a 2x studio scale I made a while back, and is over 4' long for perspective).
And here's some of the big happy family with the 5' Falcon. Can't wait to see Dan Durda's tile updates next!!
Thanks!
-Sean
So, yeah, as I hinted at a couple posts above back in June, there was definitely more in the works from us!
In addition to the so called 'Kit Kat' tile that Sean so masterfully crafted I've been busy completing the 'Fins' and 'Chimney' (I think some folks refer to this as the Citadel) tiles. Before I say any more about those let me tell you - getting these done while juggling as stay-at-home daddy the demands of our months-old (now 8 months) son Lucas has been... challenging!
All three of these tiles started life as MDF layers, bonded together in the right combos to get the right thicknesses for each tile. Then I did a bunch of 3D modeling in modo to produce the basic 3D-printed structures that would lay on top. In each case we had either 3D laser scans from original tiles (thanks to Jason Eaton for access to those) or photogrammetry that I completed from a casting of an original tile (thanks to Steve Neisen for loaning that one). With access to the original or once- or twice-removed assets and the dimensions measured from those, I think we can be pretty well-assured that these replicas are dimensionally accurate to within 1-2mm over almost their entire structure. There may be a few places where we might be 3-4mm off but based on the fits with the various greeblies I know those few places are few and far between. Most surfaces were then clad in 0.020" or 0.040" styrene - either for the sake of creating a nice smooth surface or, in many cases, for coverage in those areas that had laser-etched scribe lines.
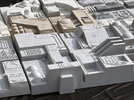
Here are a bunch of build-up pics of the 'Fins' and 'Chimney' tiles, along with pics of the finished products.


(This one is a stereo pair)


Messy workshop, but a busy workshop - it's a tile factory!


It's been a long road getting here, and keen eyes will spot in the background of my workshop pic a 'redo' in progress of one of the tiles we previously completed (doing that to cover some accuracy issues in the previous version). But we're pretty much done now and I can't tell you how satisfying it is to look at these all together in one place. It's been a pure joy working through all the process and details with Sean - what a fun collaboration!
We're getting the band back together!")


Dan
In addition to the so called 'Kit Kat' tile that Sean so masterfully crafted I've been busy completing the 'Fins' and 'Chimney' (I think some folks refer to this as the Citadel) tiles. Before I say any more about those let me tell you - getting these done while juggling as stay-at-home daddy the demands of our months-old (now 8 months) son Lucas has been... challenging!
All three of these tiles started life as MDF layers, bonded together in the right combos to get the right thicknesses for each tile. Then I did a bunch of 3D modeling in modo to produce the basic 3D-printed structures that would lay on top. In each case we had either 3D laser scans from original tiles (thanks to Jason Eaton for access to those) or photogrammetry that I completed from a casting of an original tile (thanks to Steve Neisen for loaning that one). With access to the original or once- or twice-removed assets and the dimensions measured from those, I think we can be pretty well-assured that these replicas are dimensionally accurate to within 1-2mm over almost their entire structure. There may be a few places where we might be 3-4mm off but based on the fits with the various greeblies I know those few places are few and far between. Most surfaces were then clad in 0.020" or 0.040" styrene - either for the sake of creating a nice smooth surface or, in many cases, for coverage in those areas that had laser-etched scribe lines.
Here are a bunch of build-up pics of the 'Fins' and 'Chimney' tiles, along with pics of the finished products.
(This one is a stereo pair)
Messy workshop, but a busy workshop - it's a tile factory!
It's been a long road getting here, and keen eyes will spot in the background of my workshop pic a 'redo' in progress of one of the tiles we previously completed (doing that to cover some accuracy issues in the previous version). But we're pretty much done now and I can't tell you how satisfying it is to look at these all together in one place. It's been a pure joy working through all the process and details with Sean - what a fun collaboration!
We're getting the band back together!
Dan
Attachments
Last edited:
What a fascinating process. Thanks for sharing the way you made these!
Combat Baby
New Member
First, I really have to laugh at the irony of hitting reload everyday since June as I've closely followed this project and not realizing it had moved into a second page. I'm a month late, but it doesn't stop me from being completely blown away.
I knew your team and contributors would come through on this and it's nothing short of amazing.
I know this forum is huge and there are a lot of different types of work and interests, but personally I consider this one of the best projects I've seen here (or anywhere)
I have nowhere near the skill much less resources to accomplish something like this, but I've chased kit parts to do similar for a long time including getting some very rare kits at flea markets this year (sealab, Hummel, nichimo, 1/12 f1) so I realize how satisfying it is to get those real pieces and relive what ILM employees got to do all those years ago.
The perfect blend of old school model making techniques and new technology really made this project perfect. Accurate scribe lines and dimensions near 2mm or better is something to celebrate and I hope everyone who ever sees this acknowledges how amazing doing something like this really is.
Having the kit kat on the second wave not only makes sense, but everything you learned and experienced before probably helped it be that much better.
Thank you so much for sharing this project and the images and detail as well as those who personally answered my emails or PMs as I navigate my own more abstract tile project.
I eagerly await what's next as you perfect the last details and get your molds done.
Again, this is simply jaw dropping. Fantastic work to everyone involved. You rebuilt the Death Star.
Gosh, thanks so much! It's appreciation like this that let's us know we're on the right track...
The base structure for the master for the last tile - a re-do of Tile Module 5, the square tower - based on photogrammetry of an original, is just about done. I'll hand it to Sean for priming and greeblies.


Dan
The base structure for the master for the last tile - a re-do of Tile Module 5, the square tower - based on photogrammetry of an original, is just about done. I'll hand it to Sean for priming and greeblies.
Dan
Last edited:
Combat Baby
New Member
I have to hand it to you guys again, absolutely amazing to see the level of perfectionism here to redo Module 5.
Will that require you to use an all new set of original greeblies or are you able to salvage what you had? I know most of these require multiples of some hard to come by parts and I'm not sure if you were insistent on using all original parts or were using castings for copies.
Will that require you to use an all new set of original greeblies or are you able to salvage what you had? I know most of these require multiples of some hard to come by parts and I'm not sure if you were insistent on using all original parts or were using castings for copies.
Will that require you to use an all new set of original greeblies or are you able to salvage what you had? I know most of these require multiples of some hard to come by parts and I'm not sure if you were insistent on using all original parts or were using castings for copies.
Yeah, Sean is going to attempt to remove what can be salvaged from the first version. Failing that, time to go back to some of the kits for new bits...
Dan
Oh, heh - you obviously didn’t need our models. Your work is beautiful! I went to your website to see some of the other work hinted at in these photos. As one of my grad school professors once commented in response to one of my fellow student’s exam answers… “I hang my head in shame’.
Dan
Dan
t2sides
Master Member
Hello All!!
Exciting update!! We completed our first test castings of the awesome “KiKat” tile.
I’ll place progress over the next couple posts.
To start, we made the mold box and then applied numerous coats of Dragon Skin rubber.


So then it looks like this after all layers down.


Exciting update!! We completed our first test castings of the awesome “KiKat” tile.
I’ll place progress over the next couple posts.
To start, we made the mold box and then applied numerous coats of Dragon Skin rubber.
So then it looks like this after all layers down.
Similar threads
- Replies
- 4
- Views
- 411
- Replies
- 6
- Views
- 2,628