You are using an out of date browser. It may not display this or other websites correctly.
You should upgrade or use an alternative browser.
You should upgrade or use an alternative browser.
DEATH STAR DROID - HEAD - FIRST CASTING POST #1
- Thread starter zorg
- Start date
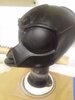
Working on the top triangle bit today, i used clear sticky artist film to trace the position on the 9 holes, used a bradle to transfer it to the sculpt.

i also did the slatted piece below the star out of plastic card, i have included the asymmetrical characteristics on either side, the left is square and the right is slashed off at an angle and is lower down where it touches the eyebrow, the filling in the sandwich has a semi circle depression, the whole piece is curved top to bottom as well as side to side. i knocked down all the sharp corners and edges.....i know the metal disk sticks out too much , i had it Machined that way with extra material for molding. can see the light at the end of the tunnel...........

i also did the slatted piece below the star out of plastic card, i have included the asymmetrical characteristics on either side, the left is square and the right is slashed off at an angle and is lower down where it touches the eyebrow, the filling in the sandwich has a semi circle depression, the whole piece is curved top to bottom as well as side to side. i knocked down all the sharp corners and edges.....i know the metal disk sticks out too much , i had it Machined that way with extra material for molding. can see the light at the end of the tunnel...........
Last edited:
Too Much Garlic
Master Member
Love the attention to detail.
JGwinner
New Member
right now it will be display, i don't really have the facilities right now for vac forming due to home reasons.
there doesn't look like much scope for breathing in the helmet, if you look at the droid in the last sandcrawler interior scene the rear of the helmet is missing. i think this was done so the actor could breathe.
i would think the first time we see the droid in the sandcrawler it is operated like a puppet, like 3po was on several occasions.
View attachment 1308825
You know, the bottom half looks to me like it's a rough of Darth Vadar's mask. I can see the conversation now. George:"It looks too friendly, and sort of dorky! Redo it!"
Then the prop guys are talking. "Geez, I did all this work on this dang thing, now what?" "Oh, we've got a scene where we need a ton of droids!" "I'll get the gold spraypaint!"
== John ==
i gave the sanding a break and did some work on the neck rings. my usual plastic card and some pipe,

the tour droid is sadly missing the inner neck ring but its there in the sandcrawler shots and 1 archive shot i found (must have been taken long ago)

the inner ring is higher up and the rear half is misaligned higher still. i have replicated this for accuracy and a bit of visual interest to make it look like they are multiple parts.
i have 4 knurled thumb screws installed on the front and the small plate which i traced from the screen like the forehead holes.


i don't think i will get away with casting the 4 side bolts in situ without introducing bubbles so i'm going to leave them off and cast those separate. i don't have a pressure casting system setup at the moment.
the side bolts seem to swap position and type depending on when and where it is on display. the alignment of the bolts are not consistent from the reference i have.
i am awaiting the side bolts from a chinese gentleman, a Mr E. Bay
the tour droid is sadly missing the inner neck ring but its there in the sandcrawler shots and 1 archive shot i found (must have been taken long ago)
the inner ring is higher up and the rear half is misaligned higher still. i have replicated this for accuracy and a bit of visual interest to make it look like they are multiple parts.
i have 4 knurled thumb screws installed on the front and the small plate which i traced from the screen like the forehead holes.
i don't think i will get away with casting the 4 side bolts in situ without introducing bubbles so i'm going to leave them off and cast those separate. i don't have a pressure casting system setup at the moment.
the side bolts seem to swap position and type depending on when and where it is on display. the alignment of the bolts are not consistent from the reference i have.
i am awaiting the side bolts from a chinese gentleman, a Mr E. Bay
Last edited:
got the mold for the neck rings done today and first cast.....drumroll please

annnnnnd
success


pretty happy with how it came out, was worried about bubbles at the thumbscrews but all good.
i'm going to modify the mold/casts slightly, there will be a 90 mm hole in the base instead of being flat all the way across.
4 reasons...
1. considerably less material to sand down
2. less resin used
3. easier to get out of the mold
4. if you bond the neck rings to the neck tube you will still have access to the head interior to store ganja
no idea when the side neck bolts will arrive
z
annnnnnd
success
pretty happy with how it came out, was worried about bubbles at the thumbscrews but all good.
i'm going to modify the mold/casts slightly, there will be a 90 mm hole in the base instead of being flat all the way across.
4 reasons...
1. considerably less material to sand down
2. less resin used
3. easier to get out of the mold
4. if you bond the neck rings to the neck tube you will still have access to the head interior to store ganja
no idea when the side neck bolts will arrive
z
Last edited:
Awesome job! Chris will you be offering this beautiful sculpt vacuum metalized?
i don't have the facilities, due to where i am staying at the moment. the virus situation has put my house buying on hold.Awesome job! Chris will you be offering this beautiful sculpt vacuum metalized?
Any progress on this beauty Chris?
just been going back over details that i had already finished, i need to stop looking at the reference!
got the side neck ring bolts in from china after a long delay "lost"
was working on the top of the snout this week, just about ready to start on the eye lense, i want it to look like a seperate piece.
i could rush this out but i want to take my time, it's really paying off stepping back, i'm seeing things to change or re do.
this is not an easy head to replicate but i'm getting there.
Last edited:
russellsch
Master Member
Well that's all I see now 
Seriously though, if you're getting down to that level of detail (& you know you are), then this is going to be the most epic kit ever.
Seriously though, if you're getting down to that level of detail (& you know you are
), then this is going to be the most epic kit ever.This is at the top of my must haves Chris, thanks for your hard work!

Yeah there are 5 of them dotted around the head, I got the measurements from one and had a workmate machine one up. I use this to make most of the measurements. It's working out quite well. I garentee this will be the smallest 1:1 replica. Its a very slender head. Not much bigger than a 3po front on.Usual great work, Chris.
I spot bevelled Transcriptor discs on the side of the neck like the Bowcaster above the trigger. From the original Sweep Arm.
Sorry, bottom side edge of the head, not neck. I see you refer to it as the head disc.
Side on... Well that's a different story lol
I
Think the knurling might be too heavy and the centre hole doesn't look to be the right size, the ones I got in from China are reasonably close. I got different size spur gears for the other ones. As I said earlier in the thread they change type and position depending on its time and location.The one knurled knob on the side looks like an upside-down transcriptor nut (fine knurl). Here is my deep knurl as reference.
View attachment 1337144
Similar threads
- Replies
- 12
- Views
- 744
- Replies
- 24
- Views
- 3,613