You are using an out of date browser. It may not display this or other websites correctly.
You should upgrade or use an alternative browser.
You should upgrade or use an alternative browser.
Death Star 2 Port Attack Diorama
- Thread starter OTnROTSfan
- Start date
Thanks!
Getting there with the surface layout... next back to the corner with the partial tower and three surrounding red structures. Woo, finally get to build the tower.
Getting there with the surface layout... next back to the corner with the partial tower and three surrounding red structures. Woo, finally get to build the tower.
Another cold rainy weekend, so lots of progress (for once)...
Got the core structures for the tower area laid out as well as the frame and shell for the partial tower. This phase is so much fun!
Lots of clean-up and sanding of all the surface parts, then onto superdetailing and painting of all the surface elements...
Got the core structures for the tower area laid out as well as the frame and shell for the partial tower. This phase is so much fun!
Lots of clean-up and sanding of all the surface parts, then onto superdetailing and painting of all the surface elements...
Finally found a local place to make acrylic cases and cut large styrene/ABS... spec'd out the large ABS surface piece with the "official" hole that will be clad to the MDF. In the meantime, getting cold out, so time to paint the port (since I had to remove it anyways). Forgot I had only tacked the inside structures in the corners... was hanging that way all summer, but didn't fall into the hole! I remembered when I tried to pick it up and they started falling inside the port... lol. All is good... built a quick temporary cardboard carrier so I can get at most angles of it. First time all the port sections were fully attached and painted. A few sand and putty spots, but actually not too bad overall for first crack at it... will work on that until the surface cladding is done.


Thestig604
New Member
The scale of this build is nuts. I don't think I could even get off the ground with this idea. Can't wait to see more progress, had to click though all the pages again to see it all.
Keep up the awesome work!
Keep up the awesome work!
Master Tej
Active Member
Wow, I just read through this entire thing, and I am thoroughly amazed! Fantastic work on this! It's awesome!
- Master Tej -
- Master Tej -
Wouldchop
Active Member
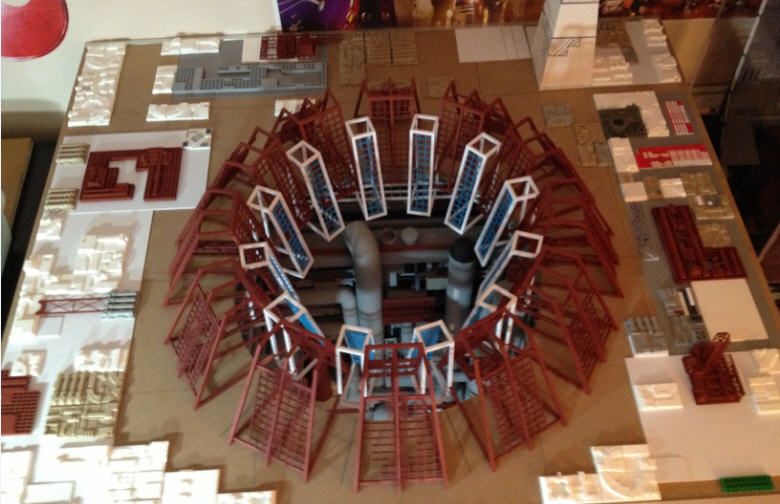
I just fell through it! There's something about this picture of delicate construction and mint work.
sithfire30
Active Member
This is so exciting! Eisley is right - a very unique project and brilliantly done! Looking forward to more updates!
Thanks all... got to admit, have looked down the port hole more than a couple of times... just a really cool view.
My large rough-cut piece of ABS was ready Fri, so I got some work done on the new surface base... new piece of MDF and got the embedded grid piece roughed in.


My large rough-cut piece of ABS was ready Fri, so I got some work done on the new surface base... new piece of MDF and got the embedded grid piece roughed in.
Fashioned some thick aluminum edging out of some angle and flats... creates a nice lip to hold the surface piece as well as to add an acrylic cover at the end (having had to dust this thing a few too many times already)... next to cut the hole, add the mounting pins for the lower base, and some underside handles... then the final surface work can begin.

shadowlova
Well-Known Member
Awesome feat of patience.............can I have some? 
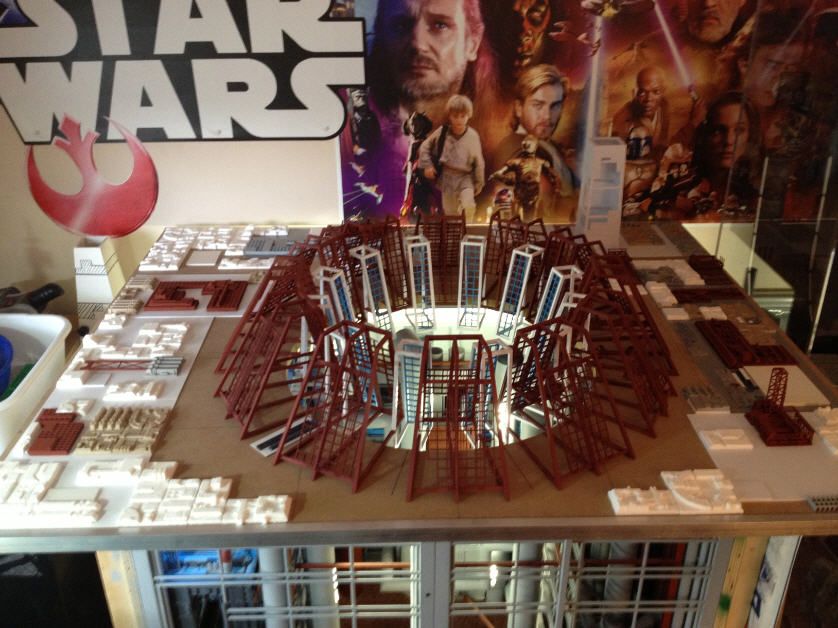
Looks fantastic. Seeing you are really crowded there by the look of the pics, I happily offer my place for you to ummm.........display it. :lol
Looks fantastic. Seeing you are really crowded there by the look of the pics, I happily offer my place for you to ummm.........display it. :lol
Haha. You are right though, I had to rearrange my whole little room to make it so I can turn it different ways to work on it...
Past the scary part... I used the edge of the ABS circle to cut the new circle out of the MDF. I thought about using a router, but haven't used one in years... didn't want to chance it. Forgot how much fine sawdust MDF makes. Got it cut out and drum-sanded smooth and even with the ABS edge. Did a test fit over the lower port. Also taped in a piece of edging that I'm thinking of putting around the inside edge for a nice uniform edge. Epoxying the ABS to the MDF, final sanding, then a test fit for the red port.

Past the scary part... I used the edge of the ABS circle to cut the new circle out of the MDF. I thought about using a router, but haven't used one in years... didn't want to chance it. Forgot how much fine sawdust MDF makes. Got it cut out and drum-sanded smooth and even with the ABS edge. Did a test fit over the lower port. Also taped in a piece of edging that I'm thinking of putting around the inside edge for a nice uniform edge. Epoxying the ABS to the MDF, final sanding, then a test fit for the red port.
Very, very slick. What a great build.
Thanks. Mounted the top... hinges along the back that I can pull the pins on to remove it. Going to want to move this around the house and maybe some shows, so decided not to epoxy, but instead try lots of permanent double-stick tabs to mount the ABS. Had done some previous tests and works well. Should also absorb minor vibrations for all those surface parts. Also got the inner hole cowling installed. A little bit of sanding and primer... then onto the port test.

Had an abnormal week of single-digit temps and snow... even too cold in the garage to lay down the surface... got back to 40 degrees today so got 'er done. Glad I did the inner hole ring, too...

Gone for the holidays then two week sinus infection so been away from the glue and resin for a bit. Decided to finally make some space in the display room. Made a little workshop and year-round paint station out of the old basement laundry room. Good timing since the garage was below zero for like two weeks. Finally have some room to finish this.

jediscout72
Well-Known Member
How did this turn out? is there another thread showing the final ?
It sat under plastic for about seven years while life happened... . I dug it out last Fall, and have the core all set back up, along with having unpacked all of the many custom surface parts. Shooting for next Winter or Spring to paint up all of those parts and figure out how to dust off all of the mounted structural parts. Once cool thing is that the structural port itself has been hanging successfully over the main tunnel for that long now with no sagging. Need to go through and re-pin a few of the inner port sections, but it survived fairly intact, even with stuff sitting on top of it over the years. May do some of that structural repair work later this summer. At least it is now out from sitting in a corner...
. I dug it out last Fall, and have the core all set back up, along with having unpacked all of the many custom surface parts. Shooting for next Winter or Spring to paint up all of those parts and figure out how to dust off all of the mounted structural parts. Once cool thing is that the structural port itself has been hanging successfully over the main tunnel for that long now with no sagging. Need to go through and re-pin a few of the inner port sections, but it survived fairly intact, even with stuff sitting on top of it over the years. May do some of that structural repair work later this summer. At least it is now out from sitting in a corner...Similar threads
- Replies
- 8
- Views
- 1,430
- Replies
- 5
- Views
- 1,421
- Replies
- 34
- Views
- 5,354
- Replies
- 12
- Views
- 1,911