You are using an out of date browser. It may not display this or other websites correctly.
You should upgrade or use an alternative browser.
You should upgrade or use an alternative browser.
Death Star 2 Port Attack Diorama
- Thread starter OTnROTSfan
- Start date
Rick Deckard
Sr Member
Amazing!!:eek
Adolfo
Adolfo
Thanks guys. This one's getting built mightly slow... but phase 2 of 3 is complete (finally). Even though the top/surface is going to be a wicked build, it feels good to be on the last stretch and actually working the coolest part (and on some ships, too).
Yeah, I know... it's been two months. :cry I got put on the lead of a massive work project when I got back from Labor Day. That, and we had to clean up from three recent days of 60+ mph winds. Also always take a break between phases to work on other stuff (note the side project freshly basecoated in the background).
But, Phase 3 has begun... finally! :thumbsup
I decided to do the entire port, after all... will make pictures easier and more robust. Now you see why the top surface will be removable... 40" by 48".

More soon... I promise... :angel
But, Phase 3 has begun... finally! :thumbsup
I decided to do the entire port, after all... will make pictures easier and more robust. Now you see why the top surface will be removable... 40" by 48".
More soon... I promise... :angel
Amish Trooper
Master Member
I love this thing
Thx.
Got the full hole cut and replaced the cement blocks it was sitting on with some temporary big wheels. Kinda looks like one of those street food carts in the short term. At least I can move it around now, and get underneath better to work on it.
I had been using a piece of table glass as a template for the hole, with packing tape around the outside so it wouldn't shatter... worked pretty darn nice, if I do say so, although it did crack once it fell through after cutting. It was cool being able to see through it and that it was still all lined up while cutting. Now to decide which part to work on first... so many options here...
Hehe. Thanks. I'm dying for updates, too... a major work project has kept me away from progress the past few months... but...
Got the top mounting holes permanently fixed into the inner surface panel and the white gridwork that appears under the surface is completed. Also finally lit the inner "laboratory" bay. Still deciding between green or blue filter under the light... comparison shot included. Have seen both lighting wash schemes used. I can switch them, so no biggie.
Started laying out the surface. Looks like they used standard ceiling light diffuser egg crate grid (or similar 1/2") on the original. Since mine is in smaller scale, I've been looking for smaller gridwork. Interesting that a 1/2" egg carton grid panel I had bought when I started is now "smaller" than the 1/2" grid panels you can buy now. Gotta love "standards". Both are too big of a grid anyways.

Have been playing around with 3/8" paint bucket strainer grids I found. They seem like they will work... might have to double them up for more prounounced thickness. At least they have the squared crossbars (not rounded). Will mock up a prototype structure in the next couple of weeks... off we go on the fun part... finally! :cool
Got the top mounting holes permanently fixed into the inner surface panel and the white gridwork that appears under the surface is completed. Also finally lit the inner "laboratory" bay. Still deciding between green or blue filter under the light... comparison shot included. Have seen both lighting wash schemes used. I can switch them, so no biggie.
Started laying out the surface. Looks like they used standard ceiling light diffuser egg crate grid (or similar 1/2") on the original. Since mine is in smaller scale, I've been looking for smaller gridwork. Interesting that a 1/2" egg carton grid panel I had bought when I started is now "smaller" than the 1/2" grid panels you can buy now. Gotta love "standards". Both are too big of a grid anyways.
Have been playing around with 3/8" paint bucket strainer grids I found. They seem like they will work... might have to double them up for more prounounced thickness. At least they have the squared crossbars (not rounded). Will mock up a prototype structure in the next couple of weeks... off we go on the fun part... finally! :cool
Thanks, me too... :lol
Here goes nothing! And the fun part begins... At least this is the part I have been waiting for all along (and dreading)... LOL
Started the full-size prototypes for the red port structure. I tacked this together the past two nights for more sizing tests and checking some math.
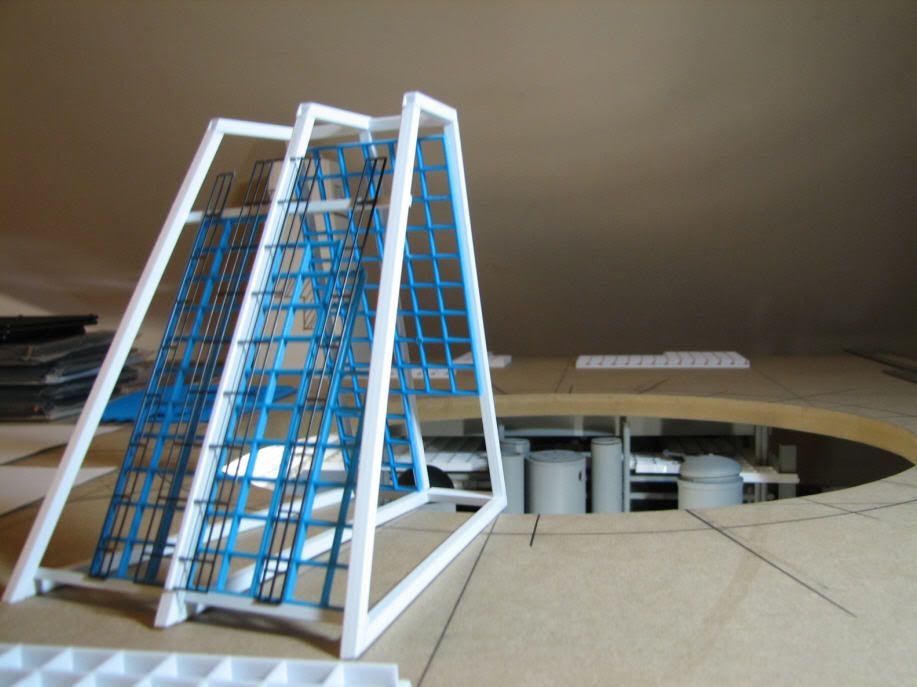
The hole is undersized on purpose (so I can fit it just right at the end, in case of any gaps).
I hope to clean up the proto and get a couple of side inner boxes made and primed this weekend for final sizing tests and tweaks, color tests, etc...
Here goes nothing! And the fun part begins... At least this is the part I have been waiting for all along (and dreading)... LOL
Started the full-size prototypes for the red port structure. I tacked this together the past two nights for more sizing tests and checking some math.
The hole is undersized on purpose (so I can fit it just right at the end, in case of any gaps).
I hope to clean up the proto and get a couple of side inner boxes made and primed this weekend for final sizing tests and tweaks, color tests, etc...
Crazy work schedule again and a broken tooth to deal with... but got through the prototyping and sizing phase... tried a bunch of different square tube materials and think I have it worked out. Also ripped apart the back of the original prototype and replaced crossbeams with thicker stock.
Out of state all next week on business, but getting my styrene stock order in tomorrow so it will be waiting when I get back. Then onward...
Out of state all next week on business, but getting my styrene stock order in tomorrow so it will be waiting when I get back. Then onward...
My order came in while I was gone last week... and I stopped and raided the paint department of plastic bucket grids one more time. Funny looks ensued. :confused
")
Similar threads
- Replies
- 8
- Views
- 1,430
- Replies
- 5
- Views
- 1,420
- Replies
- 34
- Views
- 5,347
- Replies
- 12
- Views
- 1,910