Darth Vader ROTJ Build - Studio 49

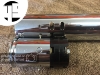
Just out of curiosity ... is that Parks' shroud made of metal or somesort of resin/plastic?

Chaim

So I just had a look at the shroud and it is 100% metal. What I did was unscrew the thumb screw on the rear and I could see the thread was an un-anodized metal
 
So today I began removing the grips and cleaning up the hilt. The rubber grips peeled off with zero hassle but did leave behind a significant amount of glue.
Most of the glue came of with some gentle encouragement from the wet wipes alone and then for the more stubborn parts I moved onto my other cleaners alternating as I saw fit.
So the pictures below are of where the hilt is up to now:


4A_zpsu2spzvin.jpg
 
Last edited:
Some more progress on the saber today.
I completely stripped it back to individual parts so I could get into removing the "MICROFLASH" Logo.
So I figure I may as well explain each step I went through today in preparation for the upgrades

5A_zpscqdovq23.jpg


5B_zpsa7bfbevm.jpg


5C_zpsxumrdvrq.jpg


5D_zps5v7dt978.jpg
 

Attachments

  • 5A_zpscqdovq23.jpg
    5A_zpscqdovq23.jpg
    640.4 KB · Views: 292
  • 5B_zpsa7bfbevm.jpg
    5B_zpsa7bfbevm.jpg
    540.2 KB · Views: 265
  • 5C_zpsxumrdvrq.jpg
    5C_zpsxumrdvrq.jpg
    737.3 KB · Views: 271
  • 5D_zps5v7dt978.jpg
    5D_zps5v7dt978.jpg
    486 KB · Views: 318
  • 5E_zps2vip8o2o.jpg
    5E_zps2vip8o2o.jpg
    320.5 KB · Views: 262
  • 5E_zps2vip8o2o.jpg
    5E_zps2vip8o2o.jpg
    320.5 KB · Views: 299
Last edited:
Just so you know ... now that you've confirmed Parks shroud to be metal ... for ROTJ there's no need to get another MPP replica shroud ... Parks is as close to what the MPP shroud looked in ROTJ in regards to the thicker edge :


Roy does have a set of all the colored wires for ESB/ROTJ :)

Chaim
 
Great update. I really like the quality work on the rivets/badge. I probably wouldn't have chanced it. Well done.
 
You have to cut those wires to the size you need about an inch (?) ... and the red can be even shorter and then squeeze the ends with a plier before adding in both 'E' sockets ... just do some proper measurements with a piece of left-over electrical wire in the house before cutting up Roy's colored ones. As you mentioned it is possible that the bulb release replica is not perfect to swap with your Parks ... the size was based on my MPP so the distance of screw holes may vary slightly :)


Chaim
 
Great update. I really like the quality work on the rivets/badge. I probably wouldn't have chanced it. Well done.

Thanks mate, I really appreciate it! I'm certainly glad I was determined to go through with it since I figured theres got to be a better way to do this and it turns out there is :thumbsup
 
You have to cut those wires to the size you need about an inch (?) ... and the red can be even shorter and then squeeze the ends with a plier before adding in both 'E' sockets ... just do some proper measurements with a piece of left-over electrical wire in the house before cutting up Roy's colored ones. As you mentioned it is possible that the bulb release replica is not perfect to swap with your Parks ... the size was based on my MPP so the distance of screw holes may vary slightly :)

http://i833.photobucket.com/albums/zz258/Sym-Cha/ESB_Darth_Vader_Hero_Lightsaber_4_zpsqxnzvymu.jpg

Chaim


Yeah I was probably going to shorten them and I do like the plier Idea, I'm certainly going give that a go!
As for the Bulb release, I bought all the parts know there may be some slight differences but thats fine everything went on without a hitch! Hopefully I'll be able to use all my spare hilt parts to upgrade a future MR Hilt when I want one with electronics.
 
So I have one question, how long should the grips be for ROTJ Vader?
So the Parks ones were too short so I got the Wanna Wanga grips, but I feel that at 5 inches they're way too long because then the clamp is way too high (Ruler for comparison)
I was under the impression that the grips were 4.8-ish inches, is that correct?
(Also I take it the grips start after the first ring on the pommel so to speak at the ridges)
 
Last edited:
Here you get an idea how deep the red wire goes :


And here how long the T-tracks are and where they start :


And here how to line up the first grip with the clamp :


Chaim
 
The saber is coming along great. Did you wind up shaving the wires down a bit? On mine, the red one is too thick. I was thinking of both shaving & glueing it. That duct tape idea for the shroud is brilliant. I have the same nightmare of it coming apart, & I didn't want to glue it.
 
Back
Top