CombaTech Equinox laser rifle from Starfield

Randers

New Member
Thought I would make my first real post here near the beginning of my project.

I'm attempting to bring the CombaTech Equinox laser rifle to life from the game Starfield. There are so many original and unique weapons, space suits, gadgets, spacecraft from this game. If you aren't familiar and are a sci-fi fan like myself, I would highly recommend taking a look. Since the beginning I have always liked the looks of the Equinox and its unique style always called to me in a way the others didn't. Over the holiday season I was fortunate enough to get a 3d printer so this will be my first all 3d printed prop (I have done some sword making previously but those were made from wood).
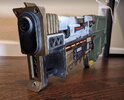
Here is a picture of the Equinox:
Base_Equinox.jpg

In the game there are several flavors including a stripped down version that is much more complex:
Fancy_Equinox.jpg

Of course I decided that for my first ground up 3d design I should take it easy and do the base version - which I immediately disregarded and figured that I should just jump into the deep end and try for the fancy one. I wasn't a complete lunatic so I will not be recreating the scope.... maybe.

I did search a couple places online to see if there was an existing model so I wouldn't have to start from scratch, but then I got lazy and figured the only sensible course of action was to teach myself 3d modeling and create the entire rifle from scratch. Here are some particulars about this project:

  • What is Starfield - Starfield | Official Website
  • What is an Equinox - Equinox | Starfield Wiki | Fandom
  • How did I start? Youtube of course! I found a video outlining how to design and print your first 3d printed part (
    ). It seemed easy enough so I decided to give it a shot.
  • What 3d modeling program did I use: The one from the video - Fusion 360 (now just called Fusion by Autodesk), it's free for personal use and decently easy to use. The best thing is there are a TON of how-to videos out there. https://www.autodesk.com/products/f...s professional,based, non-commercial projects.
  • How did I decide on dimensions? - I decided to copy a similarly sized rifle that I just happen to have an airsoft version of - the G36C - this one is roughly 29 inches long x 10 inches tall which seemed to jive with the measurements of the handguard on the equinox (no idea if there are actual dimensions on the Equinox... maybe the developers know).
  • What to print first - The handguard on the Equinox looks like a detachable battery so I decided to start there. If I could figure that out I could maybe do parts here and there until I had a full prop or failed miserably and threw my printer out the window.
  • Upgrades? How about making the battery a working power bank or making the trigger functional or making parts detachable... what about that scope huh? No.... I want to keep this as easy on myself as possible so I won't be doing any of that.
  • Upgrades part 2 - That power bank idea does sound pretty sweet. Hey, what about being able to break down the rifle like a real one like they do in the movies? OK so maybe some upgrades. What is that saying: In for a penny?
So as of right now I've been working with Fusion for a month and have started to get some of the in's and out's of the program. I further realized that if you want to get into 3d printing you will need some stuff.... some of which I had, most I didn't:

  • Digital Caliper used for measuring stuff, especially good for millimeters because freedom units apparently aren't the language of engineering or modeling.
  • Lots of filament because I don't know how to do 3d printing.
  • Any old table so my family doesn't kill me for taking over the dining room.
  • A desk mounted swing arm light because light is your best friend when figuring out if something printed correctly.
  • Flush cut nippers - man did you know that you had to cut a LOT of things off your 3d prints?
  • A good (or crappy) razor knife with new blades. No, really... you need more blades.
  • Super glue and accelerator spray - you will need to join things together and the best thing I've found that doesn't involve staples or another 3d printer gadget that costs more is super glue. Accelerator spray for those times you need it glued yesterday.
  • Bondo Glazing Putty - Joining 3d prints together because you can't print the whole part in one go causes seams. Seams need filler.
  • A good deburring tool. I think I may have mentioned that you need to cut things off your print... well it turns out you need this thing too.

After collecting all of the above mentioned things, I started designing and printing.... and look what I did:
Screenshot 2024-02-08 143509.png


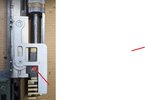
Yep, I'm on my way. No seriously, I think I mostly finished the battery design and now I'm printing!
Screenshot 2024-02-08 143833.png

You may notice that there is a slot on the front... and a matching one you can't see on the rear. Those will allow me to guide the battery when you slot it into the rifle. Also that kind of ribbed thing on the upper side of the battery looks like a locking mechanism of some sort so.... you guessed it... I'm going to make it functional and you should be able to lock that thing into place once you install it.

Overall the design process was a little difficult for a newbie like myself, but based on what I did here, I think I can do a good approximation of the rest.

Stay tuned and wish me luck.
 
Quick update!

I have completed the printing of the battery and done a heck of a lot of 3d modeling in Fusion to create the structure of the rifle body based on the dimensions of the battery. I printed the battery in four pieces. I could have printed it in 2 parts to minimize the number of seams but since I'm so new to printing, it seemed to be the best way to minimize waste.... which I'm glad I did because the battery ended up being about 20% too large overall. After three different tests (of 1/4 of the battery only) I was able to settle on a finished size which seems perfect!

Battery_Assembly.jpg

Notice the slide lock I have installed as well as the light holes which I inset so I can create a faceplate which will sandwich a colored bit of plastic so I can create the backlight. Here is what I'm going for:

Battery_Screenshot.jpg

Obviously I'm going to have to do some modifications here and there for ease of printing/finishing, but I'll try to get the finished rifle as close to the picture as possible (given my skill level).

Note: I'm going to use a common method of coating 3d prints with UV resin to get a smooth finish. I've ordered a bottle of UV resin and UV light for the process. I'll post more on that later.

I'll also post more about the design of the body which will hold the battery - I'll have to do a good bit of testing to make sure I get a perfect fit. For now, here is my Fusion model of that structure and how the battery fits:

MidStructure_Assy.jpg

It may look a little disjointed, but I have to balance which parts I can print in one shot and which ones I have to cut into sections. On top of that, you can't just glue two thin edges together and expect it to hold up to much handling. Like in the upper structure, I had to make a little lego-like join so the glue would have more to adhere to and thus make the part stronger.

Another thing I've figured out about 3d printing... everything depends on your printer (resolution/bed size) and what orientation you print it. How you slice each piece matters a huge amount. Through my many failed prints, I have discovered that a part that prints just fine in one orientation, looks like trash in another. Who knew.... besides everyone who has ever printed things before.... and everyone on Youtube apparently.

That's it for this update. Hopefully on the next one print/fit those two parts together, maybe get the UV smoothing and some painting on the battery done... oh and get some simple electronics together to light the thing.

I've got a lot to do....
 
So much work, so little time.

Update three of this saga finds our maker spinning out of control and 3d printing so many parts he starts to doubt his sanity - half he throws away, the other half he keeps but then finds out that 1/4 of that half could use some touch ups and modifications so he prints another half. Wait is that like 150%? Oh no... am I running out of filament again?

No, really... the many many late nights have allowed me to design and print a great number of parts (some of which I will actually use). For example, I have finished the printing of what I call the 'mid body' of the rifle.
Mid_body.jpg

As you can see from the different colored pieces, I printed this thing in 5 parts for some reason. The front (left most) grey part is actually 2 different pieces mashed together followed by the two mid body pieces and finally the bulbus rear part. The reason I alluded to was the battery which must fit this perfectly.... and it does... mostly.

The newest addition to the build are the 'barrels' which were such a confusing mishmash of parts I wasn't sure where to start - so I just started at the frontmost section and then moved my way back, designing each bit then trying to figure out a way to fit them together. Each piece that was a different color was designed as a separate part so I could paint it, then glue it together as one big part in the end.

Barrel_Design.jpg

Did I mention that I picked the most complicated, difficult version of this rifle? Yah, I shouldn't do that.

Here is that same section of the original model I used for reference:
Barrel_Parts.jpg

I took some liberties with the lower barrel design as it is hidden behind the wires and external plates in the original. Hopefully that will look pretty good once everything is put together.

Note: I tried to print the letters you can see on that upper plate that says "Technology Patented by CombaTech Inc.", but that really is too small for my printer to make legible, so I decided to make some sort of decal I could slap on there once it's painted. In fact, all of the markings, stickers, and other external lettering will have to be done like that with the exception of the big "COMBATECH EQUINOX" scribed into the stock of the rifle. That I think I can do.

I also received my UV curing light and UV resin and used some of my many misprinted parts as test subjects. Here again I learned a few things:

1: Just because it's a UV light doesn't mean it's the right one - you have to make sure the light is the correct wavelength to cure the particular resin you are using.
2: More UV light is better than less!
3: Trying to make a UV curing oven with one wonky light, a cardboard box and some aluminum foil isn't ideal.
4: Not all resin will cure and your part will be tacky regardless of how long you have it under a light. High purity (95+) Isopropyl Alcohol is needed to wash off the tack.

Thanks to the many Youtube videos I watched, I think I'm ready to build version 2 of my UV curing cabinet... this time I'm going to use a plastic storage container and some mylar... and a UV rope light for good measure..... sigh... let me open Amazon one more time.

That is the end of this update. I'll post more after I get some sleep :)
 
Update 3 (or 4 depending how you count these)

This update will focus on one thing.... well maybe two... how about 'several'... yep, we'll call it several things as I am having a hard time keeping everything straight now that I'm juggling the printing of parts, the UV curing cabinet? Oven? What do you call these things?, also I've started to prime and paint some parts, not because that is exactly what is needed right now, but I was dying to see how the green I picked out looked on the stock of the rifle.

So..... printing parts: I have printed every single part... sometimes two or three times, but they are all finally done in one form or another. I do need to reprint one part that was delicate and broke when I was trying to deburr it, but lets not focus on that. I mentioned that I started painting the stock, which I printed and finally glued together. Each major piece of the rifle can be snapped together as I added attachment points to get everything lined up before I glued it. Here is a part of the rear stock I glued and clamped (yea bandy clamps!).
StockV5.jpg

Here is that same part on the original model:
StockModel.jpg

You can see that I put a cutout in the top middle which houses some sort of aluminum looking battery or flux capacitor or something. I decided to print that part separately since those will be painted and weathered separately and doing that outside the main body is so much easier.

In the printed part you can also see an L shaped extension protruding from the top of the part. I designed that so I could slide off the top rear cover of the rifle once the entire thing is done. I really wanted to add some functionality into the model so it wouldn't just be static. As I mentioned in the first post, being able to partially disassemble it would be awesome (as well as adding some ability to modify or upgrade it later). Once I finish perhaps I'll post a video of the disassembly process.

Here is my highly technical diagram of how this would work:
SlideCover.jpg


My new UV curing cabinet is done and working great. I watched a dozen videos and mashed up the best parts based on the stuff I had on hand and the parts available online. Here is one of the videos that I referenced:

The last thing I wanted to talk about is the painting, but I basically just got started on my first painted part, so I think I'll save that for the next update where I'll paint and start to glue up some of the many, many, many parts.

That's all for this week - stay tuned for more :)
 
Update 4 - Painting, Painting, Painting

So besides learning 3d modeling by watching snippets of Youtube videos, painting has got to be the hardest parts of this build. The original Equinox model (like all the others) isn't lit very well.... basically it's like the model is hanging in a dark room with one harsh light pointing at it from some distance away, which makes the colors a bunch of guesswork.

Here is what I've come up with so far:

1709065707988.png

(Not shown) Rust‐Oleum 2 in 1 Automotive Primer Grey
1. Rust‐Oleum 334071 Heirloom White
2. Rust-Oleum 334058 Aluminum
3. Rust-Oleum 262662 Dark Steel
4. Rust-Oleum 7274830 Antique Brass
5. Generic Yellow Acrylic Paint (had this one)
6. Rust-Oleum 1920830 Army Green
7. Rust-Oleum 383421 Earthy Green
8. (Generic not shown) Flat Black

I had some of these paints in my collection already so I started down the road to painting some of the parts to see how they would look and.... the results were not that promising. I think the issues come from the parts looking a little too 'cartoony' and not what you would expect looking at a real rifle part... but that could just be my color choice or the fact that the part isn't hanging in a dark room with a single harsh light pointing at it. Some of my past projects have turned out great because I didn't follow the exact color guidelines and instead put my own spin on it. I may end up doing the same with this one (keeping with the major themes of the rifle like a green stock and white and gold/bronze barrel parts).

Weathering will also play a big role in making things look more realistic. Taking something from looking like a bit of plastic to a 'metallic' part.

Here is a test that I did with the front plate:

Front_plate_before.jpg
Front_plate_after.jpg
Front_plate_orig.jpg

You can still see some of the layer lines from the printing in the glossy brass color of the plate, but in normal lighting (the pictures were under bright white LED) you don't notice it at all. The UV resin process really does 95% of the work requiring just a scuffing with some 250/500 grit sandpaper before hitting it with primer.
The bolts really pop and look a bit more like the real thing and the black plate really comes across as more metallic in normal light.
The original brass/gold is more of a mirror shine from this angle, but from others it looks flat... so dealers choice. I'll do some more weathering and add some other colors to make the worn look pop out more, but a good start.

This actually reminds me that I've decided to incorporate an actual lens into my build to give it a better finish. To do this I ordered a monocular that seemed perfect. The best part about it.... it only costs $3. Yea!
Tem_monocular.jpg

I'll just take the lens out and incorporate it into the build (which is why I made that part of the plate in 2 pieces) - I can make it fit perfectly with a separate cover piece, even if it comes in bigger or smaller than I estimate.

Another unexpected find were some bulk micro switches from the same site for $2. This should allow me to make the fire/safe buttons on the side of the lower receiver right above the trigger operational (perhaps some electronics later?).
Switches.jpg


That is it for this update. I'm closing in on having the lower receiver and stock finished so I should have that painted and assembled soon. I guess the next update is where things really start coming together.. unless I change my mind on those colors.... hmmmmmm

Till then - keep building!
 
Update 5 - Final Assembly and Finishes

This update will cover all sorts of things involved with finishing this project... starting with a quick update on final assembly. Each part of the assembly process went pretty smoothly. After shooting paint on each group of similarly painted parts I assembled everything with a combination of physical joins (pieces designed to lock together) and superglue. One bright star in this process is my can of superglue accelerator. This stuff works like magic to instantly set the superglue. While this isn't as strong as a standard slow road glue setting, it does allow you to move quickly on parts that don't need 100% strong bonds.

Once they parts were glued, I used the bondo spot putty I talked about in the first post to fill in the seams.
RearCoverBare.jpg

This is the way it went with most of the rifle body - glue, fill, sand, paint.
1710533149134.png

Ignore some of the obvious seams along the recessed portion of that cover as those will be covered by a plate. Overall, the part came out decently (IMHO).

At other times it would go something like - glue, fill, sand, paint, oops, fill, sand, paint. Like in the below picture.
GuardAssembly.jpg


On the subject of paint - the majority of the rifle is painted with two different colors of green. As I said in my previous post: After searching around I decided on:

Lower receiver: Rust-Oleum 1920830 Army Green
Upper cover: Rust-Oleum 383421 Earthy Green

This was completely wrong. After I painted each of the major assemblies I put them next to each other and immediately knew the Earthy Green wasn't going to work. It was too vibrant and no self respecting space explorer would dare paint this color on their rifle for fear of the sheer volume of mockery they would have to endure. Also, the two tone green paint job just looked weird in real life, so I decided to do a light spray of the Army green over the Earthy Green parts which brought them closer together and seemed to make more sense to me (If this rifle was in service and was given a rough spray job by its user... they would have just done it with one color: OD/Army Green).
1710533690303.png

Something to note in this picture is the rail on the top of the lower receiver which will allow that upper cover to slide on (from back to front).

Once finished I'll be able to pull the cover off to get at the internals. The trigger assembly works great and is spring assisted so I can add or replace the whole thing in the future if I need to make other changes. Finally, I incorporated the microswitches into the body and now all 4 buttons are operative with plenty of room on the inside (accessed by upper cover removal) to be soldered to whatever future electronics might be added.

Here is a picture of what I'm calling the lower barrel which is finally assembled and painted:
1710534109885.png

I had to guess at what most of this would look like since the screengrabs have about 75% of it hidden behind plates and wires.
1710534191461.png

In the picture above you will also notice that wire bundle. I considered printing it, but finally decided that a real wire harness would give it way more wow factor, so I went about searching for the colors and sizes in that image.... which was way harder than it should have been. I looked online at wire suppliers, local hardware stores and came up with nothing. Well, there were options but all of them were expensive. Just when I had given up hope, I stumbled across the exact colors and lengths I needed in my basement. Scrounged off an old computer power supply - YEA FREE!

Hopefully it will turn out to be something close to the reference image.

What I'm working on right now are all the little stickers and labels that cover the rifle. On the top of the upper barrel there is a red H2O sticker along with a caution label on the black chamber. Note: Should this say D2O and not H2O? The red warning label actually says "CAUTION DEUTERIUM"... no idea.
1710534512228.png

There are various labels here and there on the body:
1710535261338.png

After some research here and on Youtube I think I can do most if it using waterslide labels (like decals you use on model airplanes). You can laser print them, cut them out, and using a little warm water - pop them on just about any smooth surface. As a plus they are pretty cheap at only $8 for a pack.

I'll report back here once those are complete, but after that I only have the last weathering pass to do and a clearcoat to protect everything.... starting to see light at the end of this tunnel, which got me thinking.... What's next? The obsession of the moment is Helldivers 2 and they have some really cool models.....

Until then - Back to building!!
 
Final Update - The long road is done, now my feet are tired.

I have finished final assembly and painting... and I think it came out great (for my skill level). Let me hit some of the final highlights:

First, it turns out that once I removed the rubber eye cup of the monocular it was almost the perfect size. So I decided to just mount the entire thing in the rifle instead of disassembling and making custom mounts for the lenses.
Front_Plate.jpg

So I friction fit the entire assembly together and it slides nicely into the upper barrel.
Here is a bit more detail on the front completed three part lens assembly:

Front_Zoom.jpg

Next, I printed and did the base color paint for the final wire loom assembly.
Wire_Loom.jpg

This consists of the side plate and a small plastic holder part as you can see from the reference image:
Orig_Assy.jpg

The rear of the wire assembly I built directly into the upper barrel since, in the original model, if I made the rear connection point 7-8 mm thick the rear of the actual barrel would be too thin.
Mid_Body_Assy.jpg

I also super glued the wires I harvested from my old power supply onto a thin 2mm backing plate that was formed into the correct shape.
Wire_Loom_Finished.jpg

Finally I printed some internal structure and a cover plate for the battery which I mounted a cheap self contained LED lightbar into. I will probably wire in one of the buttons on the side of the gun to turn the battery light on/off, but for now it is super easy to detach the battery and switch it on for pictures!

After the complete assembly I did 3 or 4 weathering passes to tie everything together and here are some final pictures side-by-side with the reference images:
Final_Front_SBS.jpg

Final_Side.jpg

Final_Side_Ref.jpg

Top_Final.jpg

Top_Ref.jpg

So there you have it.... couple months worth of work and I get to put this fine piece of kit on my shelf! Oh and if you were wondering... yes, I made that top piece just forward of the rear cover removeable so I can replace it with one that has a scope or holographic sight mounted to it. It actually has hooks that tie it into the top barrel assembly.

Oh, one last picture! I did make the thing able to be disassembled so I could upgrade it in the future... maybe electronics? Here is a picture of it broken down:

No_Disassemble_J5.jpg

Thanks for coming on this journey with me. I have been considering what I could do next.... and I think I'm zeroing in on something from the Helldivers 2 game. I just need to pick one of the many fine models in that really, really fun game.

FOR SUPER EARTH!
 

Attachments

  • Final_F.jpg
    Final_F.jpg
    120.1 KB · Views: 15
  • Final_F.jpg
    Final_F.jpg
    120.1 KB · Views: 9
  • Mid_Body_Assy.jpg
    Mid_Body_Assy.jpg
    73.4 KB · Views: 10

Your message may be considered spam for the following reasons:

If you wish to reply despite these issues, check the box below before replying.
Be aware that malicious compliance may result in more severe penalties.
Back
Top